We may not have the course you’re looking for. If you enquire or give us a call on 01344203999 and speak to our training experts, we may still be able to help with your training requirements.
We ensure quality, budget-alignment, and timely delivery by our expert instructors.

Ever wished that technical writing could be a simpler affair? Wondering if there's a quicker and creative way to develop structured content? It's time to embrace the Adobe FrameMaker. This powerhouse tool is a game-changer for content developers and documentation teams, turning the process of technical writing from daunting to delightful. This blog assembles the essential Adobe FrameMaker Basics to get you started on a superior documentation experience. So read on, unlock FrameMaker's potential and make it your next big skill!
Table of Contents
1) Why Choose FrameMaker for Technical Documentation?
2) Understanding the Adobe FrameMaker Interface
3) Core Adobe FrameMaker Basics to get Started
a) Creating a New Document
b) Creating Master Pages
c) Formatting and Styles
d) Adding Graphics and Illustrations
e) Working With Tables and Lists
f) Saving Your Work
4) Conclusion
Why Choose FrameMaker for Technical Documentation?
There are numerous tools that you can use if you are doing any technical documentation. However, Adobe FrameMaker stands out as one of the best tools to use for your technical documentation. Here's why:
1) Creating Structured Content: FrameMaker allows the creation of structured documents using XML or Darwin Information Typing Architecture (DITA). It ensures consistency in document design and content, making it ideal for complex technical documents with a consistent format.
2) Scalability: FrameMaker excels at handling large, complex documents. Its powerful architecture ensures that even voluminous documents are managed seamlessly without sacrificing performance.
3) Multi-channel Publishing: With FrameMaker, you can publish across various platforms and devices with ease. Be it PDF, web, mobile, or print, the tool ensures consistent quality throughout.
4) Template-driven Design: This feature ensures uniformity across all documents. With its advanced templating system, authors can ensure that every piece of documentation adheres to brand and style guidelines.
5) Intuitive User Interface: FrameMaker's UI is designed with technical writers in mind, making complex tasks straightforward and reducing the learning curve.
6) Robust Integration Capabilities: Whether it's integrating with a Content Management System (CMS) or other tools, FrameMaker's compatibility ensures a smooth workflow.
7) Globalisation and Localisation: FrameMaker simplifies the translation process, making it an excellent choice for companies with a global presence aiming for multilingual documentation.
Understanding the Adobe FrameMaker Interface
If you want to understand What is Adobe FrameMaker Interface and its basics, the following steps will help you:
1) Workspace Customisation: FrameMaker's interface is adaptable, which allows you to arrange toolbars and panels to suit their workflow preferences.
2) Pods: These are specialised panels that provide easy access to common tasks like paragraph and character design.
3) Status Bar: Located at the bottom, it displays information about the active document, including page and cursor position.
4) Command Bars: These are collections of icons and commands, simplifying tasks like formatting and editing.
5) Book Window: A central space for managing and organising files in a book, aiding in efficient multi-file operations.
6) Structured View: For those working with XML/DITA, this view offers a hierarchical representation of content elements.
7) Master Pages: It allows you to define and manage recurring layouts and designs for consistent document presentation.
8) Reference Pages: These are used to store and manage reusable content snippets and graphics.
9) Quick Access Toolbar: Positioned at the top, this provides shortcuts to frequently used commands, streamlining processes.
Unlock your creativity with our Adobe Courses! Start transforming your skills today and create stunning designs!
Core Adobe FrameMaker Basics to get Started
Here, you will learn about the Adobe FrameMaker Basics to help you get started. So, let’s begin learning:
Creating a new Document
The creation of a new document is foundational in any software application. In Adobe FrameMaker, this process is intuitive yet offers depth, catering to both novices and professionals. Here's a comprehensive guide to creating a new document in FrameMaker:
1) If you want to create a new document, you have to launch Adobe FrameMaker.
2) Once the application is up and running, you’re greeted with a start screen that showcases a variety of options, including opening an existing document, reviewing recent files, or creating a new one.
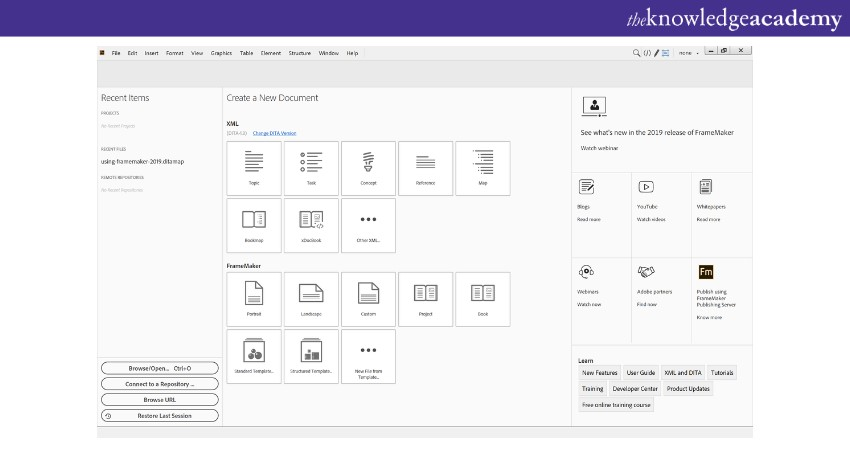
3) You can choose either portrait, landscape or custom layout.
4) After clicking on “Create”, a new document opens with the selected layout.
5) You can create headers, footers, and page numbers in Adobe FrameMaker. Here's how:
a) If you want to create a footer, click “View” from the menu bar and click “Master Pages”.
b) Then select the “Footer” element from the bottom of the page.
c) After mentioning the author’s name, click the “File” option and then “Save”.
d) For adding page numbers to your document, you can select “Special” from the menu bar and then select “Variables”.
e) From the “Variables” section, you can click on “Current Page #”. This “#” will automatically generate the correct page number.
f) Then click on “File” and choose the “Save” option.
Learn the basics of Adobe FrameMaker with our Adobe FrameMaker Training. Join now!
Creating Master Pages
Master pages are important, as they set the format for the rest of the pages in your document. If you are keen on making headers, footers and page numbers, then creating master pages will help in setting up these, including logos.
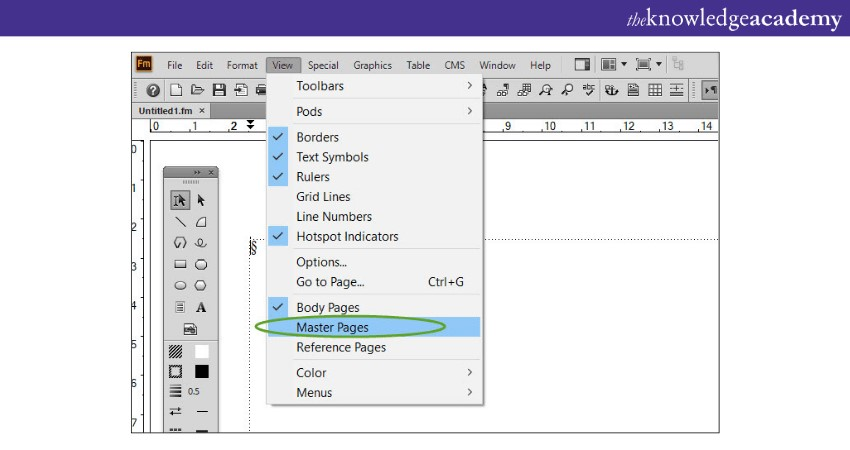
a) The first step you can take to create a master page is to select “View” and then click on “Master Pages”.
b) Then click on “Special”. This will take you to the next option - “Add Master Page”.
c) If you want to base this new master for your pages, click on “Copy From Master Page”.
d) Then select “Add”.
Formatting and Styles
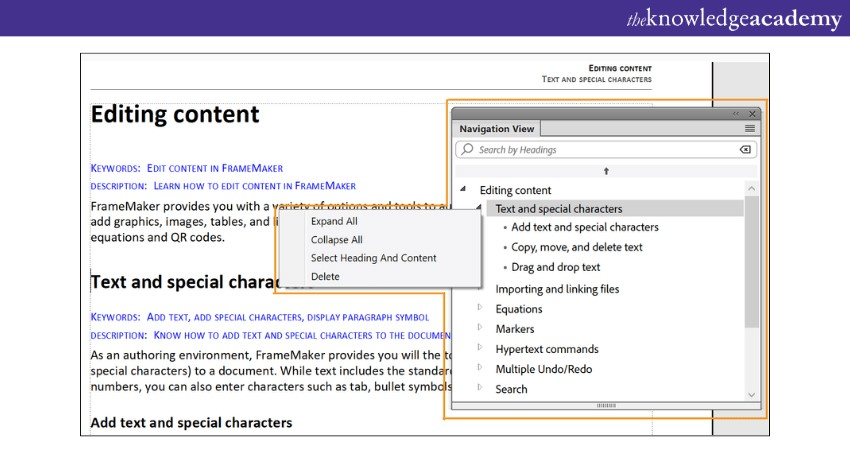
Like you perform formatting in Microsoft Word, you can also use “tags” or “styles” in Adobe InDesign as an alternative to quickly change the formatting of your document. These “tags’’ help you maintain the same style throughout your whole document. If you want to change only the characters and not the entire paragraph, then follow these steps:
a) Select the text to format.
b) Then click on “Format”, “Characters”, and finally on “Designer”.
c) After this, you can write or choose the desired style that you want to apply to your characters.
d) Then click on the arrow on “Commands”. Now, select “New Format”.
e) After that, click on “Create”.
f) After you have chosen the desired character tag, you can click on “Apply”. After that, click on “Update All” to apply to any existing character tag.
If you want to apply a paragraph tag, then follow these steps:
a) First, select the paragraph you want to format.
b) After that, click on “Format”, which is on the menu bar.
c) Further, click on “Paragraph” and then “Designer”.
d) In the “Paragraph Tag” option, select the desired tag from the drop-down menu.
f) After that, you can adjust the fields, such as “Basic”, “Default Font”, “Pagination”, “Numbering”, “Advanced”, “Asian”, and “Table Cell”, in the “Paragraph Tag”.
g) After you have made all the adjustments, click on “Apply”.
h) If you want to change the formatting of any paragraph to the existing paragraph tag, select “Update All”.
Create documents and designs with Adobe InDesign Course. Sign up now!
Adding Graphics and Illustrations
Another good part of Adobe FrameMaker is that you can insert tables, graphics or illustrations into your documents. You can use a table tag to apply tables consistently throughout your documents, or you can simply follow these following steps:
a) For Inserting a new Table:
1) From the menu bar, click on “Table” and then on “Insert Table”.
2) The “Insert Table” dialogue box appears. You will notice that under “Table Format” there are two default options – Format A and Format B.
3) You can adjust the “Columns”, “Body Rows”, “Heading Rows”, and “Footing Rows”.
4) Then click on “Insert”.
b) To Import any Graphic:
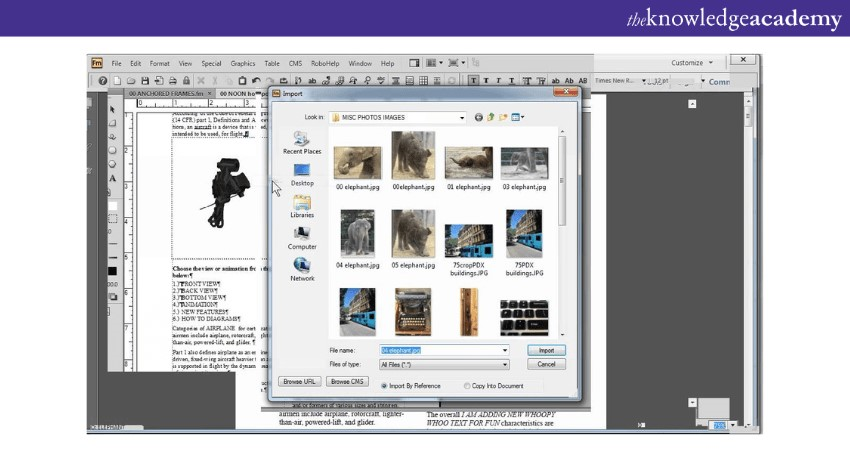
1) If you want to import any graphic on your FrameMaker document, first select the document where you will import the graphic.
2) After that, from the menu bar, select “File”, and then “Import”. You will see the “Import” dialogue box appearing on the screen.
3) Then click on any graphic that you wish to import to this document by selecting “Import by Reference” or “Copy into Document”, which appears at the bottom of the dialogue box.
4) After this, click on “Import”. Adobe FrameMaker can sometimes detect the type of graphic that you are importing. If it detects the graphic, the “Imported Graphic Scaling” dialogue box appears. If it doesn’t detect, then the “Unknown File Type” dialogue box appears.
5) To select the graphic from the list, click on “Convert”.
6) Then click on “Set” after adjusting from the dialogue box.
7) Finally, click on “Set” to complete the process.
Saving your Work
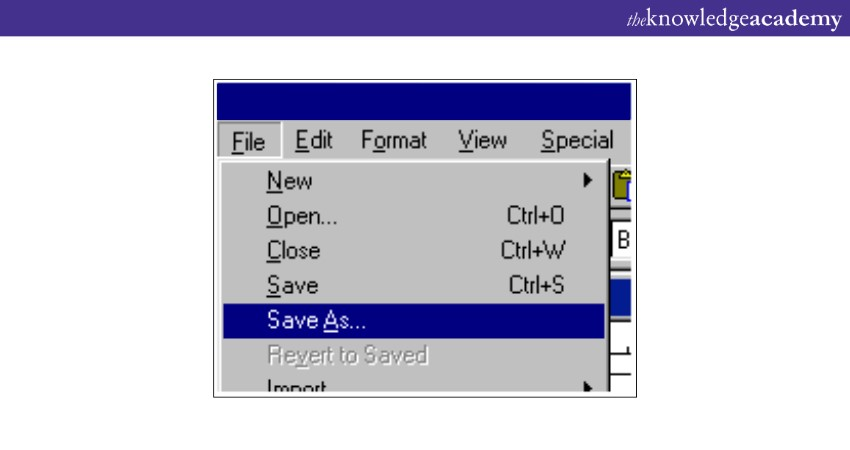
It is very important that you save your work after creating a new document or making any changes. To save your work, you can follow these steps. They are as follows:
a) On the menu bar, click on "File" option and then select “Save”.
b) Then, name your document by filling in the “File Name” field.
c) Then, select your desired location where you want to save the document.
Explore the differences in Adobe Framemaker vs. Adobe RoboHelp for your next project.
Conclusion
In conclusion, the Adobe FrameMaker is the ultimate ally in your journey towards mastering structured authoring. It empowers users with features such as an intuitive structure view, online review & translation, integration with Content Management Systems (CMS) and multi-device publishing options. Understanding the Adobe FrameMaker Basics, as outlined in this blog, will help you take the first essential steps to mastering this tool and the art of technical writing.
Learn how to create images like a pro with Adobe Premiere Pro Course. Join now!
Frequently Asked Questions
What are the System Requirements for Adobe FrameMaker?

System requirements for Adobe FrameMaker include:
a) Core i5 or faster processor
b) 64-bit version of Microsoft Windows 11 or 10
c) 4 GB RAM or higher
d) Minimum 5 GB of hard disk space for installation
e) Maximum supported screen resolution: 4K
f) JRE 8 is required for the publishing process
What is the Difference Between InDesign and FrameMaker?

Adobe InDesign is best suited for shorter, multi-page documents that need sophisticated design elements. FrameMaker easily handles long documents, providing features like cross-references, multi-file book management, and conditional text.
What are the Other Resources and Offers Provided by The Knowledge Academy?

The Knowledge Academy takes global learning to new heights, offering over 3,000 online courses across 490+ locations in 190+ countries. This expansive reach ensures accessibility and convenience for learners worldwide.
Alongside our diverse Online Course Catalogue, encompassing 19 major categories, we go the extra mile by providing a plethora of free educational Online Resources like News updates, Blogs, videos, webinars, and interview questions. Tailoring learning experiences further, professionals can maximise value with customisable Course Bundles of TKA.
What is The Knowledge Pass, and How Does it Work?

The Knowledge Academy’s Knowledge Pass, a prepaid voucher, adds another layer of flexibility, allowing course bookings over a 12-month period. Join us on a journey where education knows no bounds.
What are the Related Courses and Blogs Provided by The Knowledge Academy?

The Knowledge Academy offers various Adobe Courses, including the Adobe Illustrator Course and the Photoshop Course. These courses cater to different skill levels, providing comprehensive insights into What is Adobe Acrobat.
Our Office Applications Blogs cover a range of topics related to Adobe, offering valuable resources, best practices, and industry insights. Whether you are a beginner or looking to advance your Adobe skills, The Knowledge Academy's diverse courses and informative blogs have got you covered.
Upcoming Office Applications Resources Batches & Dates
Date
 Photoshop Course
Wed 16th Apr 2025
Wed 18th Jun 2025
Wed 13th Aug 2025
Wed 15th Oct 2025
Wed 10th Dec 2025


 Top Rated Course


 If you wish to make any changes to your course, please


