


 Top Rated Course

We may not have the course you’re looking for. If you enquire or give us a call on 01344203999 and speak to our training experts, we may still be able to help with your training requirements.
How to Back Up iPhone Without Losing Data (iCloud, MacOS, or Windows)
Scarlett Adams 25 March 2025The iPhone backup can only be useful when one has backed up an iPhone in case of data loss through an accident. This blog will explicate different procedures examining How to Back Up iPhone using iCloud, MacOS versions, and Windows. Find out how to back up your photos, messages, and other applications on your phone to avoid losing them.
Home
 Resources
Programming & DevOps
How to Back Up iPhone Without Losing Data (iCloud, MacOS, or Windows)
Resources
Programming & DevOps
How to Back Up iPhone Without Losing Data (iCloud, MacOS, or Windows)
Training Outcomes Within Your Budget!
We ensure quality, budget-alignment, and timely delivery by our expert instructors.
Do you know the feeling when you have lost your iPhone data because you never backed it up? Or maybe you plan to switch to a new device, and you are concerned about how you can move those valuable moments, necessary documents, and discussion? You're not alone! This is where knowledge of How to Back Up iPhone comes in handy, as there are many various methods of how to do that.
You’ll discover How to Back Up iPhone without the deletion of important files using iCloud, MacOS, and Windows in this blog. Everyone wants to backup important files, but no one likes the complicated methods that come with it; let us ease it for you!
Table of Contents
1) iCloud Backup
2) Backing Up to Your Mac
3) Backing Up to a Windows PC
4) iTunes Backup With a Windows Computer
5) Conclusion
iCloud Backup
Apple's iCloud is a cloud-based service that enables seamless synchronization of iPhone data with Apple servers. If you're wondering how to unlock iPhone passcode without computer, iCloud offers a convenient solution as it eliminates the need to connect your phone to a computer. Once iCloud is set up, your iPhone automatically backs up over Wi-Fi, ensuring your data, including screen recordings in iPhone, remains secure and accessible. which is especially useful before resetting your Apple Watch to prevent data loss.
Step 1: Connect to Wi-Fi
As it is with iCloud backups, you have to make sure that your iPhone is connected to a working Wi-Fi network. This is important as storing large data backed up can sometimes use up a lot of mobile data.
Why It's Important:
However, it was observed that if Wi-Fi is not available, then the backup will not begin. It provides a fast and stable wireless connection for your uploading data to Apple’s server.

Step 2: Open Settings
If you are using your iPhone, get to the home screen then click on the Settings icon. This is where you’ll find all your device’s configuration options including the Apple ID and iCloud.
Why It's Important:
The backup options are in the settings app. This is the control centre where you manage various functions of your iPhone.
Step 3: Tap Your Apple ID
At the top of Settings menu, you will find your name on the tab and your profile picture. Tap on it to open the page that shows your details of the Apple ID account. Your Apple ID is basically your identification number that connects your iPhone to your iCloud account in the Apple ecosystem.
Why It's Important:
And getting to your Apple ID is important because the backup process is dependent on your iCloud. iPhone backup to iCloud is only possible under one condition: you have to sign in with your Apple ID.
Transform ideas into excellent applications with our IOS App Development Course - Sign up today!
Step 4: Go to iCloud Settings
If you got inside the Apple ID menu, tap on the iCloud option. This section provides knowledge and understanding of Cloud available services including backup for your account.
Why It's Important:
This part lets you decide which data to save, including photo, contacts, messages, app, etc.
Step 5: Enable iCloud Backup
Go to the iCloud menu then go down to look for the iCloud Backup then switch it on. This ensures that your iOS Device such as iPhone will automatically back up to iCloud as soon as: or if: The iPhone is connected to a Wi-Fi connection; The iPhone is connected to an electrical power source; The iPhone’s display screen is turned off.
Why It's Important:
Performing this step is necessary to activate the backup feature. Once activated, your iPhone will automatically back up your data without you having to worry about it.
Step 6: Start Backup
Last of all, use the Back Up Now button if you wish the backup operation to start right now. That might take some time depending on the amount of data stored on your iPhone and the stability of the internet connection available. Ensure that your iPhone is connected to the Wi-Fi connection until the backup data process is through.
Why It's Important:
This process can be done manually and means to make sure that you have the latest backup for your iPhone data. Even after automatic backup is activated, it is wise to run a backup to make sure that the data being backed up is the latest.
Backing Up to Your Mac
Transferring our data from iPhone to Mac means that the data is backing up locally and not through the cloud storage. This method is perfect for users who need offline backups or for those who must back up huge amounts of Data. Depending on your MacOS version, we have slightly different steps:
Backing Up to MacOS Catalina 10.15 or Later
Apple has removed iTunes from MacOS Catalina (10.15) and setup Finder to manage iPhone backups. Here's how you can do it:
1) To do this, one needs a Lightning cable and a Mac computer ; just plug your iPhone into the Mac.
2) Open Finder
3) Choose your iPhone from the Sidebar
4) In the Finder windows, click the General Licence category.
5) When initially setting this up, select Back up all the data on your iPhone to this Mac.
6) Click "Back Up Now"
Enhance the art of app development with our Mobile App Development Course - Join today!
Backing Up to MacOS Mojave 10.14 or Earlier
If you currently have MacOS 10.14 or an older version on your Mac computer, you have to utilise iTunes for iPhone backup.
1) Plug your iPhone into your Mac with a Lightning cable
2) Open iTunes
3) Tap on your device radio button in the Device Menu
4) In the Summary tab you can click on “Back Up Now”
5) Restoration of the backup can also be encrypted by choosing “Encrypt iPhone Backup” followed by inputting the password.
Backing Up to a Windows PC
If one does not own a Windows-based PC, one can also back up an iPhone using iTunes since it supports the Windows Operating System (OS). Lose a few preventive measures to adopt that will help you store your data securely.
Step 1: Connect Your iPhone to a Windows PC
It is recommended that one can use a Lightning cable to connect an iPhone to a computer.
Step 2: Open iTunes and Select iPhone
Launch iTunes on your PC. Next, in the upper left corner of a program window, click the device icon to choose your iPhone.
Step 3: Click Summary
Choose the Summary in the left-hand sidebar if necessary to find out the backup possibilities.
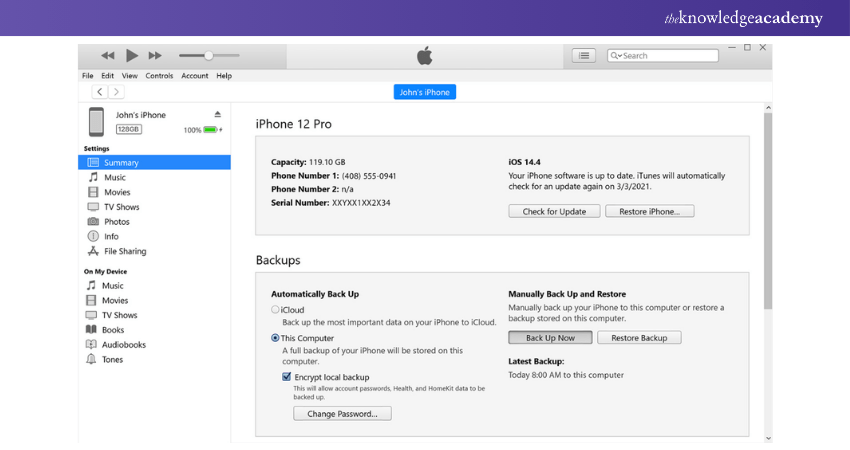
Step 4: Tap "Back Up Now" Under Backups
From these options, touch the Back Up Now button situated under the Backups section to begin with the backups.
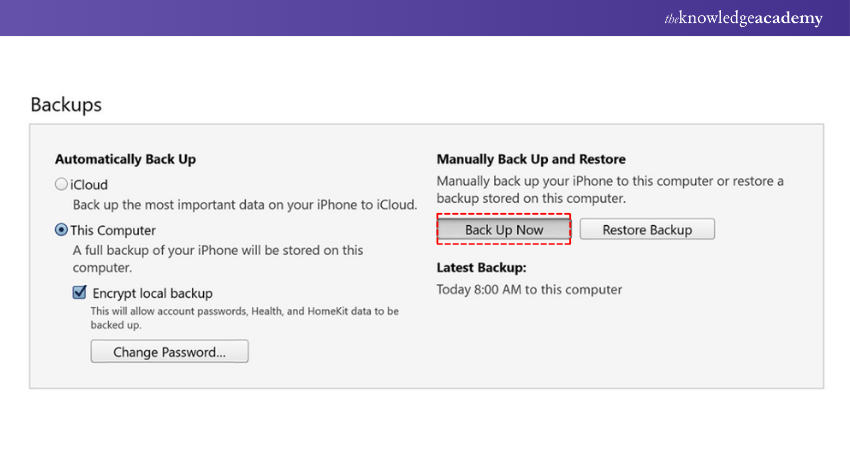
Step 5: Encrypt Backups by Setting a Password
To earn an extra layer of protection, choose Encrypt Local Backup. Choose a password for your backup so that you can only access it from your computer.
iTunes Backup With a Windows Computer
If one considers a more conventional backup method, then you can use iTunes for your Windows PC.
Step 1: Install the Latest iTunes Version
One should have iTunes downloaded and installed in your windows from the Apple’s official website since one in the particular version might not be compatible with your iPhone.
Step 2: Connect Your iPhone to the Computer
Physically it is connected between the iPhone and Windows PC using a Lightning cable.
Stronger the skills of database with our MongoDB Certification Course - Register now!
Step 3: Trust the Computer
On the iPhone, you get a pop-up to ‘Trust This Computer’, click on it to allow the PC to interact with the iPhone.
Step 4: Select Your iPhone in iTunes
Turn on iTunes, by that you mean click on the icon in the upper left corner of your iTunes screen which will display your chosen iPhone.
Step 5: Start the Backup Process
In the Summary section of your iPhone, choose “Back Up Now” to begin archiving your iPhone information on the computer.
Step 6: Wait Until Backup Completes
Do not disconnect your iPhone from the computer during this process in order to avoid interruption or loss of information.
Learn how to turn off emergency alerts on iPhone with our step-by-step guide. Stay in control of your notifications and reduce unwanted disruptions.
Conclusion
The other benefit that comes with the iPhone is the ability to always back it up so that, in case of anything, you don’t lose important information. Irrespective of the method you consider – iCloud, Mac, or Windows, each of them has its own advantages. Similarly, by knowing How to Hide Apps on iPhone, you can keep your apps organized and maintain privacy without cluttering your screen. Following the above blog on How to Back Up iPhone, your information is saved and can be easily retrieved each time the need arises. Additionally, if you're experiencing issues or want to optimize your device, consider checking out Turning Off iPhone features that might help improve performance.
Unlock the potential of IOS with our IOS App Development Course - Join today!
Frequently Asked Questions
What is the Best Way to Back Up Your Phone?
The method to back up the iPhone depends on your requirements. iCloud extracts wireless backup for the device, whereas the Mac/PC backup offers a backup of the device. Security requires the backups to be encrypted on the computer. Ah, yes – the simultaneous use of both keeps your data secure when you need it.
How Do I Separate Two iPhones With the Same Apple ID?
To unlock the two separate iPhones with the same Apple ID, make a new Apple ID on one iPhone. In the second iPhone settings, tap on the Apple ID and sign out, then proceed to sign in with the new Apple ID. This is necessary in order to prevent precise synchronisation with the second device on various activities.
What are the Other Resources and Offers Provided by The Knowledge Academy?
The Knowledge Academy takes global learning to new heights, offering over 3,000 online courses across 490+ locations in 190+ countries. This expansive reach ensures accessibility and convenience for learners worldwide.
Alongside our diverse Online Course Catalogue, encompassing 19 major categories, we go the extra mile by providing a plethora of free educational Online Resources like News updates, Blogs, videos, webinars, and interview questions. Tailoring learning experiences further, professionals can maximise value with customisable Course Bundles of TKA.
What is The Knowledge Pass, and How Does it Work?
The Knowledge Academy’s Knowledge Pass, a prepaid voucher, adds another layer of flexibility, allowing course bookings over a 12-month period. Join us on a journey where education knows no bounds.
What are the Related Courses and Blogs Provided by The Knowledge Academy?
The Knowledge Academy offers various App & Web Development Training, including the HTML and CSS Course, UI UX Design Course and the Mobile App Development Course. These courses cater to different skill levels, providing comprehensive insights into Clear Cache on iPhone.
Our Programming & DevOps Blogs cover a range of topics related to Development, offering valuable resources, best practices, and industry insights. Whether you are a beginner or looking to advance your App Development Skills, The Knowledge Academy's diverse courses and informative blogs have got you covered.
Upcoming Programming & DevOps Resources Batches & Dates
Date
 iOS App Development Course
iOS App Development Course
Thu 29th May 2025
iOS App Development Course
Thu 24th Jul 2025
iOS App Development Course
Thu 25th Sep 2025
iOS App Development Course
Thu 27th Nov 2025
 If you wish to make any changes to your course, please


