


 Top Rated Course

We may not have the course you’re looking for. If you enquire or give us a call on 01344203999 and speak to our training experts, we may still be able to help with your training requirements.
How to Edit Youtube Videos: An Ultimate Guide
Eliza Taylor 15 February 2025Learn the art of How to Edit YouTube Videos in this comprehensive blog. Explore pre-editing preparation steps to set the stage for your editing journey. Discover editing techniques on both desktop and mobile devices, empowering you to create captivating content. Uncover advanced editing tricks to take your videos to the next level. Read more to learn!
Training Outcomes Within Your Budget!
We ensure quality, budget-alignment, and timely delivery by our expert instructors.
Table of Contents
YouTube videos is a critical skill for creating polished, professional content that resonates with your audience. Whether you're a beginner or an experienced creator, knowing How to Edit YouTube Videos can immensely improve your videos' quality and viewer engagement.
This blog will walk you through the essential editing techniques, from basic trimming and transitions to advanced features like colour grading and audio enhancement. We’ll explore the most effective video editing software options tailored to different skill levels, offering you the tools to refine your content.
Table of Contents
1) Pre-editing Preparation
2) Editing YouTube Videos on Desktop
3) Editing YouTube Videos on Mobile Devices
4) How do Most YouTubers Edit Their Videos?
5) Which app Should I use to Edit my YouTube Videos?
6) Conclusion
Pre-editing Preparation
Before getting started with learning How to Edit YouTube Videos, it’s crucial to know some of the essential steps. These steps will provide a smooth and more efficient Editing experience to create high-quality videos. The following are some pre-editing preparation methods that will help you enhance your Editing journey:
Organising Your Footage
Organising videos and files before starting to work on Video Editing can make the process easy. You can create a folder for your video project and further divide it into subfolders if necessary. Each subfolder can represent different scenes, sequences, or content categories. This organisational structure minimises the time spent searching for specific clips, allowing you to focus on the creative aspects of editing.

Selecting a Video Editing Software
Choosing a Video Editing Software is crucial to creating high-quality and engaging videos. Before selecting an Editing tool, you must consider your Video Editing skills, the project you are working on and the desired outcome.
For beginners and those looking for a user-friendly experience, software like iMovie or Filmora provides excellent interfaces with simplified editing tools. These platforms are ideal for entry-level Video Creators, allowing them to get comfortable with the Editing process.
Unlock your creative potential and elevate your Video Editing skills; register for our Video Editing Training!
Editing YouTube Videos on Desktop
Editing YouTube Videos is a creative process which includes various elements like adding text, trimming clips, adding filters and more. Mastering the art of Editing Videos for YouTube might take some time for beginners. However, the following steps will take you through the whole process and help you Edit Videos efficiently, ensuring that your content is polished and engaging before you decide to Delete YouTube Channel or make any changes to your video library.
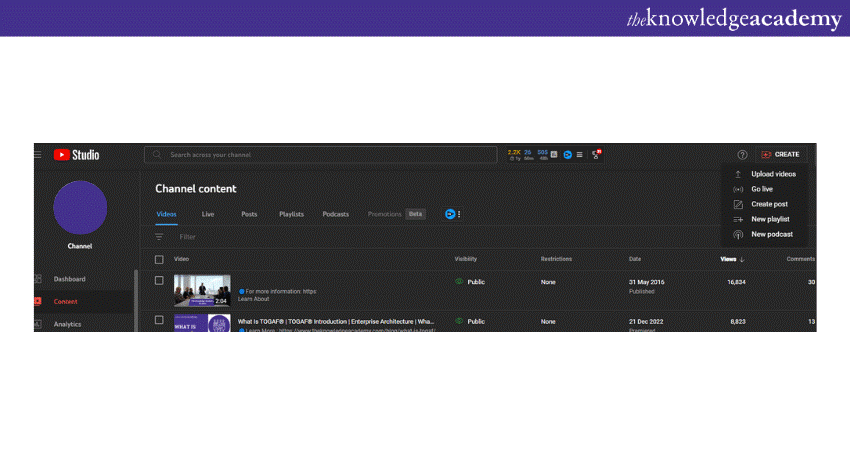
Sign into YouTube Studio
To get started with Editing Videos on YouTube, first, you need to sign in to YouTube Studios. You can easily sign in using your Google account. Here’s how:
Select Videos to Upload
Once you are logged in to the YouTube Studio, click on the ‘Content’ tab from the sidebar on the left of your screen. In the Content tab, click on the ‘Select Files’ tab in the centre of your screen. YouTube supports multiple formats like 3GPP, AVI, MOV, MPEG4, MP4 etc. However, YouTube's suggested formats are MP4 and MPEG4.
Add Video Details and Elements
After uploading selected videos, you need to fill in the details in four steps:
a) Details
b) Video Elements
c) Checks
d) Visibility
In these sections, you will be asked to fill in the following information:
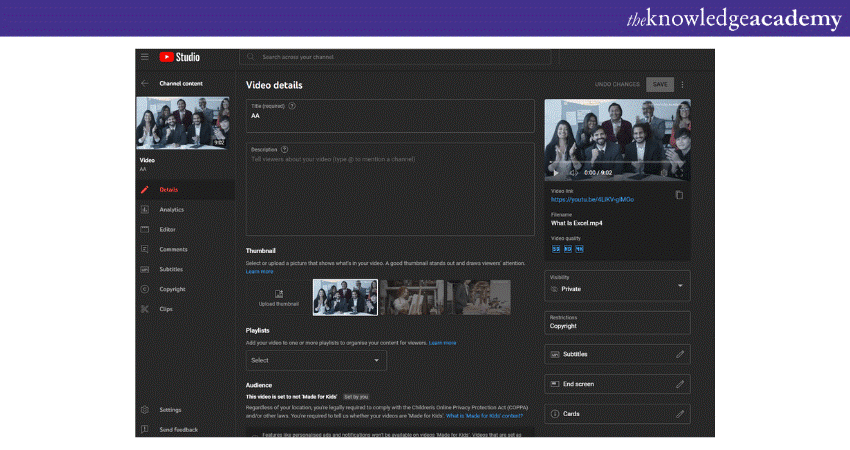
a) Video title and description
b) Video thumbnail and the playlist you want to add the video to
c) The language and subtitles (if required)
d) Audience type
In the Visibility section, you can select the visibility of the video. There are three Visibility options: Public, Private and Unlisted. After selecting the Visibility, click on the ‘Save’ button to complete the uploading process.
Transform your creativity into stunning visuals—Join our Logo Design Course today!
Select the Video to Begin Editing
Once your video is uploaded, go back to the ‘Content’ tab and click on the video thumbnail you want to edit. After selecting the video thumbnail, make sure the YouTube Thumbnail Size is optimal, and then click on the ‘Editor’ tab on the sidebar on the left side of the screen.
Trimming Your Videos
In the Editor tab, to trim your videos, click on the ‘Trim’ button, and you will be able to see a timeline panel. Drag the bar at both ends of the timeline to remove the part you do not want to get published. Click on ‘Preview’ to view the changes made in the videos after trimming. Click on the ‘Save’ button situated on the top right corner of the desktop screen to save the changes.
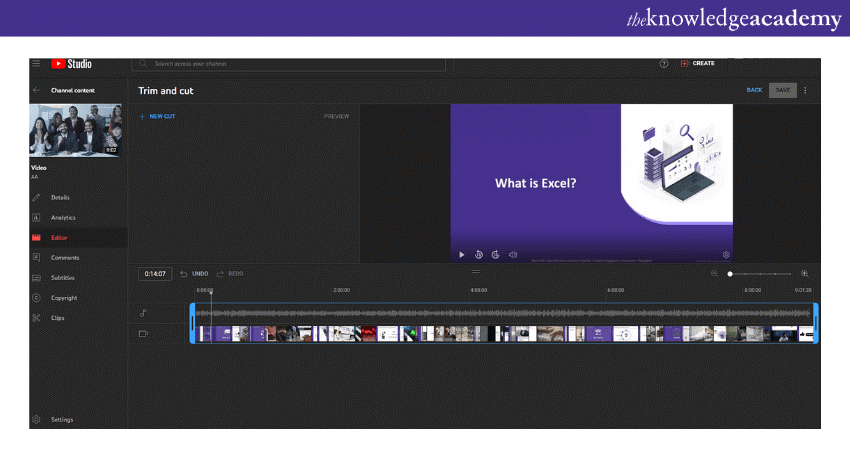
You can also trim the middle section of your videos by dragging the blue bar from the cornet to the part you want to trim. Once you have placed the bar on the part you want to edit, click on trim and click on the ‘Split’ option.
After clicking the ‘Split’ option, drag the blue bar to the point you want to remove from your video and click ‘Save’ to save the changes.
Adjusting Audio Levels and Adding Music
To add music and other sound effects to your video, click on the ‘Audio’ tab. On clicking the Audio tab, you will see a dialogue box with ‘Free music’ and ‘Starred’ options. Click on the ‘Add’ option by hovering on the audio clip.
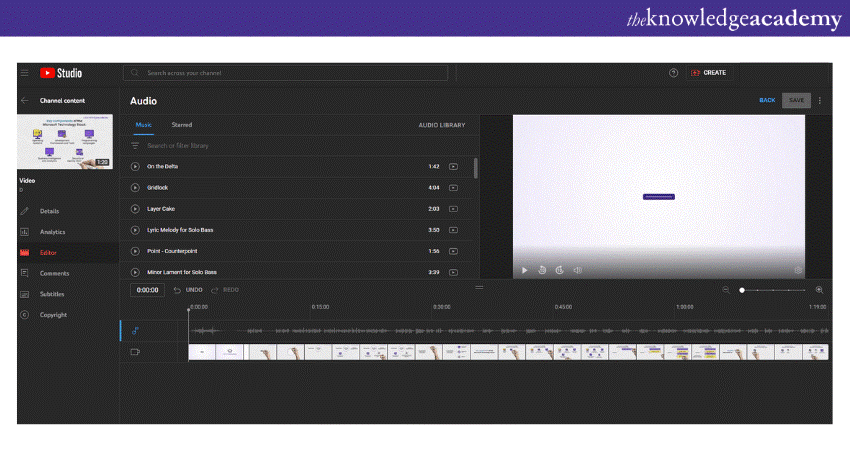
Once the clip is added, you can see the track timeline over the video timeline. Here, you can adjust and trim the music using the adjust bars on the timeline.
Blur Your Videos
You can blur your videos by clicking on the Blur option in the Editor tab. Upon clicking on the Blur section, you will see options like ‘Face blur’ or ‘Custom blur’. The ‘Face blur’ option automatically detects faces in the video and blurs them.
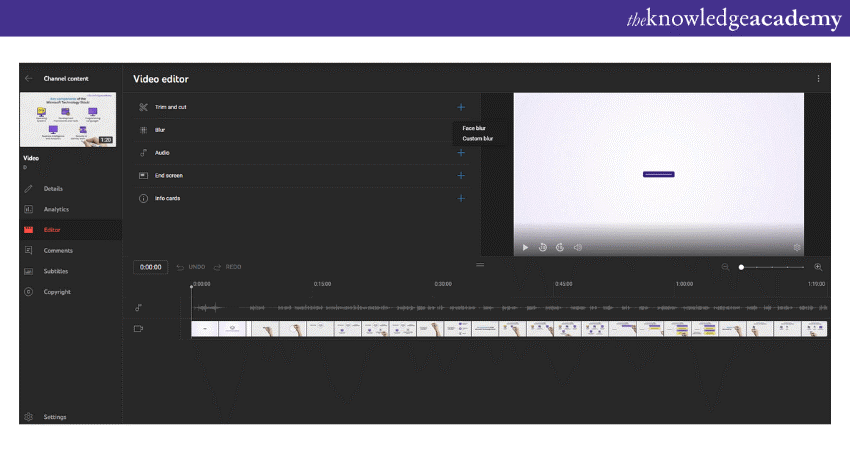
By clicking on the ‘Custom blur’ option, you can adjust the timing and size of the blur. The two options for custom blur are ‘Rectangle blur’ and ‘Oval blur’. After the changes are done, click on the ‘Save’ button to apply changes.
Adding end Screen
Adding an end screen to your videos will provide the option for viewers to watch other videos on your channel. You can also add a playlist of videos or subscribe to your channel on the end screen.
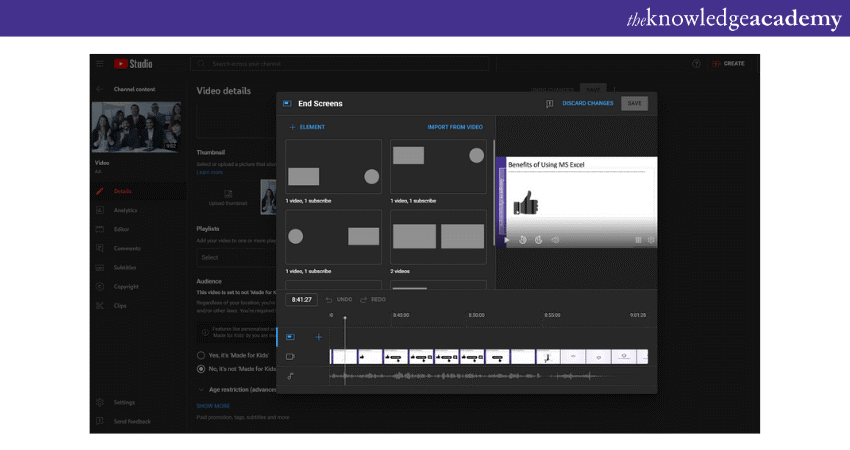
Click on the ‘End screen’ tab in the ‘Editor’ tool. Upon clicking, you will see options like Apply template, Video, Playlist, Subscribe, etc. Click on the element you want to add to your end screen.
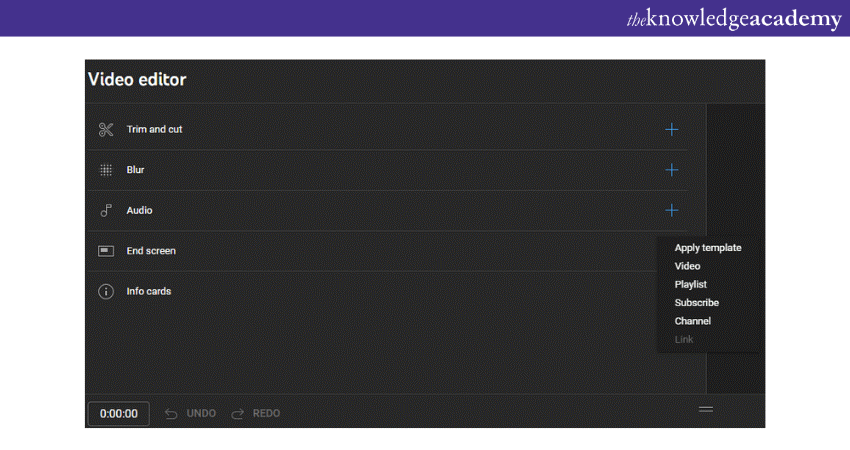
You can also apply the previous templates from previous videos by clicking on the ‘Apply Template’ option. Lastly, click on the ‘Save’ button to save the changes.
Editing YouTube Videos on Mobile Devices
While on desktop, YouTube includes options like trim, audio, end screen and others, on mobile devices, these options are not available. However, some of the options and how to use those features are as follows:
Select the Video
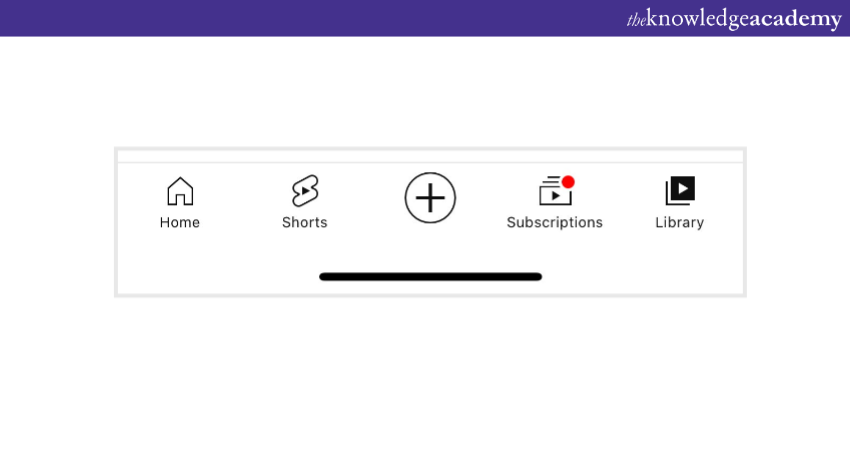
To edit YouTube videos from mobile, click on the ‘Library’ option situated on the bottom right of your mobile screen.
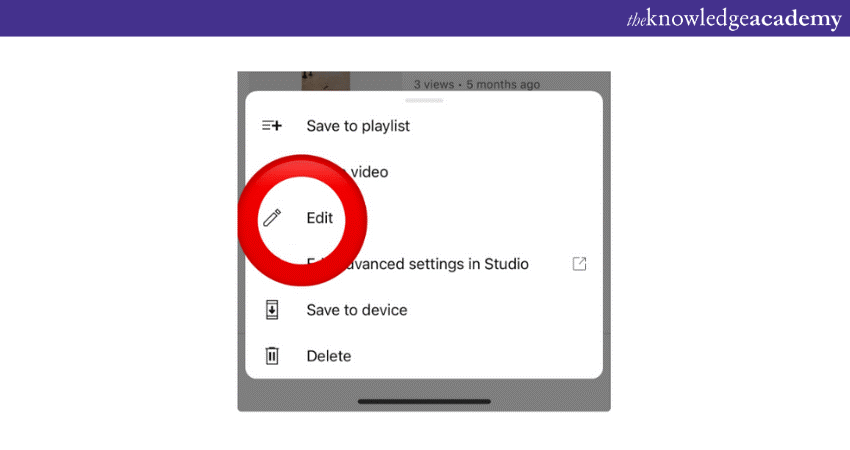
In the Library tab, click on the dots in front of the video you want to edit. Here’s how:
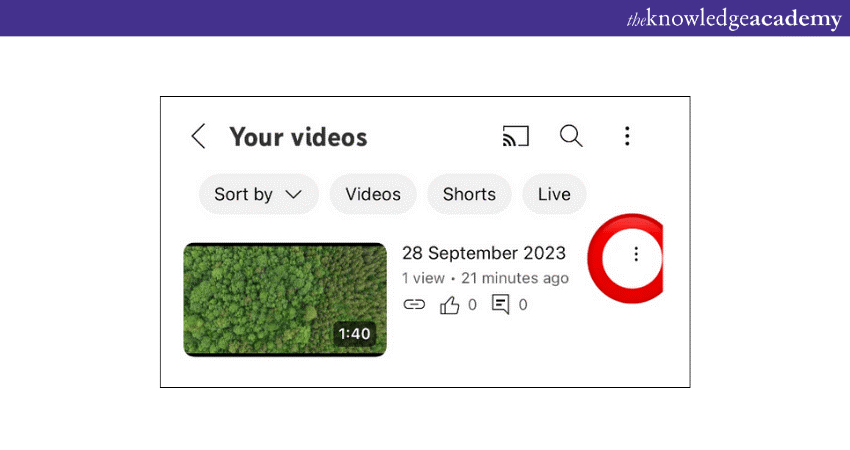
Select the ‘Edit’ option from the list to begin editing the selected video – as shown in the image:
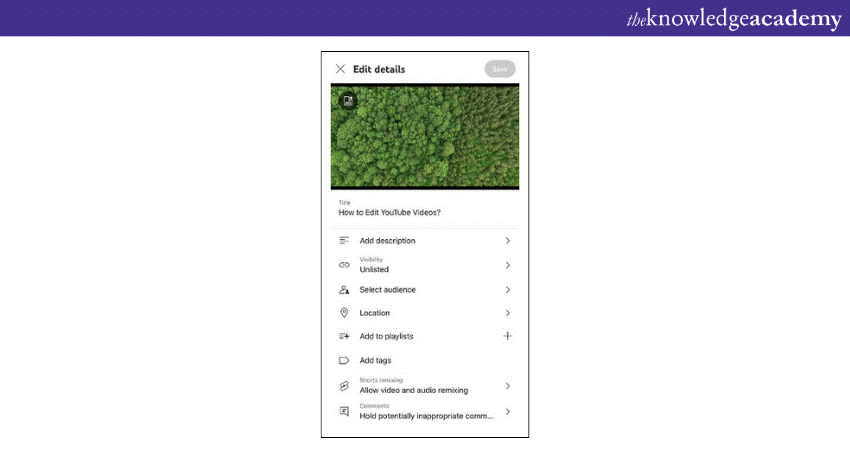
Edit Page on Mobile Devices
On the edit page, you will see various sections to add details such as Title, Description, Visibility, Location and more. Fill in the details by clicking on each section. In the ‘Tags’ option, you can tag relevant topics to your videos, which will help your videos to reach more viewers. Here's how you can do
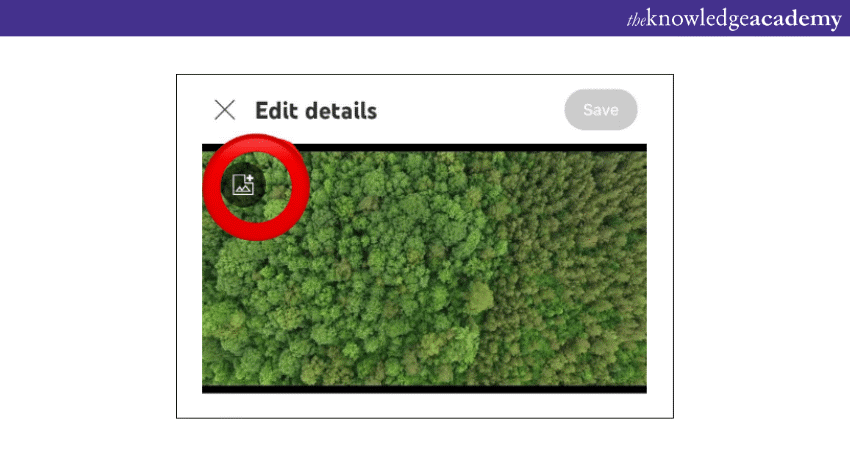
Adding Thumbnail
You can add a thumbnail to your video by clicking on the ‘Image-like’ icon on the top left corner of the video – as shown in the following image:
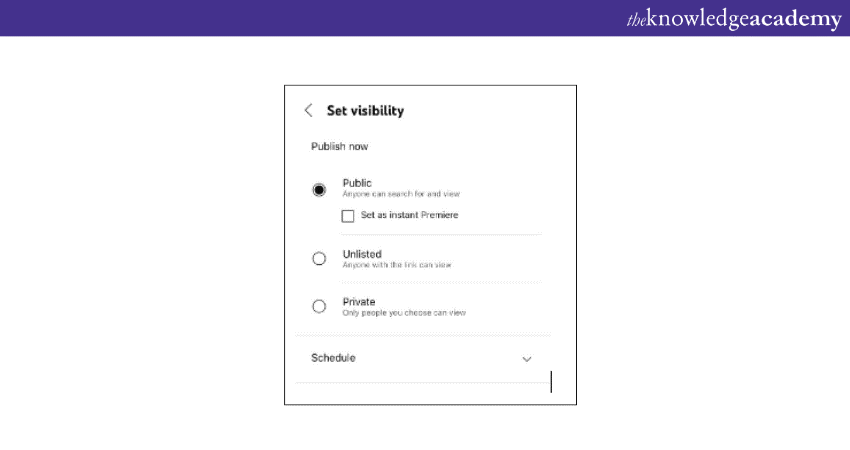
Set Visibility and Audience
Click on the ‘Visibility’ button and select one of the Visibility options. In the Visibility section, you will find three options: Public, Private, and Unlisted.
In the ‘Audience’ tab, you need to answer if the video is ‘Made for Kids’ or not. Select any one option based on your video.
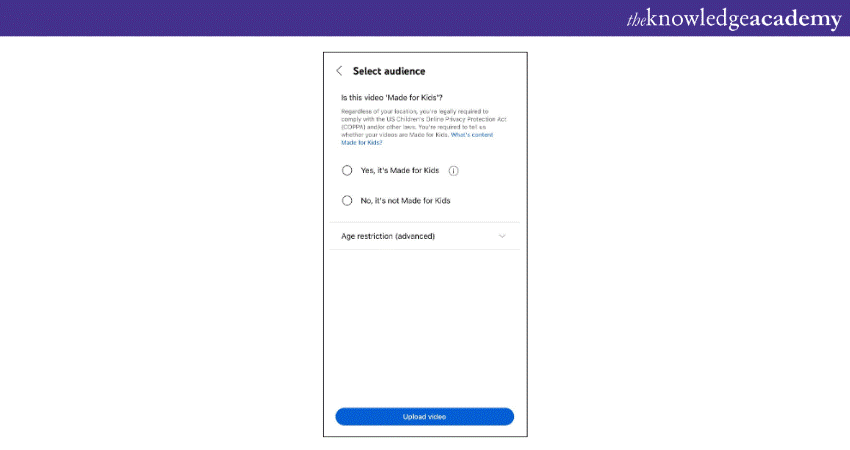
You can also add specific age restrictions in the advanced setting, as shown in the image. Once you are done filling in all the details, click on the ‘Upload Video’ button to successfully upload and publish the video.
The best way to Edit YouTube Videos on mobile devices is by using the in-build editor or using a compatible app to edit videos before uploading them onto your YouTube channel. Some of the most trusted YouTube Video Editing apps on mobile are CapCut, VSCO, InShot, and Kinemaster.
Unlock the power of design—join our CorelDRAW Training today and master the tools to create professional-grade graphics!
How do Most YouTubers Edit Their Videos?
Most YouTubers use software like Adobe Premiere Pro, Final Cut Pro, or more beginner-friendly options like iMovie and Shotcut. They focus on trimming, adding transitions, effects, sound enhancements, and colour correction to create polished, engaging content that keeps viewers interested. If you want to download YouTube videos for editing purposes, these tools can also help you get the footage you need to work with.
Which app Should I use to Edit my YouTube Videos?
The best app depends on your skill level. Beginners can start with iMovie, Shotcut, or DaVinci Resolve. Adobe Premiere Pro and Final Cut Pro has effective features for advanced editing. Choose based on your experience, budget, and the level of customisation you need for your content.
Conclusion
Mastering How to Edit YouTube Videos opens the door to endless creative possibilities. You can transform raw footage into captivating content with the proper techniques—like seamless cuts, stunning effects, and crisp sound design. By experimenting with different tools and honing your skills, you'll create videos that stand out and keep your audience coming back for more.
Unlock your creative potential with our Animation and Design Training – Sign up now and bring your imagination to life!
Frequently Asked Questions
Is it Free to Edit YouTube Videos?
You can edit YouTube videos for free using the YouTube Studio editor. Free software like Shotcut or DaVinci Resolve is available for more advanced editing, though premium tools like Adobe Premiere Pro may require a subscription.
How Long Does YouTube Editing Take?
The time to edit YouTube videos depends on the project's complexity. Simple edits can take a few hours, while more intricate edits with effects, transitions, and sound adjustments can take several days, especially for longer videos.
What are the Other Resources and Offers Provided by The Knowledge Academy?
The Knowledge Academy takes global learning to new heights, offering over 3,000 online courses across 490+ locations in 190+ countries. This expansive reach ensures accessibility and convenience for learners worldwide.
Alongside our diverse Online Course Catalogue, encompassing 19 major categories, we go the extra mile by providing a plethora of free educational Online Resources like News updates, Blogs, videos, webinars, and interview questions. Tailoring learning experiences further, professionals can maximise value with customisable Course Bundles of TKA.
What is The Knowledge Pass, and How Does it Work?
The Knowledge Academy’s Knowledge Pass, a prepaid voucher, adds another layer of flexibility, allowing course bookings over a 12-month period. Join us on a journey where education knows no bounds.
What are the Related Courses and Blogs Provided by The Knowledge Academy?
The Knowledge Academy offers various Animation and Design Training, including the Video Editing Course. These courses cater to different skill levels, providing comprehensive insights into How To Clear Cache and Cookies.
Our Office Applications Blogs cover a range of topics related to the Internet of Things, offering valuable resources, best practices, and industry insights. Whether you are a beginner or looking to advance your Video Editing skills, The Knowledge Academy's diverse courses and informative blogs have got you covered.
Upcoming Office Applications Resources Batches & Dates
Date
 Video Editing Course
Video Editing Course
Fri 4th Apr 2025
Video Editing Course
Fri 6th Jun 2025
Video Editing Course
Fri 8th Aug 2025
Video Editing Course
Fri 3rd Oct 2025
Video Editing Course
Fri 5th Dec 2025
 If you wish to make any changes to your course, please


