


 Top Rated Course

We may not have the course you’re looking for. If you enquire or give us a call on 01344203999 and speak to our training experts, we may still be able to help with your training requirements.
How To Install Apache On Windows? Explained
Eliza Taylor 27 December 2024From this blog, readers will learn How to Install Apache on Windows. This blog has covered everything from installing Apache on Windows, downloading the appropriate installer from the official Apache website, running the installer, selecting components and installation directory, configuring server settings, and completing the installation.

Training Outcomes Within Your Budget!
We ensure quality, budget-alignment, and timely delivery by our expert instructors.
Table of Contents

If you are a prospective Web Developer or System Administrator, you must learn How to Install Apache on Windows. Apache is a widely used Web Server software. It offers robust features and flexibility for hosting websites and web applications.
By following this blog, you can set up a local Web Server environment on your Windows system, facilitating Web Development, testing, and experimentation with web technologies. Get ready to learn How to Install Apache on Windows and learn this installation procedure smoothly, which will help you discover the Web Hosting domain.
Table of Contents
1) What is a Web Server?
2) Installing Apache on Windows
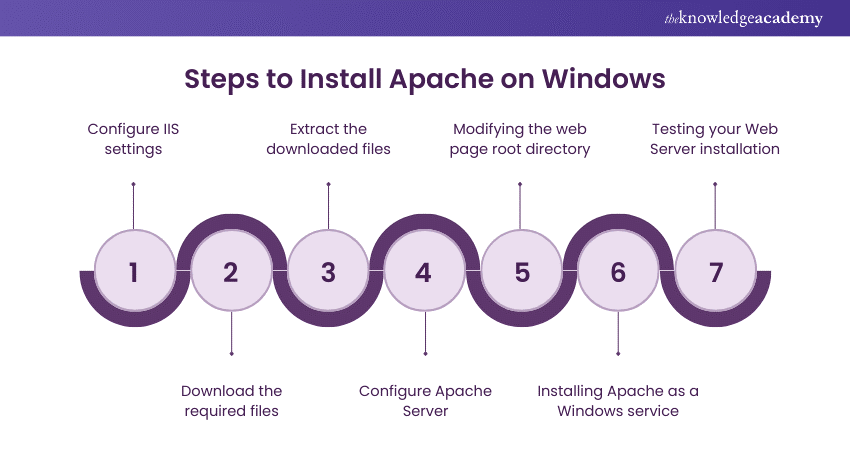
a) Step 1: Configure IIS settings
b) Step 2: Download the required files
c) Step 3: Extract the downloaded files
d) Step 4: Configure Apache Server
e) Step 5: Optional - modifying the web page root directory
f) Step 6: Installing Apache as a Windows service
g) Step 7: Testing your Web Server installation
3) Conclusion
What is a Web Server?
A Web Server is a software application that is the central pillar of the World Wide Web, responsible for delivering web content to several users' browsers upon request. It receives and processes Hypertext Transfer Protocol (HTTP) requests from clients, typically web browsers, and then provides the requested web pages, images, files, or other resources.
These Web Servers also play a vital role in hosting websites and web applications, ensuring their availability and accessibility to users worldwide. Popular web server software includes Apache HTTP Server, Nginx, and Microsoft Internet Information Services (IIS), all of which efficiently handle the communication between clients and web resources.

Installing Apache on Windows
Here are some of the steps which will help you to understand How to Install Apache on Windows:
Step 1: Configure IIS settings
Before installing Apache on Windows, it's essential to configure Internet Information Services (IIS) settings to avoid conflicts. You must open the 'Control Panel' and navigate to 'Programs and Features.' Click 'Turn Windows features on or off.' Ensure that IIS is disabled by unchecking 'Internet Information Services.' This step ensures that port 80, a common port for Web Servers, is available for Apache.
Additionally, you can use PowerShell to disable IIS:
Disable-WindowsOptionalFeature -Online -FeatureName IIS-WebServerRole
Disabling IIS ensures a smooth Apache installation without port conflicts, allowing you to run both web servers independently when needed.
Step 2: Download the required files
To install Apache on Windows, download the Apache installer package from the official Apache website. These steps will help you to download the required files:
a) Open your web browser and navigate to the Apache HTTP Server download page.
b) Choose the version of Apache that matches your Windows system architecture (32-bit or 64-bit). Then, you must click the appropriate link to download the installer.
c) Once the download is complete, you should locate the installer file (e.g., "httpd-2.4.48-win64-VS16.msi") in your Downloads folder or the directory where you had saved it.
d) Then, double-click the installer to run it. You may be prompted by User Account Control (UAC); click "Yes" to proceed.
e) The installer wizard will open, guiding you through the installation process. Follow the prompts to configure Apache for your system.
Step 3: Extract the downloaded files
After downloading the Apache installer in Step 2, you must extract the contents from the installer package. Follow these steps to remove the downloaded files:
a) Locate the downloaded Apache installer file, typically as an MSI file, such as "httpd-2.4.48-win64-VS16.msi."
b) Double-click the MSI installer file to run it. You may be prompted for administrative privileges; grant them to proceed.
c) The installer will open. Choose the destination folder where you want to install Apache or accept the default location (e.g., "C:Apache24").
d) During installation, the MSI installer will automatically extract the necessary files to the specified directory.
e) Once the installation is complete, you will have a fully extracted Apache installation in the chosen destination folder.
Here is an example of how the extraction process might look in a command prompt:
C:UsersYourUsernameDownloads>msiexec /a httpd-2.4.48-win64-VS16.msi /qb TARGETDIR=C:Apache24
The above command extracts the files from the MSI installer to the "C:Apache24" directory. Adjust the paths as needed based on your preferences.
Step 4: Configure Apache Server
After extracting Apache's files, you must configure the server according to your needs. The main configuration file is "httpd.conf," typically found in your Apache installation directory's "conf" folder. Open this file with a text editor and modify settings such as the server's port, document root, etc. For example, to change the server port to 8080, find the line:
Listen 80
And change it to:
Listen 8080
Save the file and then restart Apache by using the following command:
httpd -k restart
This step allows you to customise Apache's settings to match your requirements, ensuring your Web Server functions as intended.
Enhance your knowledge of different technology by signing up for our IT Support and Solution Training now!
Step 5: Optional - modifying the web page root directory
You can modify the default web page root directory used by Apache. Apache's web page root directory is defaulted to "htdocs" within the installation directory. You can edit the "DocumentRoot" directive in the "httpd.conf" configuration file if you prefer a different directory to store your web content. For instance, if you want to use "C:MyWebContent" as your web root directory, you will change:
DocumentRoot "C:/Apache24/htdocs"
To:
DocumentRoot "C:/MyWebContent"
This customisation allows you to organise and serve your web content from a location that suits your project or website structure.
Step 6: Installing Apache as a Windows service
Once Apache is configured, you can install it as a Windows service, making it easier to manage and run your Web Server. To do this, follow these steps:
a) Open a command prompt with administrator privileges. You can do this by searching for "Command Prompt" in the Start menu. Then right-click it and select "Run as administrator."
b) Navigate to the "bin" folder within your Apache installation directory. Use the ‘cd’ command to change the directory. For example:
cd C:Apache24bin
c) To install Apache as a service, run the following command:
httpd -k install
This command tells Apache to install itself as a service on your Windows system.
d) Once the installation is complete, you can start Apache as a service using:
httpd -k start
Your Apache Web Server is now running as a Windows service. You can use the Windows Services interface to conveniently start, stop, and configure Apache.
Step 7: Testing your Web Server installation
After configuring and installing Apache, verifying that your web server is working correctly is essential. To do this:
a) Open a web browser on your local machine.
b) In the browser's address bar, enter "https://localhost" or "https://127.0.0.1", and press Enter.
c) If Apache functions correctly, you should see the Apache default page or any web content you placed in the web root directory (e.g., "htdocs"). This indicates that your web server is operational.
Testing ensures that your Apache installation is successfully serving web pages. It's a crucial step before hosting websites or web applications on your Windows-based Apache server.
Do you want to learn data processing? Register now for our IT Fundamental Training now!
Conclusion
We hope you have learned How to Install Apache on Windows, which is a fundamental step in creating a local Web Server environment. Following the outlined steps, you can configure, customise, and test Apache, making it ready to host websites and web applications and simplifying web development and testing on their Windows system.
Learn how to deploy and manage your server -sign up for our Introduction to Networking Training now!
Frequently Asked Questions
What exactly is the Apache HTTP Server?

Apache HTTP Server is a free, open-source Web Server that delivers web content online. It is also known as Apache, and after its development, it became known as an HTTP client on the web.
What are the steps involved in Apache installation on Windows?
Here are some steps that are involved in Apache installation on Windows:
a) You should download the installation media in the form of a ZIP file
b) Then, you need to extract the contents of the Apache Web Server 2.4 zip to the file system
c) Then, locate the extracted Apache24
d) Copy this same folder to the root of C:
e) Then open the C:aPACHE24bin folder
f) Then run the http.exe command
g) Then, you can view the Apache HTTP Server landing page
What reasons might lead to the installation of Apache on Windows?
There are many reasons why you might choose to install Apache on a Windows system:
a) Web Development and testing: Apache provides a local Web Server environment for developers to create, test, and debug web applications and websites on their Windows machine before deploying them to a production server.
b) Learning and education: Installing Apache on Windows allows individuals to learn web server administration and gain hands-on experience configuring and managing a web server.
c) Software development: Developers may need Apache to serve as a backend server for applications or APIs they are developing, enabling them to test their software in a controlled environment.
d) Custom application hosting: Some users install Apache to host custom web applications or services that must be accessible on their local network.
e) Open source and cost-efficiency: Apache is open-source and free to use, making it an attractive option for organisations and individuals looking to minimise server infrastructure costs.
What are the other resources and offers provided by The Knowledge Academy?
The Knowledge Academy takes global learning to new heights, offering over 30,000 online courses across 490+ locations in 220 countries. This expansive reach ensures accessibility and convenience for learners worldwide.
Alongside our diverse Online Course Catalogue, encompassing 17 major categories, we go the extra mile by providing a plethora of free educational Online Resources like News updates, blogs, videos, webinars, and interview questions. To Tailor learning experiences further, professionals can maximise value with customisable Course Bundles of TKA.
What is Knowledge Pass, and how does it work?
The Knowledge Academy’s Knowledge Pass, a prepaid voucher, adds another layer of flexibility, allowing course bookings over a 12-month period. Join us on a journey where education knows no bounds.
What are related IT Support and Solution Courses and blogs provided by The Knowledge Academy?
The Knowledge Academy offers various IT Support and Solution Courses, including Cloudflare Training, IT Fundamentals Training, and Introduction to Networking Training. These courses cater to different skill levels, providing comprehensive insights into IT Support and Solution methodologies.
Our IT Support and Solution blogs cover a range of topics related to PRINCE2, offering valuable resources, best practices, and industry insights. Whether you are a beginner or looking to advance your IT Support and Solution skills, The Knowledge Academy's diverse courses and informative blogs have you covered.
Upcoming IT Infrastructure & Networking Resources Batches & Dates
Date
 Apache Spark Training
Apache Spark Training
Thu 23rd Jan 2025
Apache Spark Training
Thu 20th Mar 2025
Apache Spark Training
Thu 22nd May 2025
Apache Spark Training
Thu 17th Jul 2025
Apache Spark Training
Thu 18th Sep 2025
Apache Spark Training
Thu 20th Nov 2025
 If you wish to make any changes to your course, please


