


 Top Rated Course

We may not have the course you’re looking for. If you enquire or give us a call on 01344203999 and speak to our training experts, we may still be able to help with your training requirements.
How to Lock Cells in Excel: Secure Your Data
Sophia Ellis 12 February 2025Wondering how to lock cells in Excel? Locking cells help protect your data from unwanted changes and ensure a high level of accuracy in shared sheets. This blog will help you master How to Lock Cells in Excel to protect your data, control edits, and keep your worksheet secure. Start securing your Excel sheets today!
Training Outcomes Within Your Budget!
We ensure quality, budget-alignment, and timely delivery by our expert instructors.
Table of Contents
How to Lock Cells in Excel?Importance of Locking Cells in Excel How to Lock All Cells? How to Lock Formula Cells in Excel? How to Lock the Entire Worksheet in ExcelHow to Unlock Cells in ExcelHow to Unlock Specific Areas of a Protected Worksheet? How do I Lock Cells in Excel Using F4?What is the Difference Between Locked and Protected Cells in Excel?Conclusion

Have you ever spent hours perfecting an Excel spreadsheet, only to have it accidentally altered by a well-meaning colleague? If so, you understand the importance of protecting your data. Learning How to Lock Cells in Excel is a game-changer, providing peace of mind and ensuring your hard work remains intact.
Are you wondering if there's a way to allow specific edits without compromising the rest of your data? Excel's versatility doesn't stop at simply locking cells; it also lets you protect and unlock specific areas for user edits. Let's explore the methods on How to Lock Cells in Excel effectively, securing your data while keeping your worksheets flexible.
Table of Contents
1) How To Lock Cells in Excel?
2) Importance of Locking Cells in Excel
3) How to Lock All Cells?
4) How to Lock Formula Cells in Excel?
5) How to Lock the Entire Worksheet in Excel
6) How To Unlock Cells in Excel
7) How to Unlock Specific Areas of a Protected Worksheet?
8) How do I Lock Cells in Excel Using F4?
9) What is the Difference Between Locked and Protected Cells in Excel?
10) Conclusion
How to Lock Cells in Excel?
These steps will guide you in locking cells in Excel:
1) To lock a cell, range, column, or row, first select them using the mouse or the ‘Shift + Arrow’ keys.
2) To select an entire column:
a) Click the first cell in the column and click on the column header or press ‘Ctrl + Space’ or to select the whole column.
3) To select multiple columns:
a) Select one column and drag the selection left or right to include adjacent columns.
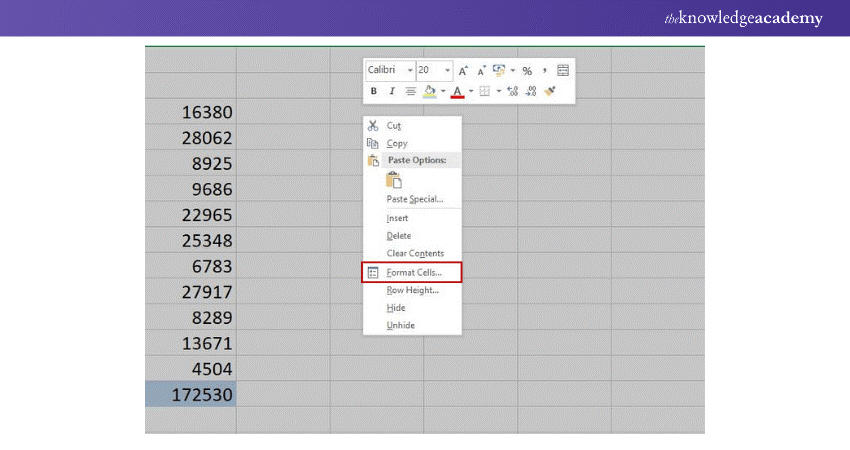
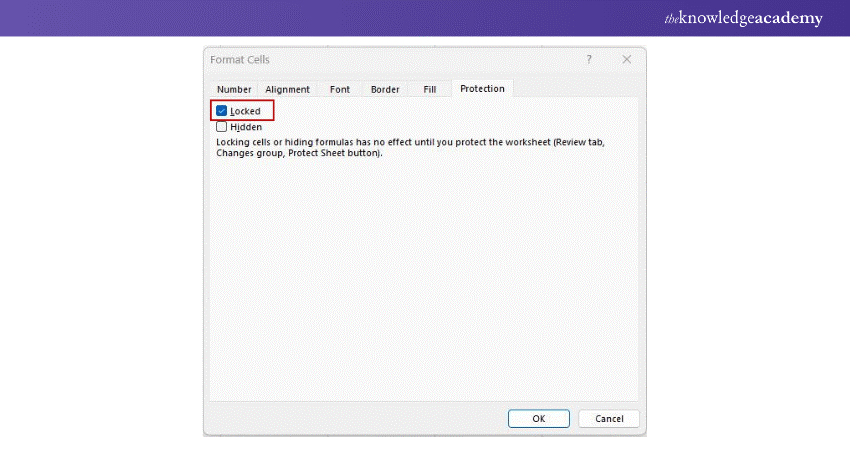
4) With the cells selected, right-click or press ‘Ctrl + 1’ to open the ‘Format Cells’ window.
a) Navigate to the ‘Protection’ tab and click on the ‘Locked’ box.
b) Click ‘OK’ to confirm.
5) Navigate to the ‘Review’ tab and select ‘Protect Sheet’ to secure the worksheet.
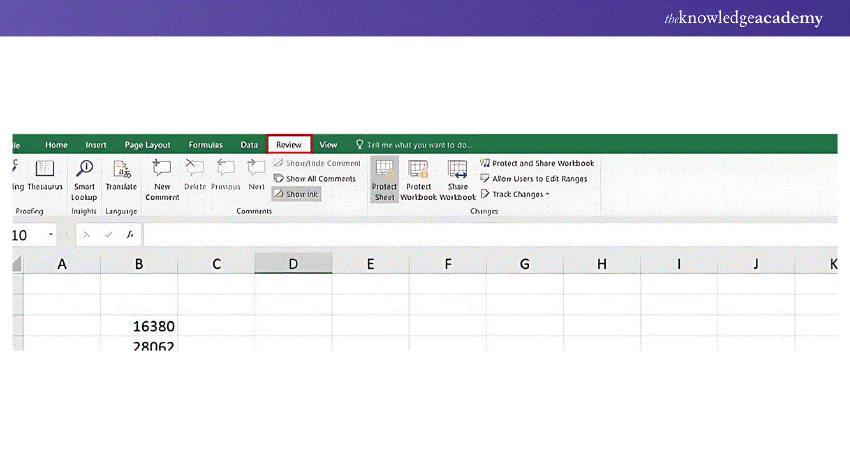
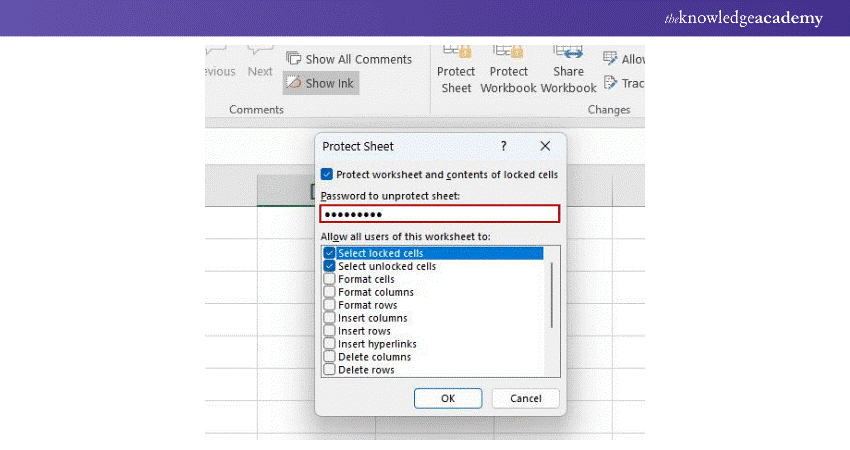
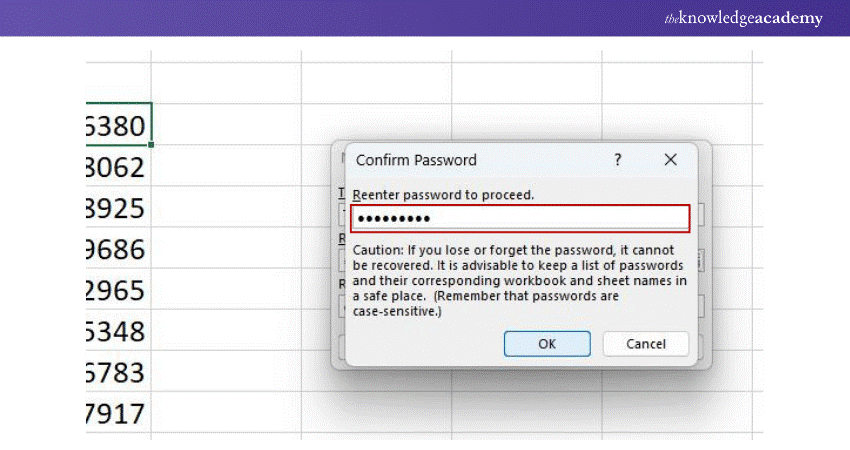
6) The ‘Protect Sheet’ window will appear, prompting you to enter a password.
a) Enter your password and click ‘OK’.
b) Reconfirm the password when prompted and click ‘OK’ again.
Importance of Locking Cells in Excel
Locking cells in Excel prevents accidental changes and ensures Data Security. To lock cells, you can either lock all cells, specific cells, or only those containing formulas. This is done by selecting the desired cells, using the Format Cells option to enable locking, and then protecting the worksheet.
By protecting the worksheet, you activate the lock, assuring that your data remains secure and unaltered by unintended edits. This process provides peace of mind, knowing that your critical information is safeguarded.

How to Lock All Cells?
In an Excel worksheet, every cell is locked by default, but this feature only becomes effective when the worksheet is protected. Here’s how to lock all cells:
1) Select the Entire Worksheet
a) Click on the 'Select All' button at the worksheet's upper-left corner of the worksheet) or press ‘Ctrl + A’.
2) Format Cells
a) Right-click and select Format Cells
b) Go to the Protection tab
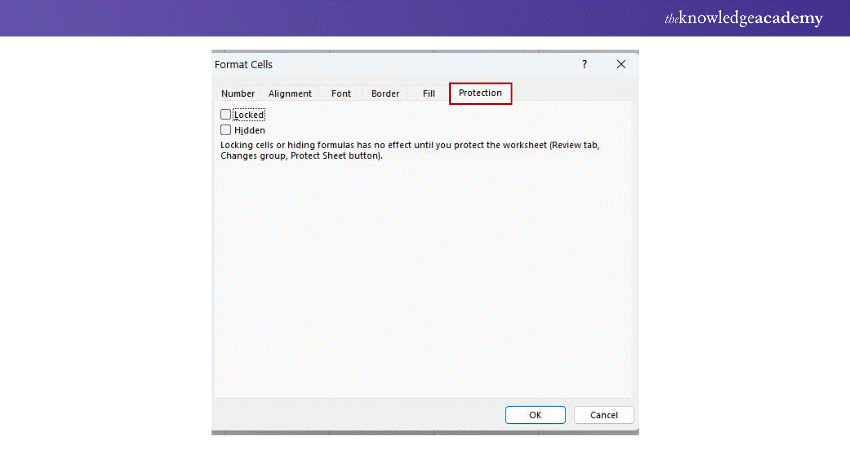
3) Lock Cells
a) Ensure that the "Locked" checkbox is checked
Excel beyond basics with our Advanced Microsoft Excel 2019 55270AC – register today and take your spreadsheet skills to the next level!
How to Lock Specific Cells in Excel?
If you only want to lock certain cells while leaving others editable, follow these steps:
a) Select Cells to Unlock
a) Highlight the cells you want to remain editable
b) Format Cells
a) Right-click and select Format Cells
b) Go to the Protection tab
c) Unlock Cells
a) Uncheck the "Locked" checkbox and click OK
How to Lock a Range of Cells Using a Password
a) Navigate to the ‘Review’ tab and select ‘Allow Edit Ranges’.
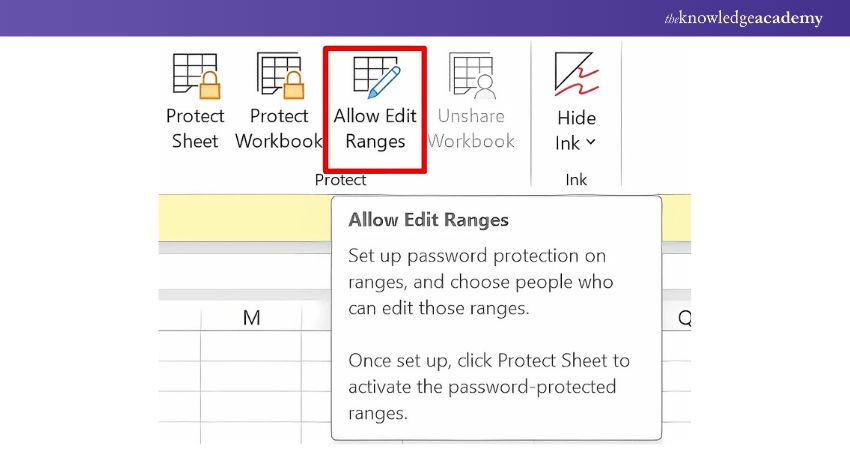
b) Ensure the sheet is unprotected before enabling this feature:
a) Select ‘Review → Unprotect Sheet’, then enter the password to remove protection.
c) In the ‘Allow Edit Ranges’ dialogue box, click ‘New’ to create a new range.
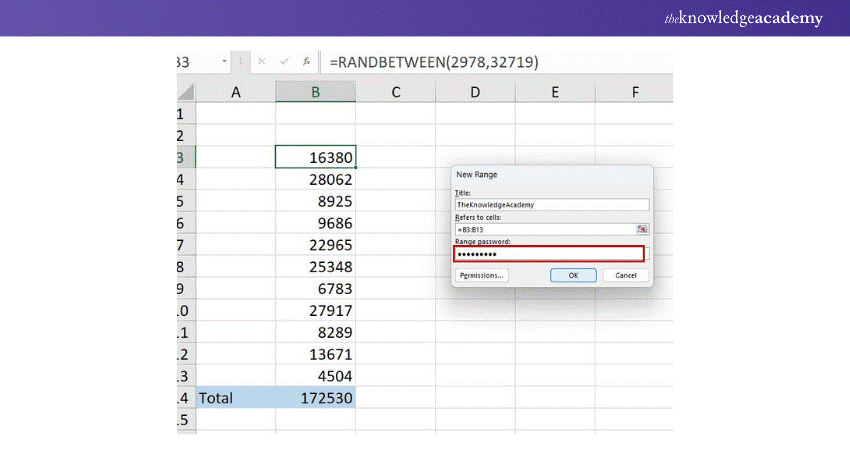
d) Fill in the required fields:
a) Title Box: Enter a name that corresponds to the information you want to lock.
b) Refers to Cells Field: Enter the cell or range reference. If columns were selected, their cell addresses would populate automatically; otherwise, manually select them.
c) Range Password Box: Type a password to secure the range. Leave it blank if you want the range to be editable without a password.
e) Click ‘OK’ to save the changes.
Advance your business insights – sign up for the Business Analytics With Excel Course and become an analytics expert!
How to Lock Formula Cells in Excel?
Protecting cells with formulas is particularly important to prevent users from accidentally altering calculations. Here’s how to lock only formula cells:
1) Select All Cells
a) Press ‘Ctrl + A’ to choose the entire worksheet
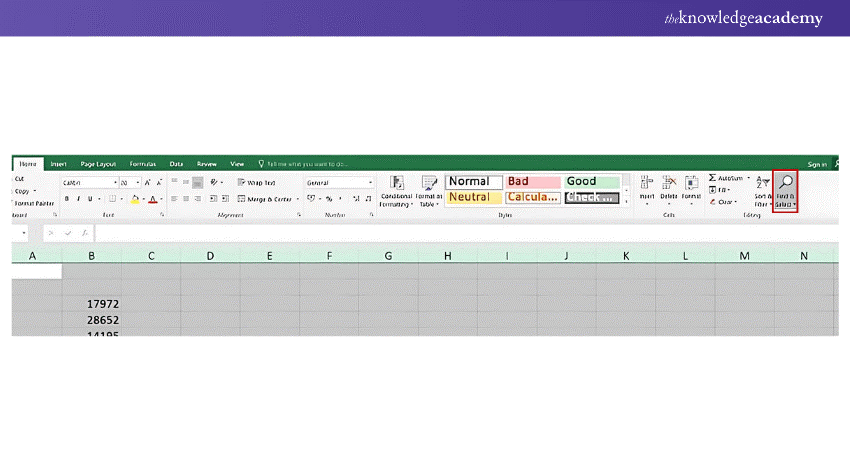
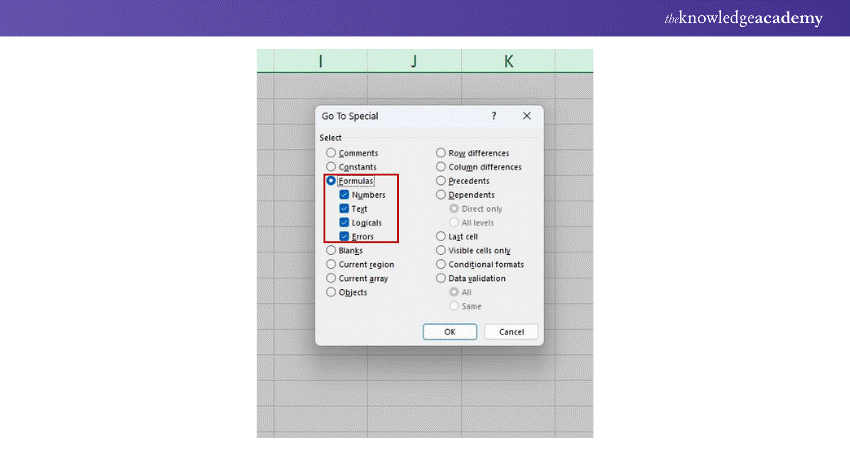
2) Find Formula Cells
a) Use the Find & Select feature under the Home tab
b) Choose ‘Go to Special’
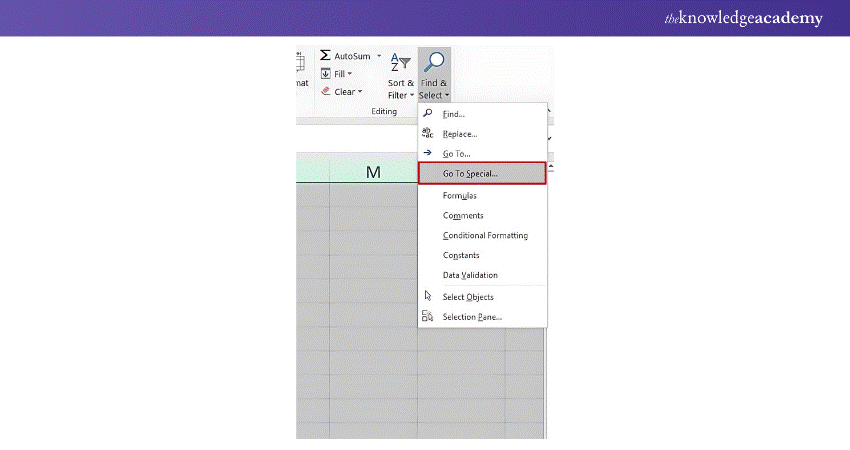
c) Select Formulas
3) Lock Formula Cells
a) Right-click the selected formula cells
b) Choose Format Cells
c) Ensure the "Locked" checkbox is checked
Transform your Excel skills with Microsoft Excel VBA and Macro Training – register now and unlock unparalleled efficiency and precision!
How to Lock the Entire Worksheet in Excel
To lock the entire worksheet, follow these steps:
1) Ensure the default 'Locked' box is unchecked.
2) Select the entire worksheet
a) Press ‘Ctrl + A’ or select the ‘Select All’ button at the top-left corner.
3) Open the ‘Format Cells’ menu
a) Press ‘Ctrl + 1’ or right-click any cell and select ‘Format Cells’.
4) Click on the 'Locked' box in the ‘Protection’ tab and click ‘OK’.
5) Navigate to the ‘Review’ tab, click ‘Protect Sheet’, set a password, and re-confirm it to secure the worksheet.
How to Unlock Cells in Excel
Take the following steps to unlock cells in Excel:
1) Go to ‘Review’ tab and click on ‘Unprotect Sheet’.
2) Enter the password you used to lock the sheet.
3) Once the protection is removed, you can edit any cells, including those that were previously locked.
How to Unlock Specific Areas of a Protected Worksheet?
Unlocking specific areas of a protected worksheet allows users to edit designated ranges while keeping the rest of the worksheet secure. Follow these steps:
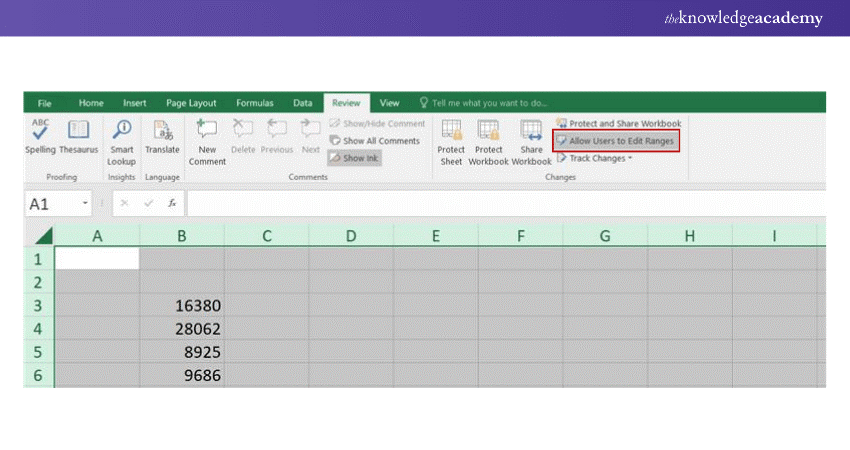
1) Go to the Review Tab
a) Select the Review tab in the ribbon
2) Allow Users to Edit Ranges
a) Click on 'Allow Users' to Edit Ranges
3) Define a New Range
a) Click ‘New’
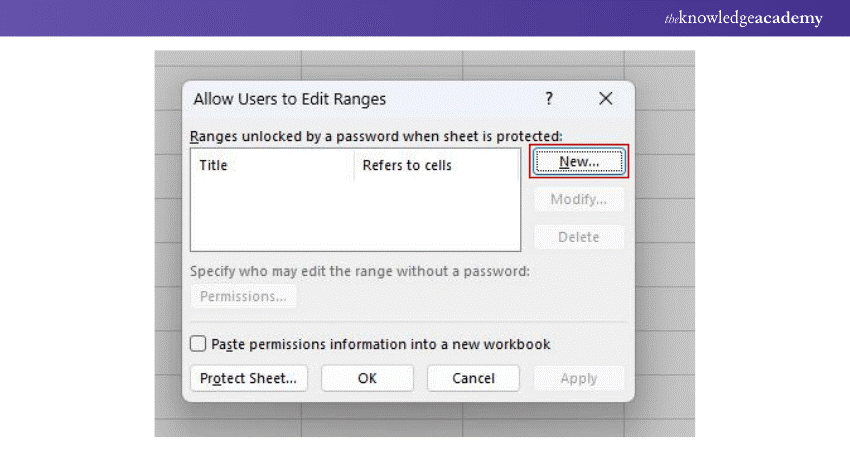
b) Select the range of cells you want to unlock
c) Set a range name and permissions if necessary
4) Set Permissions
a) Specify which users can edit the range without a password
b) Optionally, set a password to restrict access
By following these steps, you can monitor access to specific areas of your worksheet while maintaining overall protection.
Enhance your Excel skills to new heights with our expert-led Microsoft Excel Course - register now and start excelling!
How do I Lock Cells in Excel Using F4?
To lock cells in Excel using the F4 key, follow these steps:
1) Select the cell or range of cells.
2) Press your keyboard's F4 key to lock the selected cells.
3) To lock additional cells, simply press the F4 key again.
What is the Difference Between Locked and Protected Cells in Excel?
In Excel, locked cells cannot be edited when a worksheet is protected. All cells in a sheet are locked by default, but this only takes effect when the sheet is protected. On the other hand, protected cells are explicitly set to allow or restrict editing based on the worksheet's protection settings.
Conclusion
Mastering How to Lock Cells in Excel is essential for safeguarding your data against unintended changes. By following these steps, you can lock all cells, specific cells, or formula cells and even allow user-specific edits. Keep your data secure while maintaining the flexibility needed for seamless collaboration.
Transform your accounting workflow with our Excel for Accounting Course - sign up now!
Frequently Asked Questions
What Happens When I Protect a Worksheet in Excel?
When you protect a worksheet in Excel, it prevents changes to locked cells, ensuring data integrity. Users will need a password to modify any locked cells, maintaining your data's security.
Can I Lock Only Specific Cells in Excel?
Yes, you can lock particular cells in Excel. Select the cells to remain editable, unlock them using the ‘Format Cells > Protection tab’, and then protect the worksheet from locking only the desired cells.
What are the Other Resources and Offers Provided by The Knowledge Academy?
The Knowledge Academy takes global learning to new heights, offering over 3,000 online courses across 490+ locations in 190+ countries. This expansive reach ensures accessibility and convenience for learners worldwide.
Alongside our diverse Online Course Catalogue, encompassing 19 major categories, we go the extra mile by providing a plethora of free educational Online Resources like News updates, Blogs, videos, webinars, and interview questions. Tailoring learning experiences further, professionals can maximise value with customisable Course Bundles of TKA.
What is The Knowledge Pass, and How Does it Work?
The Knowledge Academy’s Knowledge Pass, a prepaid voucher, adds another layer of flexibility, allowing course bookings over a 12-month period. Join us on a journey where education knows no bounds.
What are the Related Courses and Blogs Provided by The Knowledge Academy?
The Knowledge Academy offers various Microsoft Excel Courses, including the Microsoft Excel Course, Microsoft Excel VBA And Macro Training, Excel For Accounting Course and Business Analytics With Excel Course. These courses cater to different skill levels, providing comprehensive insights into How to Freeze Panes in Excel.
Our Office Applications Blogs cover a range of topics related to Microsoft Excel, offering valuable resources, best practices, and industry insights. Whether you are a beginner or looking to advance your Excel skills, The Knowledge Academy's diverse courses and informative blogs have got you covered.
Upcoming Office Applications Resources Batches & Dates
Date
 Microsoft Excel Course
Microsoft Excel Course
Mon 7th Apr 2025
Microsoft Excel Course
Mon 9th Jun 2025
Microsoft Excel Course
Mon 8th Sep 2025
Microsoft Excel Course
Mon 1st Dec 2025
 If you wish to make any changes to your course, please


