


 Top Rated Course

We may not have the course you’re looking for. If you enquire or give us a call on 01344203999 and speak to our training experts, we may still be able to help with your training requirements.
How to Make a Website on Adobe Dreamweaver: A Complete Guide
Eliza Taylor 19 February 2024This blog explains how to create a simple and professional Website using Adobe Dreamweaver, a powerful web design tool. You will learn how to set up a new Website, design the homepage, style the Website title, and add some basic features.

Training Outcomes Within Your Budget!
We ensure quality, budget-alignment, and timely delivery by our expert instructors.
Table of Contents

Web Development is a fascinating and exciting field. However, creating a Website from scratch can be daunting, especially if you are new to this domain. Fortunately, using a powerful tool like Adobe Dreamweaver can simplify the process and pave the way for your success in web development. But How to Make a Website on Adobe Dreamweaver?
According to Glassdoor, the gross salary of a Web Developer in the UK is about 40,000 GBP per year. It is a great career with lots of perks and benefits. If you are passionate about becoming a Web Developer, then you should know how to Make a Website with Adobe Dreamweaver. That's exactly what this blog is about.
In this blog, you will learn How to Make a Website on Adobe Dreamweaver in nine easy steps. Let's dive in to learn more!
Table of Contents
1) Steps to Make a Website with Adobe Dreamweaver
a) Establish a new Website
b) Generate the homepage file
c) Develop a header
d) Implement home navigation
e) Incorporate Website description
f) Formulate a CSS file
g) Define a CSS selector for the Website title
h) Modify title font
i) Center-align the title
2) Conclusion
Steps to Make a Website with Adobe Dreamweaver
In this section, we will explore How to Make a Website on Adobe Dreamweaver simple steps. Here are the steps involved:
1) Establish a new Website
Before you start designing your Website, you need to create a new Website project in Dreamweaver. A Website project is a collection of files and folders that make up your Website. It helps you organise and manage your Website content and settings.
To create a new Website project, you need to open Dreamweaver and go to File > New > Site. This will bring a new dialogue box where you can enter some information about your Website, such as:
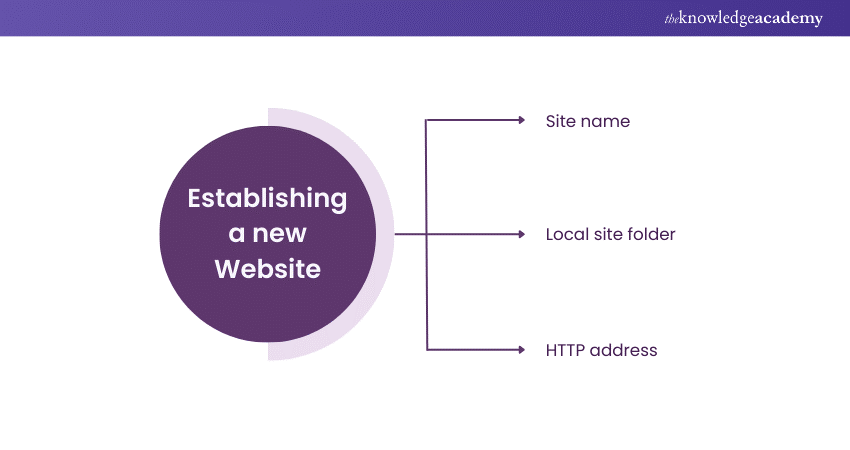
1) Site name: This is the name of your Website project, which will appear in the Files panel and the Site menu. You can choose any name that is meaningful to you, such as “My Website” or “Portfolio”.
2) Local site folder: This is the location where you will save your Website files like HTML (HyperText Markup Language), CSS, images, and scripts. You can browse an existing folder or create a new one. Make sure you have enough space and permissions to access this folder.
3) HTTP address: This is the URL of your Website, such as “http://www.example.com”. This is optional, but it can help you preview your Website in a browser and test some features, such as links and forms. You can enter the URL if you have already registered a domain name and a web hosting service, or you can leave it blank if you are not ready to publish your Website online.
After you enter this information, click Save to create your new Website project. You will see your Website name and folder in the Files panel, where you can add, edit, and delete your Website files. You can also access your Website settings and properties by going to Site > Manage Sites.

2) Generate the homepage file
The homepage file is the file that contains the HTML code for your Website’s homepage. HTML is considered the standard language for creating web pages. HTML uses tags, such as ,< html >, < head >, < body >, < h1 >, < p >, and more, to structure and format the content of your web page.
To create the homepage file, you need to go to File > New > HTML in Dreamweaver. After that, a dialogue will appear where you can choose a layout for your page. A layout is a predefined structure that can help you organise your page content into sections, such as header, footer, sidebar, and main. You can choose from different layouts, such as a blank page, a starter template, or a custom layout.
After you choose a layout, click Create to open the HTML file in Dreamweaver. You will see the HTML code in the Code view and the visual representation of your page in the Design view. You can switch between the views using the buttons at the top of the document window.
You need to save the file as index.html in your Website folder. The index.html file is typically the default file that browsers will look for when they access your Website. In order to save the file, go to the "File" menu and perform the following actions: File > Save As and browse to your Website folder. Enter index.html as the file name and click Save. You have now created the homepage file for your Website.
3) Develop a header
The header is an important part of your Website design, as it helps visitors identify your Website and navigate to other pages. To create a header, you need to use a div element. This element is a generic container that can hold any other HTML elements, such as text, images, links, and more.
To insert a div element, you need to go to Insert > Layout Objects > Div in Dreamweaver. This will switch to a dialogue box where you can enter some information about your div, such as:
1) ID: This is a unique name that identifies your div, such as “header”. You can use this name to target and style your div using CSS.
2) Class: This is an optional name that groups your div with other elements that share the same style, such as “container”. You can use this name to apply the same style to multiple elements using CSS.
3) Tag: This is the HTML tag that wraps your div, such as < div >. You can choose from different tags, such as < header >, < section >, or < article >, depending on the semantic meaning of your div.
After you enter this information, click OK to insert your div. You will see a dotted outline of your div in the Design view. You can then drag your div to the top of your page, where you want your header to be. You can also resize your div by dragging its edges or corners or by entering width and height values in the Properties panel.
You have now created a header for your Website using a div element. You can then add other elements to your header, such as the Website title, logo, and navigation menu, using the Insert panel. You can also style your header using the CSS Designer panel.
4) Implement home navigation
The home navigation is a useful feature that helps visitors find the information they are looking for on your Website. It usually consists of a horizontal or vertical list of links that lead to different pages or sections of your Website, such as Home, About, Services, Contact, and more.
To create a home navigation, you can use the Navbar element, which is a ready-made component that Dreamweaver provides for you. The Navbar element contains a list of links that are styled with CSS and have some interactivity, such as changing colour or appearance when you hover over them.
To insert a Navbar element, you need to go to Insert > Navbar in Dreamweaver. This will execute a dialogue box where you can enter some information about your navbar, such as:
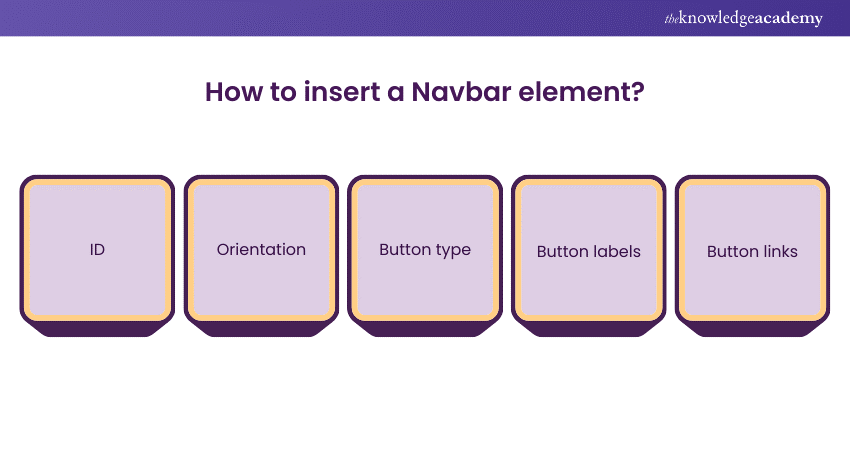
1) ID: This is a unique name that identifies your navbar, such as “nav”. You can use this name to target and style your navbar using CSS.
2) Orientation: This is the direction of your navbar, either horizontal or vertical. You can choose the one that suits your Website layout and design.
3) Button type: This is the shape and appearance of your navbar buttons, such as text, image, or both. You can choose from different options, such as rectangular, oval, or custom.
4) Button labels: This is the text that appears on your navbar buttons, such as Home, About, Services, Contact, and more. You can modify the text by selecting the buttons and typing the new text.
5) Button links: This is the URL that your navbar buttons link to, such as index.html, about.html, services.html, contact.html, and more. You can edit the URL by clicking on the buttons and typing the new URL or browsing to an existing file in your Website folder.
After you enter this information, click OK to insert your navbar. You will see your navbar in the Design view. You can then drag your navbar to the header div, where you want your home navigation to be. You can also resize your navbar by dragging its edges or corners. Alternatively, enter the width and height values in the Properties panel.
You have now created a home navigation for your Website using a Navbar element. You can then customise your navbar by adding or removing buttons, changing the text and links, and modifying the style using the CSS Designer panel.
5) Incorporate Website description
The Website description is a brief introduction to your Website that captures the attention and interest of your visitors. It usually consists of some text and images that describe the purpose, topic, and features of your Website, such as what you do, who you are, what you offer, and why you are different.
To create a Website description, you need to use another div element, which is a generic container that can hold any other HTML elements, such as text, images, links, and more.
To insert a div element, you need to go to Insert > Layout Objects > Div in Dreamweaver. Then, you should enter some information about your div in the new dialogue box. Let's explore what those details are:
1) ID: This is a unique name that identifies your div, such as “description”. You can use this name to target and style your div using CSS.
2) Class: This is an optional name that groups your div with other elements that share the same style, such as “content”. You can use this name to apply the same style to multiple elements using CSS.
3) Tag: This is the HTML tag that wraps your div, such as < div >. You can choose from different tags, such as < section >, < article >, or < aside >, depending on the semantic meaning of your div.
After you enter this information, click OK to insert your div. You will see a dotted outline of your div in the Design view. You can then drag your div below the header div, where you want your Website description to be. You can also resize your div by dragging its edges or corners. Alternatively, you can enter the height and width values in the Properties panel.
You have now created a Website description for your Website using a div element. You can then add some text and images to your div using the Insert panel. You can use the Text tool to type or paste some text and the Image tool to insert or browse some images. You can also style your text and images using the Properties panel and the CSS Designer panel.
Elevate your design skills with our Adobe InDesign Masterclass – Sign up now!
6) Formulate a CSS file
CSS is a language that describes how HTML elements should look on a web page. CSS can control the layout, colours, fonts, borders, backgrounds, and more of your web page elements.
To create a CSS file, you need to go to File > New > CSS in Dreamweaver. This will open a new blank document file, which you can use to write CSS code. You can use selectors, properties, and values to create rules that apply a style to your HTML elements. For example, you can write the following code:
|
body { background-color: lightblue; }
h1 { color: white; text-align: center; } |
This will make the background colour of your web page light blue and the colour and alignment of your h1 elements white and centre. You need to save your CSS file as style.css in your Website folder. This will be the file that contains all your style rules for your Website.
To link your CSS file to your HTML file, you need to go to Insert > CSS > Link in Dreamweaver. This will then open a new dialogue box where you can choose your style.css file and click OK. This will insert a link element in the head section of your HTML file, such as:
< link rel="stylesheet" href="style.css" >
This will tell the browser to load and apply your style.css file to your web page. You have now created and linked a CSS file to your HTML file. You can then use the CSS Designer panel to edit and preview your style rules.
7) Define a CSS selector for the Website title
A CSS selector is a rule that targets a specific element or group of elements on your Website and applies some style to them. To create a CSS selector for the Website title, go to the CSS Designer panel and click the “+” button. Enter a selector name, such as “#header h1”. This selector will target the h1 element inside the header div. You can then add some style properties to your selector, such as colour, font size, font family, and text alignment.
8) Modify title font
To modify the title font, you can use the Google Fonts service, which provides a collection of free and high-quality fonts for web design. To use Google Fonts:
1) Go to https://fonts.google.com/ and choose a font that you like, such as Roboto.
2) Click the “+” button to select the font, and then click the “Embed” tab.
3) Copy and paste the link code in the head section of your HTML file.
4) Copy the font-family code and paste it into the style property of your CSS selector.
Unlock your full potential in digital design with our Adobe Courses - Sign up today!
9) Center-align the title
To center-align the title, you can use the text-align property in your CSS selector. Set the value of the text-align property to “centre”. This will align the title to the centre of the header div.
Overall, using the comprehensive Features of Adobe Dreamweaver, you can effectively create a Website from scratch.
Conclusion
We hope you have read and understand How to Make a Website on Adobe Dreamweaver in nine simple steps. By following these steps, you have created a new Website project, designed the homepage, styled the Website title, and added some basic features. You can now use your Website as a template for creating other pages and adding more content and functionality.
Elevate your Web Design expertise with our Adobe Dreamweaver Masterclass – Sign up now!
Frequently Asked Questions
How do I create a web form in Dreamweaver?

To create a web form in Dreamweaver, you can use the Insert > Form menu. This will allow you to insert various form elements like text fields, buttons, checkboxes, radio buttons, and drop-down menus. You can then customise the form elements using the Properties panel and the CSS Designer panel.
Is Dreamweaver good for beginners?
Dreamweaver is a good tool for beginners who want to learn web development and design. It offers a friendly interface that lets you create and edit Websites visually or with code. It also provides many features and resources that can help you with web development, such as templates, code hints, live previews, and tutorials.
How can I create a homepage file in Dreamweaver?
To create a homepage file in Dreamweaver, you can go to File > New > HTML. Choose a layout for your page, such as a blank page or a starter template. Save the file as index.html in your Website folder. This will be the default page that visitors will see when they access your Website.
What are the other resources and offers provided by The Knowledge Academy?
The Knowledge Academy takes global learning to new heights, offering over 30,000 online courses across 490+ locations in 220 countries. This expansive reach ensures accessibility and convenience for learners worldwide.
Alongside our diverse Online Course Catalogue, encompassing 17 major categories, we go the extra mile by providing a plethora of free educational Online Resources like News updates, blogs, videos, webinars, and interview questions. By tailoring learning experiences further, professionals can maximise value with customisable Course Bundles of TKA.
What is the Knowledge Pass, and how does it work?
The Knowledge Academy’s Knowledge Pass, a prepaid voucher, adds another layer of flexibility, allowing course bookings over a 12-month period. Join us on a journey where education knows no bounds.
What are related Adobe courses and blogs provided by The Knowledge Academy?
The Knowledge Academy offers various Adobe courses, including Photoshop, InDesign, Adobe Illustrator and Adobe After Effects Masterclass. These courses cater to different skill levels, providing comprehensive insights into the Adobe workspace.
Our Adobe Blogs cover a range of topics related to multimedia creation, offering valuable resources, best practices, and industry insights. Whether you are a beginner or looking to advance your multimedia creation skills, The Knowledge Academy's diverse courses and informative blogs have you covered.
Upcoming Office Applications Resources Batches & Dates
Date
 Adobe Dreamweaver Training
Adobe Dreamweaver Training
Thu 12th Sep 2024
Adobe Dreamweaver Training
Thu 14th Nov 2024
Adobe Dreamweaver Training
Fri 3rd Jan 2025
Adobe Dreamweaver Training
Fri 7th Mar 2025
Adobe Dreamweaver Training
Fri 2nd May 2025
Adobe Dreamweaver Training
Fri 4th Jul 2025
Adobe Dreamweaver Training
Fri 5th Sep 2025
Adobe Dreamweaver Training
Fri 7th Nov 2025
 If you wish to make any changes to your course, please


