We may not have the course you’re looking for. If you enquire or give us a call on 01344203999 and speak to our training experts, we may still be able to help with your training requirements.
We ensure quality, budget-alignment, and timely delivery by our expert instructors.

In digital image editing, mastering the skill of creating transparent backgrounds is invaluable. Creating a transparent background in an image can transform its versatility and aesthetic, particularly for graphic design and web use. Moreover, creating a transparent Background in GIMP involves removing the whole background from an image and making it transparent. If you are wondering How to Make Transparent Background in GIMP, read this blog further to create digital art like a professional.
Table of Contents
1) Step-by-step process to make a transparent Background in GIMP
a) Step 1: Use the Fuzzy Select Tool
b) Step 2: Click on the “Select by Colour” tool
c) Step 3: Click on “Foreground Select Tool.”
d) Step 4: Select layer masks
2) Conclusion
Step-by-step process to make a transparent Background in GIMP
Whether it's for web design, layering images, or graphic design, you can follow these steps to make a transparent Background in GIMP:
Step 1: Use the ‘Fuzzy Select Tool’
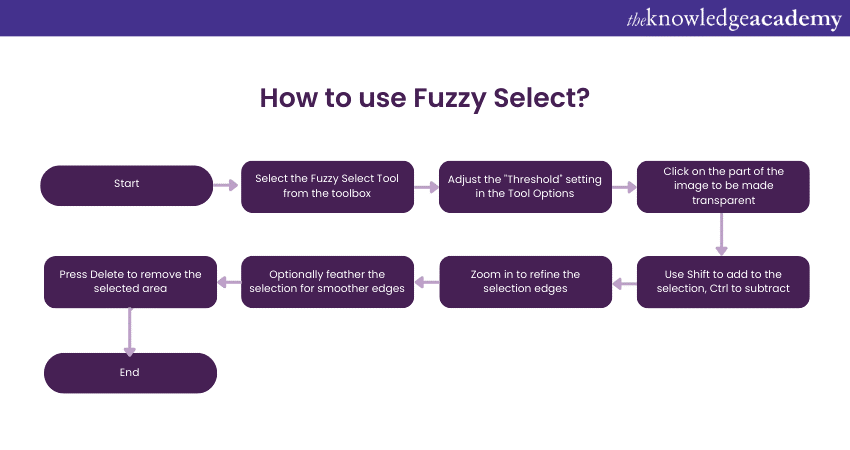
The “Fuzzy Select Tool” is ideal for simple to moderately complex backgrounds but may struggle with intricate details or backgrounds with a lot of colour variation. In such cases, a combination of different selection tools might be required for the best results. It is also known as the Magic Wand. Here's a detailed breakdown of how to use the Fuzzy Select Tool:

a) Tool selection: Open GIMP and load your image. Select the Fuzzy Select Tool from the toolbox. You can also access it quickly by pressing the 'U' key.
b) Adjust tool settings: In the Tool options, you can adjust the "Threshold" setting. The threshold determines the range of colour or tone the tool selects. A lower threshold selects a narrower range of colours similar to the clicked point, while a higher threshold expands the selection to include a broader range of matching colours.
c) Make the selection: Click on the part of the image you want to make transparent. Generally, this would be the background. If the background is a solid colour or close to it, the Fuzzy Select Tool can easily select the entire background in one click. You should adjust the threshold or make multiple selections if there are shades or gradients.
d) Refine the selection: If the tool doesn't select the entire background in the first attempt or selects too much (including parts of the subject), you can add to or subtract from the selection. Holding down the Shift key will allow you to add to the selection, while the Ctrl key lets you remove parts from the selection.
e) Check for 'Missed Spots': Zoom in and inspect the edges of your selection. Sometimes, small areas may be missed, especially around the subject's edges. Use the same add/subtract techniques to refine the edges.
f) Feather the selection: To avoid harsh edges, feather the selection. Go to "Select" in the top menu and choose "Feather." Enter a small value to blur the boundaries of your selection slightly.
g) Delete the background: Press the Delete key once satisfied with the selection. The selected area will be removed, revealing the transparent background (thanks to the alpha channel added earlier).
Step 2: Click on the 'Select by Colour' tool
This tool is ideal for images where multiple non-contiguous areas share the same or similar colour, such as a scattered background or a patterned subject against a solid backdrop. Here's an in-depth look at using the ‘Select by Colour’ tool:
a) Access the tool: Open GIMP, load your image and select the ‘Select by Colour’ tool from the toolbox. Alternatively, use the keyboard shortcut by pressing Shift + O.
b) Adjust tool settings: In the Tool Options, adjust the ‘Threshold’ setting. This determines the sensitivity of the tool to colour variations. A lower threshold limits the selection to colours very close to the one you click on, while a higher threshold includes a broader range of similar colours.
c) Making the selection: Click on the part of the image you wish to make transparent. This tool allows you to select all areas of the image that have a similar colour to where you clicked, regardless of their location in the image. It's particularly effective for selecting backgrounds with consistent colour but scattered across different image parts.
d) Refine the selection: You may need to refine the selection to exclude unwanted areas. You can then add to the selection by holding Shift, clicking on unselected areas of similar colour, subtracting from it using Ctrl, and clicking on areas you wish to deselect.
e) Inspect and adjust: Zoom in and inspect the selection, especially around the subject's edges. The ‘Select by Colour’ tool might inadvertently select parts of your subject if they match the background colour. Use the add/subtract technique to fine-tune the selection.
f) Feathering the edges: To soften the edges of your selection and ensure a more natural transition, feather the selection by going to ‘Select’ and choosing ‘Feather.’ Enter a value that slightly blurs the edges.
g) Delete the background: Press the Delete key once you are satisfied with the selection. This action will remove the selected areas, revealing the transparent background. Ensure you've added an alpha channel before doing this to enable transparency.
Step 3: Click on ‘Foreground Select Tool’
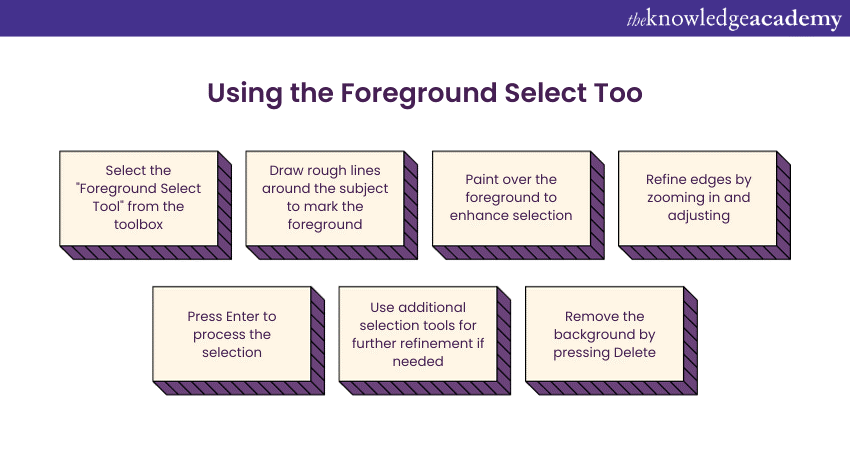
This tool is handy for more complex images where the foreground and background colours are intermingled or the subject has intricate edges, like fur or hair. Here's a detailed guide on using the Foreground Select Tool:

a) Selecting the tool: Choose the ‘Foreground Select Tool’ from the toolbox in GIMP.
b) Marking the foreground: Draw rough lines around the subject of the image. This process doesn't require precision; ensure that all parts of the subject are within the marked area.
c) Enhancing the selection: After marking the foreground, GIMP enters a mode where you can paint over the foreground. This step is crucial as it allows GIMP to understand what constitutes the foreground. Use a small brush to paint over the parts of the image that you want to keep.
d) Refining the edges: The tool is particularly effective in dealing with complex edges. As you paint over the foreground, GIMP begins to differentiate it from the background. It's helpful to zoom in on fine details and ensure all parts of the subject are covered.
e) Final selection: Once you are done marking the foreground, press Enter. GIMP processes the selection and isolates the foreground from the background.
f) Adjustments and corrections: After the initial selection, areas may need further refinement. You can add to or subtract from the selection using other selection tools like the Lasso or Quick Mask.
g) Removing the background: With the subject accurately selected, you can now remove the background. If you haven't already, add an alpha channel to the layer to ensure the background becomes transparent upon deletion.
h) Feathering the edges: For a more natural look, especially if the image will be superimposed onto another background, feather the edges of your selection.
Are you interested in discovering your creative potential? If yes, register now for our Animation and Design Training!
Step 4: Select layer masks
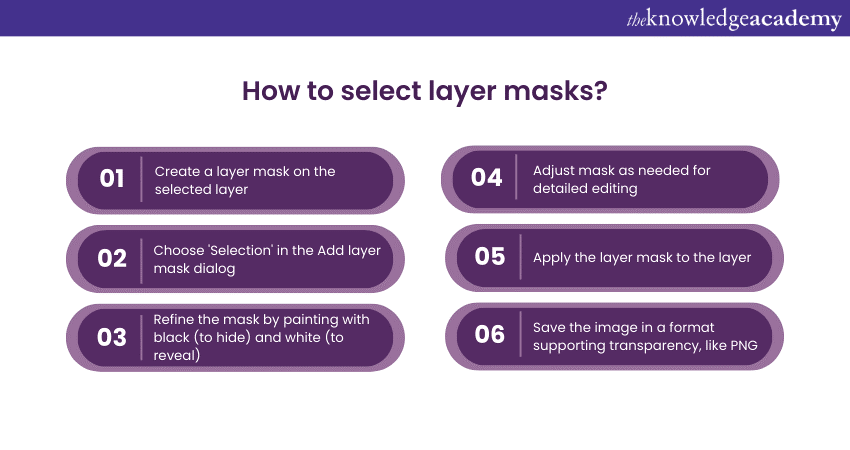
Layer Masks are a powerful feature that allows for non-destructive editing, providing a high level of control over which parts of an image remain visible. These steps are discussed in detail:

a) Understanding layer masks: A layer mask controls the transparency of the layer to which it is attached. White in the mask represents areas of complete visibility (opaque), while black represents full transparency. Grey tones indicate varying levels of transparency.
b) Creating a layer mask: After selecting the area you want to keep (your subject), you can create a mask to hide the background. Go to the Layers panel, right-click on your layer, and choose 'Add Layer Mask.'
c) Configuring the mask: In the dialogue box, choose the 'Selection' option to create a mask based on your current selection. This will turn the background (unselected area) invisible while keeping the subject visible.
d) Refining the mask: You can refine the mask by painting on it. Use a black brush to add transparency (hide parts of the layer) or a white brush to remove transparency (reveal parts of the layer). This step is crucial for fine-tuning the edges and ensuring the subject blends seamlessly with a new background.
e) Non-destructive editing: One of the significant advantages of using layer masks is that they allow for non-destructive editing. You can constantly readjust the mask without altering the original image.
f) Applying the mask: Once satisfied, you can use it to the layer. This can be done by right-clicking the layer mask in the Layers panel and selecting 'Apply Layer Mask.'
g) Saving the image: You must keep your image in a PNG format, which supports transparency. This will help you to maintain the effect created by the layer mask.
Are you interested in knowing how to unleash your storytelling skills? If yes, register now for our Video Editing Training.
Conclusion
We hope this blog has helped you to understand How to Make Transparent Background in GIMP, which involves a series of manageable yet precise steps. From selecting the right tools like the Fuzzy Select or Foreground Select to refining selections with layer masks, each phase achieves a clean, professional-looking transparent background suitable for various graphical applications.
Do you want to start shaping your creations in three dimensions? Sign up now with our Dimensional Modelling Foundations Training. Join now!
Frequently Asked Questions
What are the Other Resources and Offers Provided by The Knowledge Academy?

The Knowledge Academy takes global learning to new heights, offering over 3,000 online courses across 490+ locations in 190+ countries. This expansive reach ensures accessibility and convenience for learners worldwide.
Alongside our diverse Online Course Catalogue, encompassing 19 major categories, we go the extra mile by providing a plethora of free educational Online Resources like News updates, Blogs, videos, webinars, and interview questions. Tailoring learning experiences further, professionals can maximise value with customisable Course Bundles of TKA.
Upcoming Office Applications Resources Batches & Dates
Date
 GIMP Training
Thu 20th Mar 2025
Thu 22nd May 2025
Thu 17th Jul 2025
Thu 18th Sep 2025
Thu 20th Nov 2025


 Top Rated Course


 If you wish to make any changes to your course, please


