We may not have the course you’re looking for. If you enquire or give us a call on 01344203999 and speak to our training experts, we may still be able to help with your training requirements.
We ensure quality, budget-alignment, and timely delivery by our expert instructors.

Ever stared at a messy Excel column, wondering if there’s a quick way to transform that chaos into order? If you’ve ever puzzled over How to Split Cells in Excel to better organise your data, you’re about to discover a game-changing solution. Whether it's splitting names, breaking down addresses, or organising numbers, knowing how to split cells can revolutionise how you manage your spreadsheets.
In this blog, we’ll unlock the secrets of How to Split Cells in Excel, guiding you step by step on how to take control of your data. So, if you’re ready to elevate your Excel skills and bring order to your spreadsheets, let’s get started!
Table of Contents
1) What are Split Cells in Excel?
2) Use of Split Cells in Excel
3) How to Split Cells in Excel employing a Delimiter?
4) How to Split Cells in Excel employing the Fixed Width Option?
5) Conclusion
What are Split Cells in Excel?
Excel's Split Cells feature allows you to split text from one column into two different columns, which is especially useful for organising data, such as breaking entire names into first and last names. This feature upgrades the clarity and usability of your spreadsheet, which helps with data analysis and interpretation.
Using this function improves data management, making your Excel sheets simpler and easier to use. It's an essential tool for everyone who wants to improve the usability and efficiency of their Excel spreadsheets.
Use of Split Cells in Excel
Here's how the split cells feature in Excel can simplify your data management and enhance your analysis:
a) Enhances Data Organisation: Splitting cells allows you to separate text or numbers, making your data more organised and easier to manage.
b) Efficient Data Analysis: Quickly separate information, such as full names into first and last names, improving data clarity.
c) Streamlines Address Management: Break down addresses into street, city, and postcode, making location-based data more accessible.
d) Improves Readability of Numbers: Divide long numbers into smaller segments for better readability and analysis.
How to Split Cells in Excel Using a Delimiter?
Splitting cells using a delimiter in Excel is the easiest way to separate data based on specific characters. Follow these steps to get started:
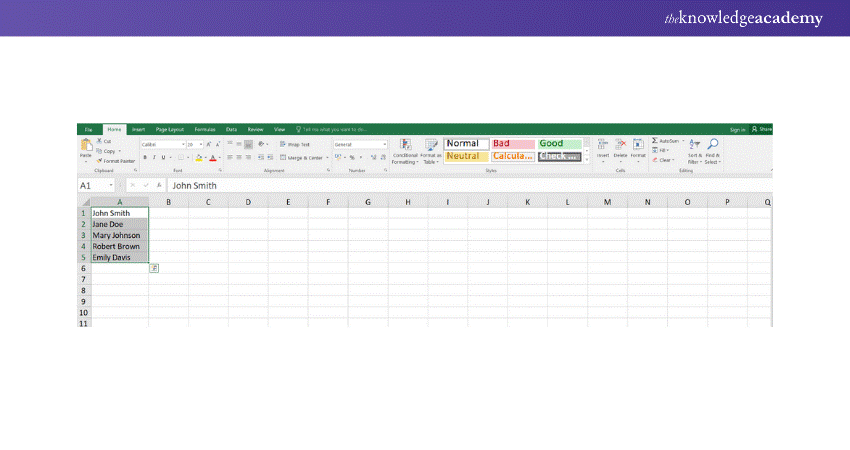
1) Select the Cells You Want to Split
Begin by highlighting the cells that contain the data you wish to split.
2) Navigate to the Data Tab
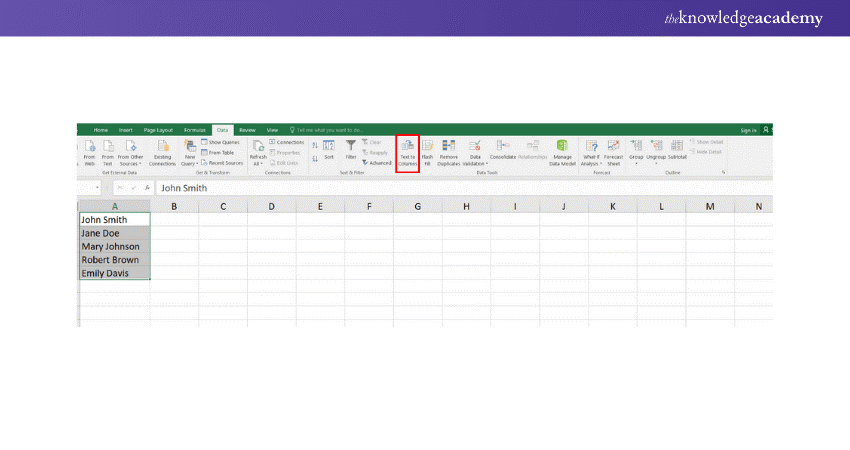
Go to the Data tab in the Excel ribbon located at the top of your screen.
3) Click on Text to Columns
Within the Data tab, click the Text to Columns button to launch the conversion wizard.
4) Choose the Delimited Option
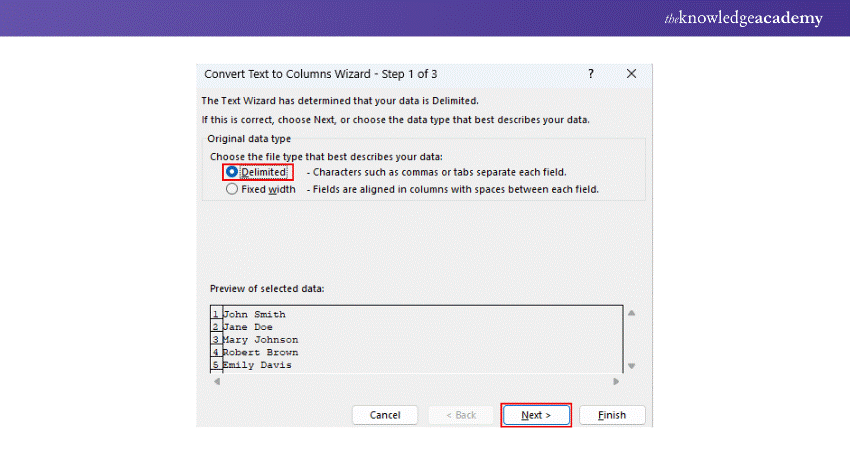
In the wizard, choose the Delimited option and click Next to proceed. This indicates that you want to split the data using a specific character.
5) Select Your Delimiters
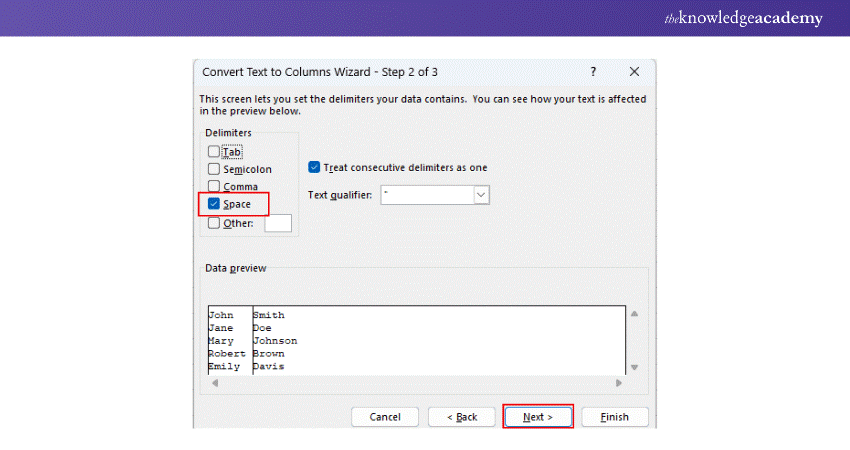
Choose the delimiter that corresponds with your data, such as a comma, space, or semicolon. You also have the option to specify a custom delimiter.
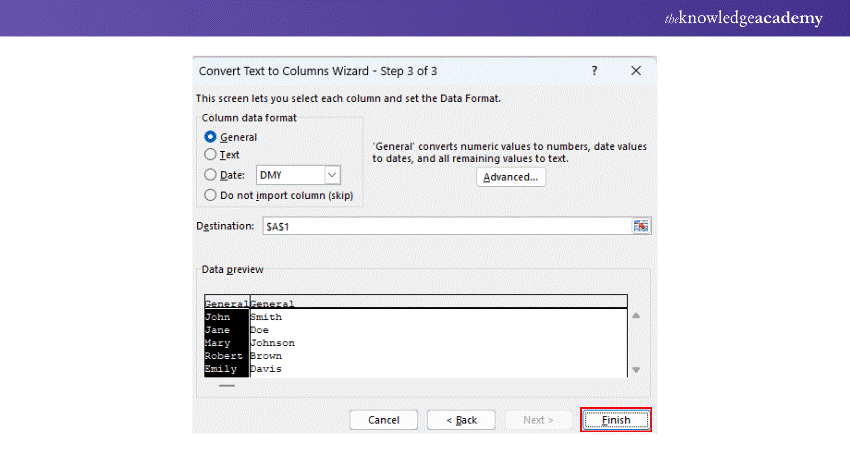
6) Preview and Apply
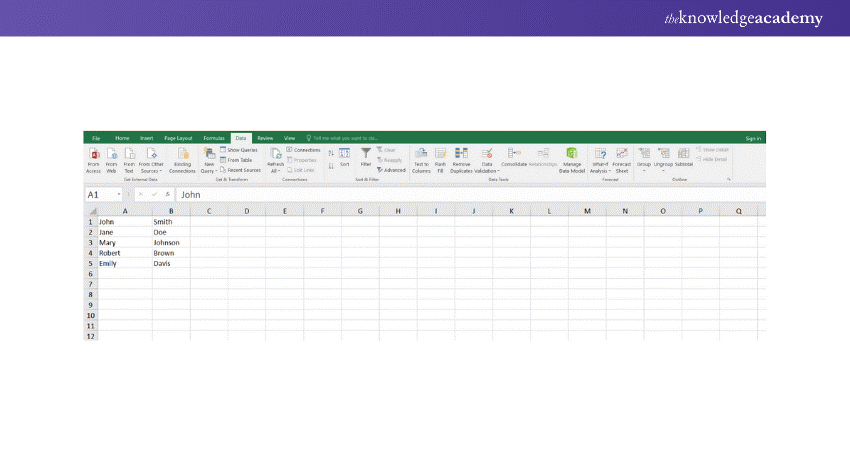
Review the preview of how your data will be split. If everything looks correct, click Finish to execute the split.
Advance your business insights – sign up for the Business Analytics With Excel Course and become an analytics expert!
How to Split Cells in Excel Using the Fixed Width Option?
The following are the steps to split cells in Excel using the Fixed Width Option:
1) Select the Cells
Highlight the cells that contain the data you want to split. Make sure the data is consistent and follows a regular pattern.
2) Go to the Data Tab
Click on the Data tab in the Excel ribbon at the top of your screen.
3) Click Text to Columns
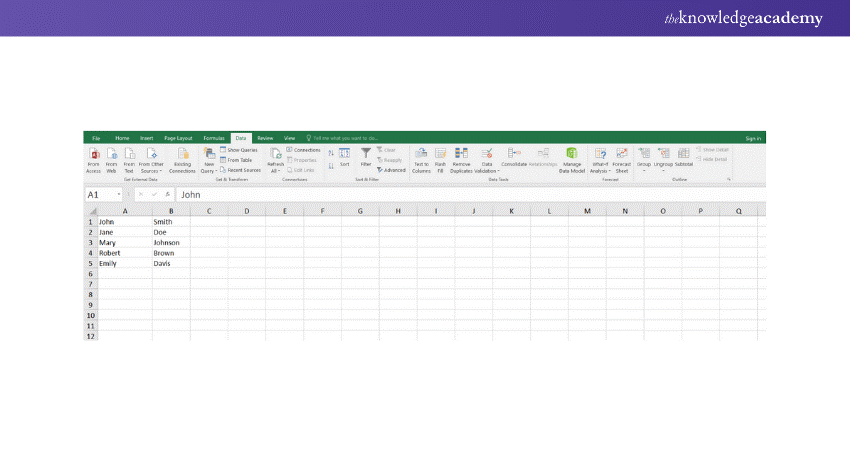
In the Data tab, click the Text to Columns button to open the conversion wizard.
4) Choose Fixed Width
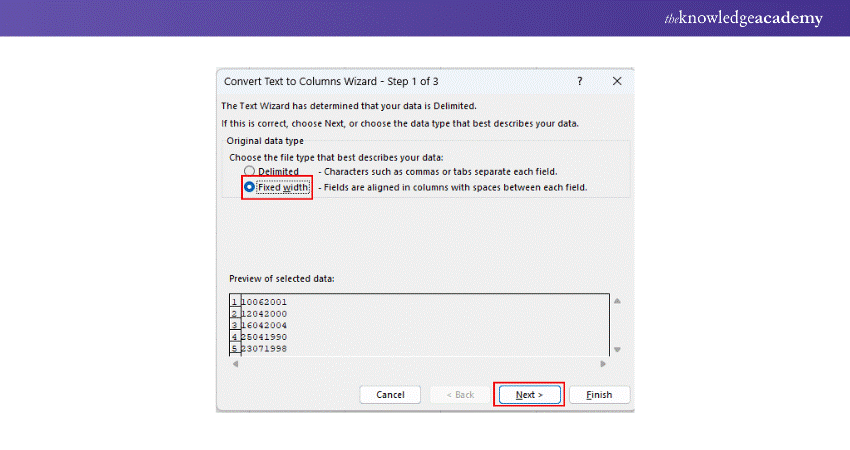
In the wizard, select the Fixed Width option and click Next. This allows you to split the data at specific character points.
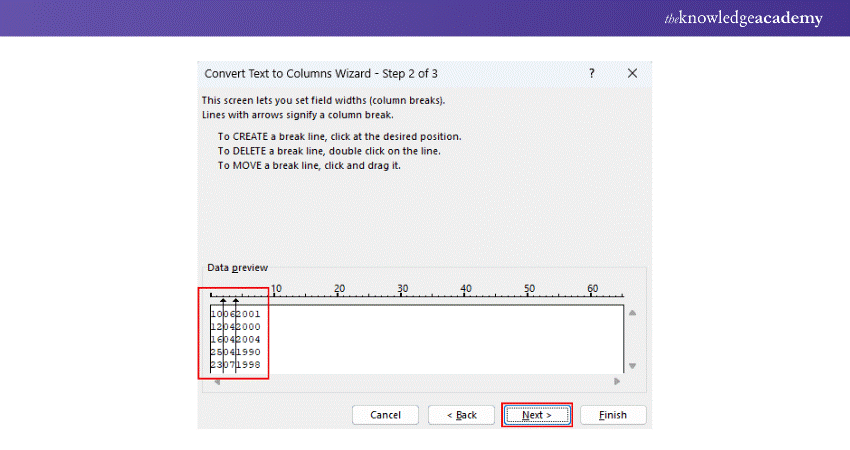
5) Set Break Lines
A preview of your data will show vertical lines where the content will be split. Click to add new lines or adjust existing ones to position the splits exactly where you want them.
6) Preview and Apply
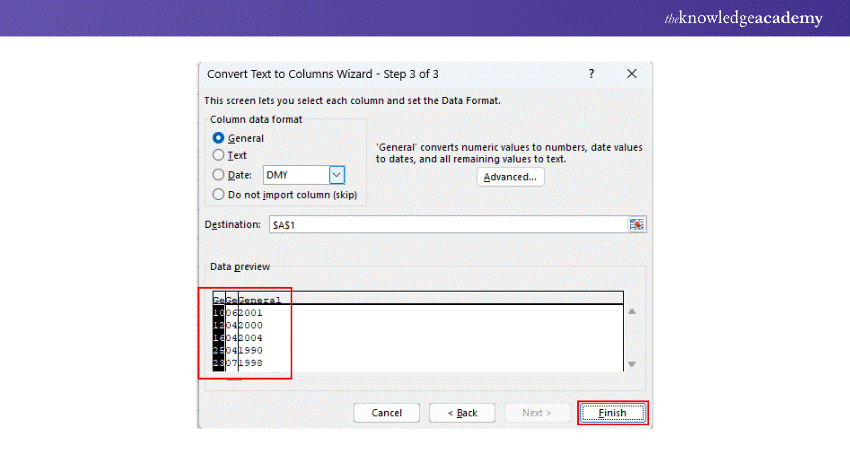
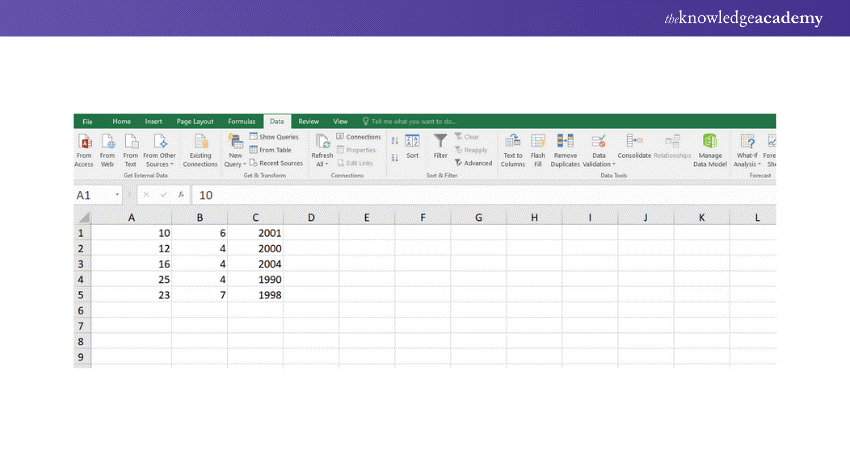
Once the break lines are set, click Next. Decide where the split data should appear, either in the current worksheet or a new location, and click Finish to apply the split.
Enhance your Excel skills to new heights with our expert-led Microsoft Excel Course - register now and start excelling!
Conclusion
Mastering How to Split Cells in Excel can greatly enhance your data management capabilities, making your spreadsheets more organised and efficient. Whether you're using delimiters or fixed width options, these techniques are essential for anyone looking to optimise their workflow. Start applying these methods today and transform your Excel experience!
Transform your accounting workflow with our Excel For Accounting Course - sign up now!
Frequently Asked Questions
Can I Split a Single Cell into Multiple Columns or Rows?

Yes, you can split a single cell into multiple columns using Excel's Text to Columns feature.
Can I Split Cells Containing Dates or Numbers?

Yes, you can split cells containing dates or numbers using the Text to Columns option in Excel. This allows you to separate components like day, month, year, or digits into different columns.
What are the Other Resources and Offers Provided by The Knowledge Academy?

The Knowledge Academy takes global learning to new heights, offering over 3,000 online courses across 490+ locations in 190+ countries. This expansive reach ensures accessibility and convenience for learners worldwide.
Alongside our diverse Online Course Catalogue, encompassing 19 major categories, we go the extra mile by providing a plethora of free educational Online Resources like News updates, Blogs, videos, webinars, and interview questions. Tailoring learning experiences further, professionals can maximise value with customisable Course Bundles of TKA.
What is The Knowledge Pass, and How Does it Work?

The Knowledge Academy’s Knowledge Pass, a prepaid voucher, adds another layer of flexibility, allowing course bookings over a 12-month period. Join us on a journey where education knows no bounds.
What are the Related Courses and Blogs Provided by The Knowledge Academy?

The Knowledge Academy offers various Microsoft Excel Courses, including Microsoft Excel Course, Microsoft Excel VBA And Macro Training, Excel For Accounting Course and Business Analytics With Excel Course. These courses cater to different skill levels, providing comprehensive insights into Create a Heat Map in Excel.
Our Office Applications Blogs cover a range of topics related to Excel, offering valuable resources, best practices, and industry insights. Whether you are a beginner or looking to advance your Office Applications skills, The Knowledge Academy's diverse courses and informative blogs have got you covered.
Upcoming Office Applications Resources Batches & Dates
Date
 Microsoft Excel Course
Mon 10th Mar 2025
Mon 7th Apr 2025
Mon 9th Jun 2025
Mon 8th Sep 2025
Mon 1st Dec 2025


 Top Rated Course


 If you wish to make any changes to your course, please


