We may not have the course you’re looking for. If you enquire or give us a call on 01344203999 and speak to our training experts, we may still be able to help with your training requirements.
Training Outcomes Within Your Budget!
We ensure quality, budget-alignment, and timely delivery by our expert instructors.

Are you wondering How to Create an Invoice in Excel? If you want a simple and effective way to create and manage invoices, consider using the Invoice Format in Excel. Excel is a robust and versatile tool that can help you customise your invoices according to your needs and preferences.
In this blog, we will give you an overview of How to Create an Invoice in Excel and show you some examples of templates that you can use or modify for your business. Whether you are a freelancer, a small business owner, or a large corporation, you can use Invoice Format in Excel to streamline your invoicing process.
Table of Contents
1) How to Make an Invoice from an Excel Template (Windows)?
2) How to Make an Invoice from an Excel Template (Mac)?
3) How to create your Invoice Template in Excel?
4) Automate Invoicing with Invoice Management Systems
5) Conclusion
How to Make an Invoice from an Excel Template (Windows)
Businesses can efficiently use customisable Excel templates to invoice their customers. Here's how to create an invoice from an Excel template on a Windows PC:
Step 1: Look for and Choose a Template for an Invoice Format in Excel
a) Open Microsoft Excel: Start by launching Microsoft Excel on your PC.
b) Search for an Invoice Template: In the search bar at the top of the window, type “invoice” to browse available templates. Ensure you’re connected to the internet to access the template options.
c) Select a Template: Browse through the different invoice templates, such as sales, service, or shipping invoices. Pick one that suits your business needs and complements your company’s branding.
d) Open the Invoice Template: Click on your chosen template to preview it, then select “Create” to open the invoice in a new workbook.
Step 2: Edit and Personalise the Excel Invoice Template
Customise the Invoice: Personalise the template by adding:
a) Your company logo
b) Contact details of the business (name, address, phone, and email)
c) Client’s contact information
d) Invoice and payment due dates
e) A unique invoice number
f) An itemised list of services or products with descriptions, quantities, rates, and subtotals
g) Payment terms, including methods and late fees
h) Total amount due, including taxes
Step 3: Save and Send the Invoice
1) Save the Invoice: Once customised, save the file in .xlsx format for future editing. Also, save a PDF version to send to your client to prevent modifications.
2) Send the Invoice: Email or mail the invoice to your client. Include a brief message highlighting key details like the due date and total amount owed.
How to Make an Invoice from an Excel Template (Mac)
To create an invoice using an Excel template on a Mac, follow these steps:
1) Open Microsoft Excel
Launch Microsoft Excel and go to the File menu. Select New from Template to access a range of available invoice templates.
2) Search for an Invoice Template
Type "invoice" in the search bar at the top right and hit enter to filter the template options.
3) Choose Your Invoice Template
Browse the templates, including those with automatic tax calculations. Choose one that meets your business requirements and aligns with your company’s branding.
4) Download the Template
Once you’ve selected the ideal template, click on it to open a preview, then hit Create to open it in a new workbook.
5) Customise Your Invoice
Edit the template with your project details, ensuring you include the following:
a) Your business logo (if applicable)
b) Contact details of the business (name, address, phone, and email)
c) Client’s contact information
d) A unique invoice number
e) The invoice date
f) An itemised list of services or products with descriptions, quantities or hours, and rates
g) Subtotals for each service
h) Payment terms, accepted payment methods, and any late fees
I) The payment due date
j) The total amount due, including applicable taxes
6) Save the Invoice
Save it to your computer in both .xlsx and PDF formats after customising it. To prevent alterations, send the PDF version to your client.
7) Send the Invoice
Send the invoice via email or mail, including a brief note highlighting critical details like the payment deadline and total amount due. Refer to a comprehensive invoicing guide for more advice on invoicing and ensuring timely payments.
Elevate your Excel proficiency to new heights with our immersive Microsoft Excel Course. Join now!
How to Create Your Invoice Template in Excel?
To create your Invoice Template in Excel, follow these following steps:
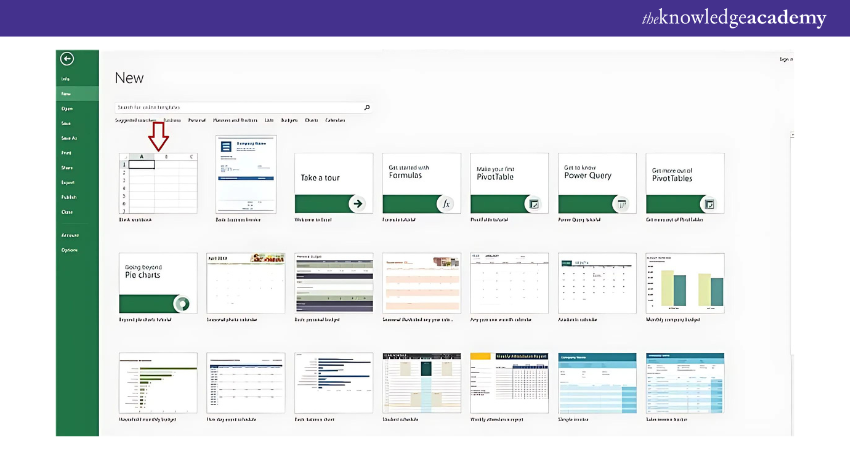
Step 1: Open a new Blank Workbook
Press ‘File’, followed by ‘New Workbook’, to start an empty Excel workbook. If Excel automatically takes you to a blank spreadsheet, you can skip this step.

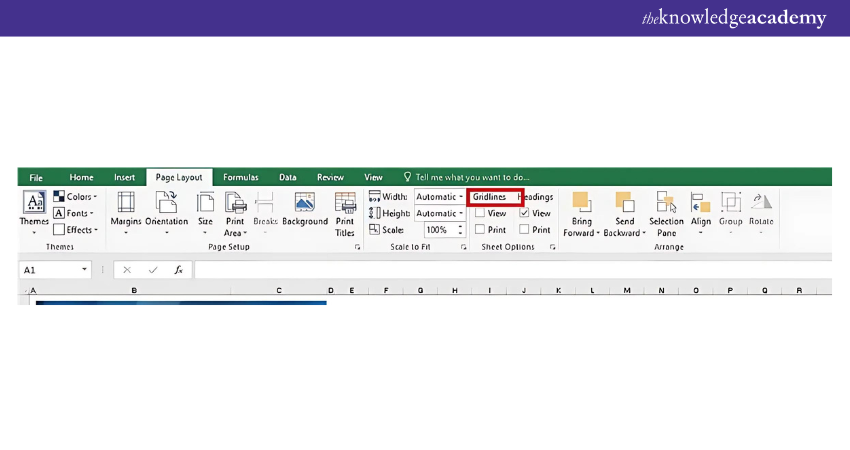
Step 2: Remove Gridlines
Remove the gridlines to get a clean sheet to work with. You can also remove the gridlines once you are done with the invoice. To do this, go to the layout menu and on the view section, uncheck the gridlines box. Here’s a sample Invoice Format in Excel:

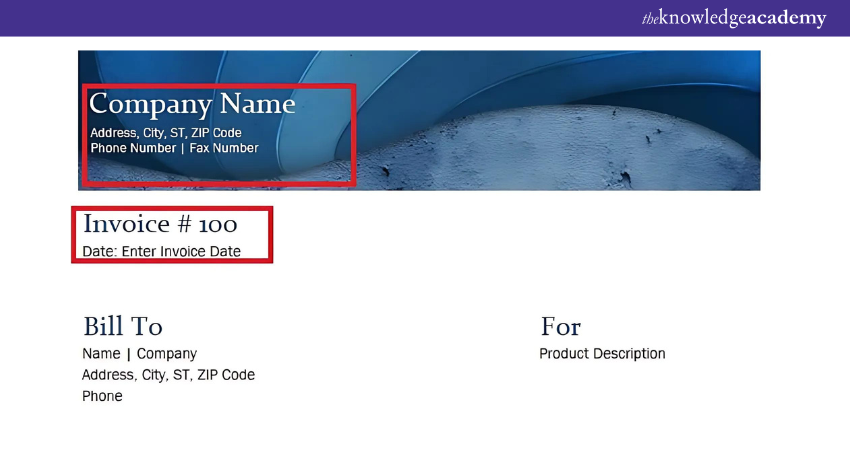
Step 3: Create an Invoice Header
Elements of an invoice header
1) Your company's logo
2) Your company's contact information
3) Different order number
4) Date of the invoice

Step 4: Add Invoice Payment due Date With an Invoice Number
Make three lines on the right side of the header to provide the billing date, payment due date, and specific invoice number. Using Excel, you can also design a unique salary slip format, keeping all available formats and components in mind.
Step 5: Enter the Client’s Contact Details
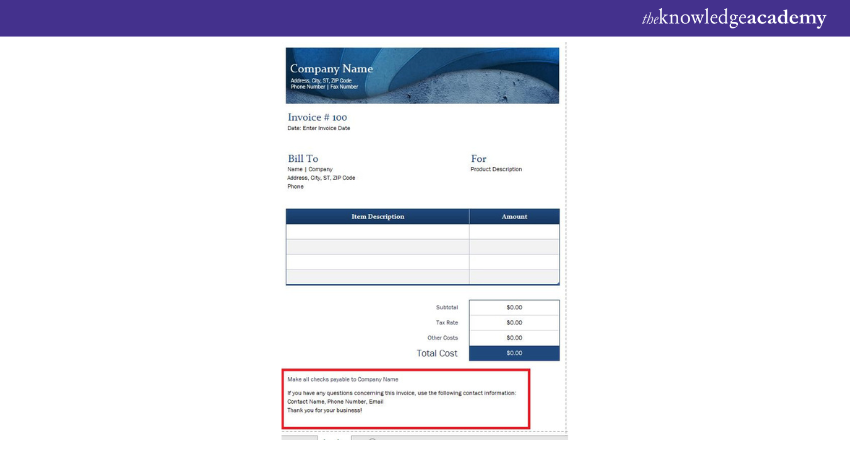
The client's name, city, street address, and phone number are included in the contact information. Include the words "invoice to" or simply "to" before filling out the rest of this form. Follow the reference given below for a sample Invoice Format in Excel:

Step 6: Make a List of all the Services and Products you Offer in Invoice Format in Excel
A categorised list of services and products includes:
1) Name and details of the product or service
2) Cost per unit
3) Amount purchased
4) Taxes and savings
5) Total for each product line
6) Sum due
Step 7: Add the Subtotal
The features of the Excel application itself can help you with mathematical activities, which is a benefit of using it to create invoices. The Excel program's SUM function can add each payment due during the billing period.
Step 8: Include Payment Terms and Other Information
Payment terms, fee policy, and further details must be included at the bottom of the Invoice Format in Excel.
Master Excel for accounting and streamline your financial management— Join our Excel for Accounting Course today!
Automate Invoicing with Invoice Management Systems
Automating your invoicing process with an Invoice Management System (IMS) can simplify billing and ensure accuracy. Follow these steps to get started:
1) Choose the Right IMS: Research an IMS that fits your business needs, such as integration with your accounting software, payment gateways, and invoice templates.
2) Set up Your Account: Create an account with the chosen IMS and input your business details, including your logo, contact information, and payment methods.
3) Create Invoice Templates: Customise invoice templates with your business branding. Include essential information like item descriptions, quantities, rates, and taxes.
4) Enable Recurring Invoices: Set up recurring invoices with predetermined intervals for repeat clients. This feature saves time and ensures consistent billing.
5) Set up Automatic Reminders: Configure automated payment reminders to notify clients before or after the due date.
6) Monitor Payments: Use the IMS dashboard to track sent invoices, monitor payments, and access financial reports for better cash flow management.
Conclusion
Creating an Invoice in Excel is a simple yet effective way to manage your business billing. With customisable templates and easy-to-use features, Excel offers the flexibility to design professional invoices tailored to your needs. Now that you know How to Create an Invoice in Excel, you can streamline your invoicing process, ensuring accuracy and efficiency. Use Excel today to save time and manage your financials with minimal effort.
Get recruited by top companies worldwide by honing Excel skills. Get an opportunity to learn at your own pace. Join our course Microsoft Excel Associate MO200.
Frequently Asked Questions

Excel is widely used across various careers for tasks like data analysis, budgeting, project management, and reporting. Its functions help professionals organise, visualise, and interpret data, making it essential in finance, marketing, and administrative roles.

To earn a Microsoft Excel certification, select your certification level, prepare using study resources, and register for the exam through Microsoft's official partners. Passing the exam demonstrates proficiency in Excel, enhancing career prospects and credibility.

The Knowledge Academy takes global learning to new heights, offering over 30,000 online courses across 490+ locations in 220 countries. This expansive reach ensures accessibility and convenience for learners worldwide.
Alongside our diverse Online Course Catalogue, encompassing 17 major categories, we go the extra mile by providing a plethora of free educational Online Resources like News updates, Blogs, videos, webinars, and interview questions. Tailoring learning experiences further, professionals can maximise value with customisable Course Bundles of TKA.

The Knowledge Academy’s Knowledge Pass, a prepaid voucher, adds another layer of flexibility, allowing course bookings over a 12-month period. Join us on a journey where education knows no bounds.

The Knowledge Academy offers various Microsoft Excel Courses, including Microsoft Excel Masterclass, Business Analytics with Excel and Excel Training with Gantt Charts. These courses cater to different skill levels, providing comprehensive insights into How to Create a Project Plan in Excel.
Our Office Applications Blogs cover a range of topics related to Microsoft Excel, offering valuable resources, best practices, and industry insights. Whether you are a beginner or looking to advance your Excel Skills, The Knowledge Academy's diverse courses and informative blogs have you covered.
Upcoming Office Applications Resources Batches & Dates
Date
 Microsoft Excel Course
Mon 13th Jan 2025
Mon 10th Mar 2025
Mon 7th Apr 2025
Mon 9th Jun 2025
Mon 8th Sep 2025
Mon 1st Dec 2025


 Top Rated Course


 If you wish to make any changes to your course, please


