


 Top Rated Course

We may not have the course you’re looking for. If you enquire or give us a call on 01344203999 and speak to our training experts, we may still be able to help with your training requirements.
Types of Pipeline in Jenkins
Sophia Ellis 09 September 2023This blog titled “Types of Pipeline in Jenkins” is about the different types of Continuous Integration (CI) pipelines that can be created using Jenkins. The blog provides a comprehensive overview of Jenkins Pipeline, which is a suite of plugins that help users implement and integrate continuous delivery pipelines into Jenkins.

Training Outcomes Within Your Budget!
We ensure quality, budget-alignment, and timely delivery by our expert instructors.
Table of Contents
In the modern era of Continuous Integration and Continuous Delivery (CI/CD), Jenkins has emerged as a valuable tool for automating Software Development processes. At the heart of Jenkins' capabilities lies its versatile Pipeline system, which allows developers to define, manage, and automate their workflows. Developers in their early years find it a bit difficult to comprehend the Types of Pipeline in Jenkins. If you happen to be one of them then this blog is for you.
In this blog, we will delve into the various Types of Pipeline in Jenkins, providing a comprehensive understanding of their features, use cases, and benefits.
Table of Contents:
1) What is a Jenkins Pipeline?
2) Why use Jenkins Pipeline?
3) What is Jenkinsfile?
4) What is a CI/CD Pipeline?
5) Different Types of Jenkins Pipeline
6) Best practices for Jenkins Pipelines
7) The Concept of stages in Jenkins Pipeline
8) How to create Jenkins Pipeline?
9) Conclusion
What is a Jenkins Pipeline?
A Jenkins Pipeline is a fundamental concept in Continuous Integration and Continuous Delivery (CI/CD). It serves as an automated and structured approach to orchestrating the entire Software Development Lifecycle, from code integration to deployment. Essentially, a Jenkins Pipeline allows developers to define, manage, and automate a series of steps that transform source code into a deployable software product.
This Pipeline concept eradicates manual interventions, reducing human errors and ensuring consistent and repeatable processes. It encompasses tasks like code compilation, testing, packaging, and deployment, all of which can be seamlessly integrated into a single workflow. Jenkins Pipelines can be defined using two main syntaxes: Declarative and Scripted.
The Declarative Pipeline offers a simpler and more human-friendly approach by using a Domain-Specific Language (DSL) to define stages, steps, and directives. In contrast, the Scripted Pipeline provides more flexibility and customisation through the use of the Groovy Scripting Language.
Jenkins Pipelines can be tailored to specific project requirements, making them a powerful tool for enhancing Software Development practices. They streamline collaboration, enhance quality control, and accelerate the delivery of software by automating the integration and deployment processes.

Why use Jenkins Pipeline?
Using the Pipeline concept in Jenkins, we can create a smooth process for Continuous Integration, testing, and delivery, ensuring that the project is always ready for production. Discussed below are the advantages provided by Jenkins Pipeline:
a) Since Pipeline is implemented as a code, many people can make changes and run the process.
b) If by any chance, the process is interrupted, the Pipeline can resume from where it left off.
c) Pipelines can be resumed if users pause it.
d) The Pipeline is capable of handling complex Pipelines that use loops, forks, or join operations. Multiple jobs can be executed easily through this way.
e) Pipelines can integrate various plugins as well.
f) The code for the Pipeline is stored in a text file called the Jenkinsfile, which can be checked into Source Code Management (SCM).
What is Jenkinsfile?
A Jenkins Pipeline is created using a special text file called a Jenkinsfile. This file is written in a programming language called Groovy, and it can be edited through a special editor or the configuration page in the Jenkins software. The Jenkinsfile allows developers to edit or access or cross check the code anytime.
What is a CI/CD Pipeline?
CI/CD Pipeline is a series of steps needed to send out a new software update. It's a way of automating the rollout of software at every stage of making it. Automating the steps from creating code to testing, deploying, and monitoring it can help companies make better and code. It is possible to execute every step of CI/CD Pipeline, but its real value depends on the automation capabilities.
Different Types of Jenkins Pipeline
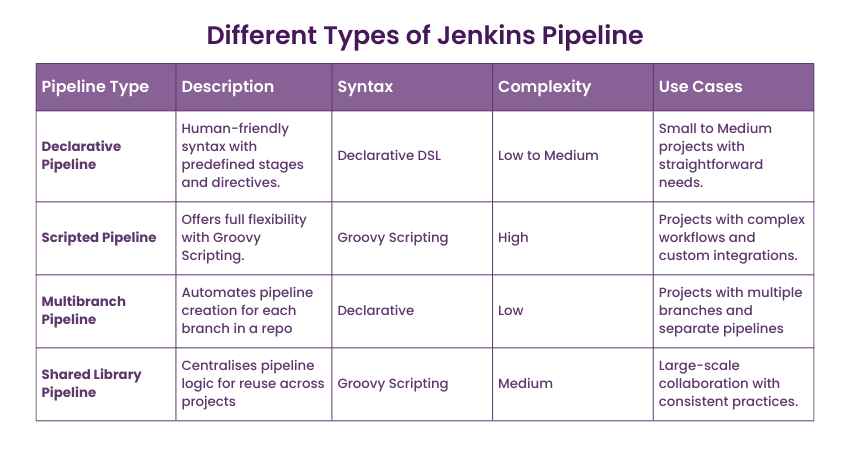
Jenkins Pipelines offer a structured and efficient approach to orchestrating the build, test, and deployment processes.It thereby enhances collaboration, reduces error, and accelerates software delivery. There are several Types of Jenkins Pipelines, each designed to cater to specific needs and scenarios. In this section, we'll discuss different Types of Pipelines in Jenkins and their unique characteristics:
a) Declarative Pipeline
The Declarative Pipeline is designed to provide a simplified and human-friendly syntax for defining Pipelines. It uses a Domain-Specific Language (DSL) to outline the entire Pipeline's structure in a series of stages, steps, and directives. This type of Pipeline promotes readability and maintainability by offering a streamlined approach to defining tasks. It also comes with built-in error checking and validation, reducing the chances of common mistakes.
The Declarative Pipeline is an excellent choice for projects with straightforward build, test, and deployment requirements, as it enables developers to quickly define and manage their Pipelines with ease.
The following are the key benefits of Declarative Pipeline:
a) Simplicity: The Declarative Pipeline's syntax abstracts complex operations, enabling developers to focus on defining stages and steps without getting bogged down in scripting details.
b) Error prevention: Built-in error checking and validation help prevent common mistakes, enhancing the reliability of Pipeline definitions.
c) Structured clarity: The defined structure ensures easy readability and maintenance, especially for those new to Jenkins Pipelines.
For startups or small teams working on projects with straightforward development processes, the Declarative Pipeline proves invaluable. Its simplified syntax and predefined structure enable quick Pipeline setup. Imagine a web development team creating a portfolio website. The Declarative Pipeline can easily handle tasks such as fetching code from Version Control, building the website, running tests, and deploying it to a hosting platform.
Elevate your DevOps expertise with our Jenkins Training for Seamless Continuous Integration! Join today!
b) Scripted Pipeline
In contrast to the Declarative Pipeline's structured approach, the Scripted Pipeline offers a higher degree of flexibility and customisability. It allows developers to define Pipeline steps using the Groovy Scripting Language. This type of Pipeline is particularly advantageous for projects with complex workflows, unique integration needs, or external tool dependencies.
The Scripted Pipeline empowers developers to exercise complete control over each step of the Pipeline, making it an ideal choice for intricate projects that demand precise customisation and integration with external tools or scripts.
The Scripted Pipeline provides complete control over every aspect of the Pipeline. This type of Pipeline is suited for projects with intricate customisations, integrations with external tools, and unique requirements. The key benefits of Scripted Pipeline are mentioned below:
a) Flexibility: The ability to use Groovy Scripting grants developer complete control over Pipeline execution, enabling them to implement custom logic and integrate with external systems.
b) Custom workflows: Ideal for projects demanding unique workflows that involve complex operations, external APIs, or advanced conditional logic.
c) External integration: The Scripted Pipeline can seamlessly integrate with external tools, databases, and APIs, facilitating diverse automation scenarios.
In complex projects where specific integrations, testing scenarios, and custom tools are vital, the Scripted Pipeline is a valuable tool. Consider a Machine Learning project that involves data preprocessing, model training, and deployment. A Scripted Pipeline can accommodate custom scripts, external tools, and intricate testing frameworks, ensuring each step is meticulously executed and validated.
c) Multibranch Pipeline
The Multibranch Pipeline is tailored for projects with multiple branches in Version Control Repositories. It automates the creation of individual Pipelines for each branch, ensuring that code changes in different branches are tested and deployed independently. This approach is viable when dealing with feature branches, bug fixes, and different development streams.
The Multibranch Pipeline simplifies the management of various branches by automatically adapting the Pipeline to the specific context of each branch, enabling efficient testing and deployment across different code streams.
The Multibranch Pipeline caters to projects with multiple branches in Version Control. It automatically creates individual Pipelines for each branch, allowing parallel testing and deployment. It is an efficient solution for projects with different development streams, feature branches, and bug fixes. Some of its key benefits are discussed below:
a) Automated branch Pipelines: The Multibranch Pipeline automatically generates Pipelines for every branch, simplifying the management of multiple development streams.
b) Parallel testing: Developers can simultaneously test changes across various branches, ensuring efficient and continuous integration of code.
c) Version Control integration: Seamlessly integrates with Version Control Systems like Git, providing a holistic view of code changes.
In larger software projects with multiple development branches, the Multibranch Pipeline proves its worth. Think of a software company working on an application with multiple feature branches. Each branch undergoes continuous integration and testing using its own isolated Pipeline. This prevents conflicts and ensures that code changes are tested thoroughly before merging.
d) Shared Library Pipeline
Shared Library Pipelines address the need for reusable and standardised Pipeline logic across multiple projects. By creating a shared library of Pipeline code, development teams can ensure consistency in practices and reduce code duplication. This approach centralises the management of Pipeline logic, making it easier to implement changes, improvements, or updates across various projects.
Shared Library Pipelines promote collaboration, enhance code sharing, and provide a uniform approach to building and deploying applications across the organisation.
The Shared Library Pipeline promotes code reuse and standardisation by allowing the centralisation of Pipeline logic and scripts. It enables teams to define common Pipeline functions, stages, and steps, ensuring consistency across projects. Its key benefits include:
a) Reusability: Shared Library Pipelines allow teams to reuse predefined Pipeline logic, reducing duplication of effort and promoting standard practices.
b) Consistency: Standardised Pipeline code ensures uniform processes across projects, enhancing collaboration and maintainability.
c) Centralised updates: Updates to Pipeline logic can be applied centrally, benefiting all projects that use the shared library.
In enterprises with numerous development teams and diverse projects, the Shared Library Pipeline offers substantial benefits. Consider a financial institution with various applications. A Shared Library Pipeline ensures consistent security checks, compliance testing, and deployment practices across all projects. Changes made to the Shared Library automatically propagate to all projects, maintaining uniformity and reducing the risk of errors.
Choosing the right Pipeline type for your project
Selecting the appropriate Jenkins Pipeline type is a critical decision that can impact your project's efficiency and success. Each Pipeline type – Declarative, Scripted, Multibranch, and Shared Library – brings distinct benefits and capabilities to the table. Your choice should align with your project's complexity, team expertise, and workflow requirements.
Declarative Pipeline
For projects with straightforward build, test, and deployment needs, the Declarative Pipeline is a natural fit. Its simplified syntax and built-in error checking makes it ideal for developers seeking an efficient way to automate their Pipelines without delving into extensive scripting. This Pipeline type encourages a structured approach that's easy to understand and maintain, making it suitable for smaller projects or those with limited customisation demands.
Scripted Pipeline
When your project's requirements extend beyond the capabilities of a predefined structure, the Scripted Pipeline offers unparalleled flexibility. If your team possesses expertise in Groovy scripting, this Pipeline empowers you to finely control every step of the CI/CD process. You can integrate external tools, write custom logic, and orchestrate intricate workflows tailored to your project's unique needs.
Multibranch Pipeline
In scenarios where your project involves multiple branches with independent development streams, the Multibranch Pipeline excels. It dynamically creates individual Pipelines for each branch, enabling seamless testing and deployment across different code versions. This Pipeline type streamlines the management of diverse code bases, ensuring efficient coordination between branches without the need for manual intervention.
Shared Library Pipeline
For organisations focused on standardising practices across various projects, the Shared Library Pipeline is a strategic choice. By centralising Pipeline logic and reusing code, you can ensure consistency and collaboration while minimising redundancy. This Pipeline type suits large-scale collaboration, enabling teams to adhere to best practices and maintain a unified approach to CI/CD processes.
Best practices for Jenkins Pipelines
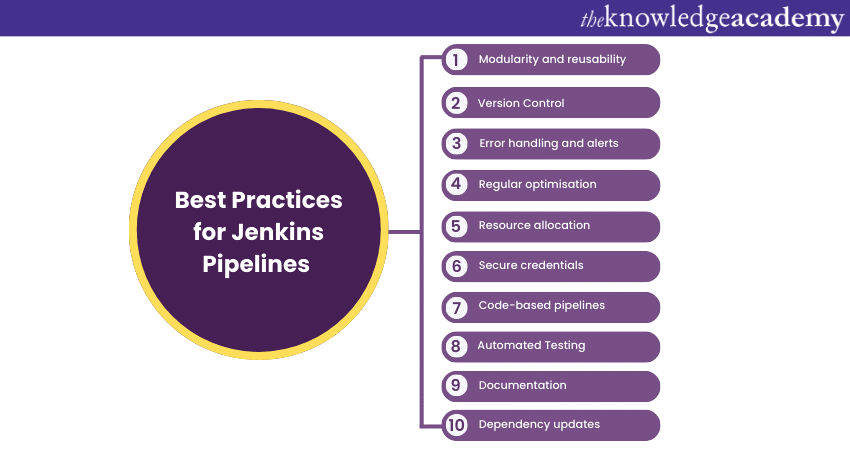
Jenkins Pipelines are the backbone of efficient software delivery. To ensure success, follow these best practices:
a) Modularity and reusability: Break Pipelines into smaller stages for reusability and easier maintenance.
b) Version Control: Store Pipeline definitions in Version Control for tracking changes and collaboration.
c) Error handling and alerts: Implement error handling and notifications for graceful issue resolution.
d) Regular optimisation: Review and optimise Pipelines to remove bottlenecks and redundancies.
e) Resource allocation: Use agent labels to run tasks on suitable nodes, optimising resources.
f) Secure credentials: Store sensitive data securely using Jenkins' credential management.
g) Code-based Pipelines: Define Pipelines as code for consistency and versioning.
h) Automated testing: Integrate automated testing to ensure code quality before deployment.
i) Documentation: Maintain clear documentation for onboarding and troubleshooting.
j) Dependency updates: Regularly update tools and dependencies for bug fixes and security patches.
Stages in Jenkins Pipeline
There are mainly two stages for Declarative Pipelines that are discussed below:
Parallel stages
In Declarative Pipelines, you can execute variable number of stages within stages, and they can happen at the same time. This is often used for tasks like building and testing on different platforms. If there's any problem in any of these parallel stages, you can abort them using the "failFast" option.
Sequential stages
The sequential stages feature widens the scope of parallel stages by letting you put multiple stages inside each parallel branch. Using a sequential stage is a great choice when a developer wants more visibility of the order of the stages and the way it is carried out.
The nested stage feature in declarative pipelines makes it simpler to track the lifeline of a pipeline. It also lets developers see the different set of logical states more clearly. The great thing is that Jenkins evolves quickly these stages, which is the core of CI/CD. This means that future updates will likely make it even easier to test and deploy applications.
How to create Jenkins Pipeline?
Now that we've learned the basics of Jenkins Pipelines, let's move on to creating our first Pipeline. Before you start, make sure to install Jenkins on your system. As we mentioned earlier, you can define a Pipeline using either Scripted or Declarative syntax. Next, we'll show you how to do both, and we'll provide examples for each:
How to create a Scripted Jenkins Pipeline?
To start creating your first Pipeline in Jenkins after starting it and logging in, follow these steps:
a) Go to the Jenkins dashboard and click on "New Item" in the menu on the left. (image)
b) Next, give your Pipeline a name, choose "Pipeline" from the options, and then click the "OK" button. (image)
c) Next, go to “Pipeline” tab, and click “Definition”, select “Pipeline script” from the dropdown menu. (image)
d) The next thing is to create your Pipeline code using the Jenkins web interface. Let's take a look at an example of a Pipeline in Jenkins.
e.You need to copy and paste the same in UI as shown below-
(image)
F. Click on “Save” and finish the process.
(image)
|
pipeline { |
e.You need to copy and paste the same in UI as shown below-
(image)
F. Click on “Save” and finish the process.
(image)
How to create a Declarative Jenkins Pipeline?
To create a Declarative Pipeline, you need to have a Jenkinsfile in place.
(IMAGE)
To create a Declarative Pipeline, follow step 1 and step 2 from the Scripted Pipeline section discussed above, and then proceed with the following steps.
a) Go to the Pipeline section, and choose "Pipeline script from SCM" from the options in the Definition dropdown menu. (image)
b) Select Git from the SCM dropdown menu. (image)
c) Now, you will find an option to put your Repository URL and credentials. (image)
d) Now, you can set the branch or keep it blank for any branch. In the script path, you need to put your Jenkinsfile which is present in your repository. Click on Save and your Declarative Pipeline is ready for use. (image)
e) You are now all set with your Pipelines, you can execute the same from your Jenkins UI. To execute, select your Pipeline and click on Build Now link on the left panel. (image)
f) After you run the Pipeline, you can see the results displayed on the stage view as given below. (image)
g) You will be able to view the console output for the build as well. It would display the print statements and errors (if any) which will be helpful for debugging. (image)
Conclusion
Jenkins Pipelines offer a versatile and powerful solution for automating software delivery processes. By understanding the different Types of Pipeline in Jenkins Declarative, Scripted, Multibranch, and Shared Library – developers can tailor their workflows to project requirements. Whether seeking simplicity, customisation, or scalability, Jenkins Pipelines empower teams to achieve efficient and consistent CI/CD practices.
Elevate your DevOps expertise with our Certified DevOps Professional (CDOP) Training and unlock the path to seamless Software Delivery.
Frequently Asked Questions
Upcoming Business Analysis Resources Batches & Dates
Date
 Jenkins Training for Continuous Integration
Jenkins Training for Continuous Integration
Thu 9th Jan 2025
Jenkins Training for Continuous Integration
Thu 6th Mar 2025
Jenkins Training for Continuous Integration
Thu 8th May 2025
Jenkins Training for Continuous Integration
Thu 3rd Jul 2025
Jenkins Training for Continuous Integration
Thu 4th Sep 2025
Jenkins Training for Continuous Integration
Thu 6th Nov 2025
 If you wish to make any changes to your course, please


