


 Top Rated Course

We may not have the course you’re looking for. If you enquire or give us a call on 01344203999 and speak to our training experts, we may still be able to help with your training requirements.
What is an Isometric Drawing? Explained
Sienna Roberts 15 November 2024Unlock the world of Isometric Drawing in this comprehensive blog, covering its definition, historical evolution, practical creation of an isometric cube, a comparison with one-point perspective, advantages, and real-world examples.

Training Outcomes Within Your Budget!
We ensure quality, budget-alignment, and timely delivery by our expert instructors.
Table of Contents

Isometric Drawing is a powerful method in the realm of technical and artistic representation, offering a clear and precise way to portray three-dimensional objects on a two-dimensional surface.
This blog explores What is an Isometric Drawing, delving into its history, the practical process of drawing an isometric cube, and a comparative analysis with a one-point perspective. Additionally, we'll uncover the advantages of using Isometric Drawings and provide practical examples to illustrate their diverse applications.
Table of Contents
1) What is an Isometric Drawing?
2) Isometric Drawing history
3) How to draw an isometric cube?
4) Isometric Drawing vs one-point perspective
5) Advantages of Isometric Drawing
6) Examples of Isometric Drawing
7) Conclusion
What is an Isometric Drawing?
An Isometric Drawing is a type of three-dimensional representation of an object or scene in which the three principal dimensions (length, width, and height) are presented at equal angles and distorted in such a way that lines parallel to these axes appear in their true lengths, and lines that are not parallel to these axes appear in their true lengths. In other words, an Isometric Drawing allows you to represent a three-dimensional object in two dimensions, with the angles and proportions preserved.
The term "isometric" comes from the Greek words "isos," meaning equal, and "metron," meaning measure. Isometric Drawings are often used in technical and engineering drawings to represent objects, buildings, or systems with a sense of three-dimensionality. These drawings are particularly useful for conveying a clear understanding of how different parts of a structure fit together.

Isometric Drawing history
The history of Isometric Drawing can be traced back to the early 20th century, and it has evolved over time in response to the needs of various industries. Here are some key points in the history of Isometric Drawing:
1) Early 20th century: Isometric Drawing gained popularity in the early 20th century as a way to represent three-dimensional objects in a more visually intuitive manner than traditional orthographic projections. The method became widely used in technical and engineering drawings.
2) 1911 - Patent by William F. Prout: The concept of Isometric Drawing was patented by William F. Prout in 1911. Prout's patent described a method for producing "technical pictures," which included the use of isometric projection to create a more realistic representation of objects.
3) World War II: Isometric Drawings became particularly useful for technical and engineering illustrations during World War II. The method allowed for clearer communication of design and construction details, especially in the production of technical manuals and drawings for military equipment.
4) Post-World War II: After the war, the use of Isometric Drawing continued to expand across various industries, including architecture, engineering, and manufacturing. It became a standard tool for representing three-dimensional objects in a way that was both accurate and easy to understand.
5) Computer-Aided Design (CAD): The advent of computer-aided design in the latter half of the 20th century further transformed the way Isometric Drawings were created and utilised. CAD software made it easier to generate and manipulate isometric views, contributing to increased efficiency in design and drafting processes.
6) Standardisation: Over time, certain standards for Isometric Drawing practices have emerged, ensuring consistency and clarity in technical drawings. Various industries may have specific guidelines for creating Isometric Drawings to facilitate communication and understanding among professionals.
Level up your artistry! Join our Drawing Masterclass for an inspiring journey into the world of creativity!
How to draw an isometric cube?
Drawing an isometric cube involves representing a three-dimensional cube in a two-dimensional space while maintaining equal angles for all three axes. Here's a step-by-step guide on how to draw an isometric cube:
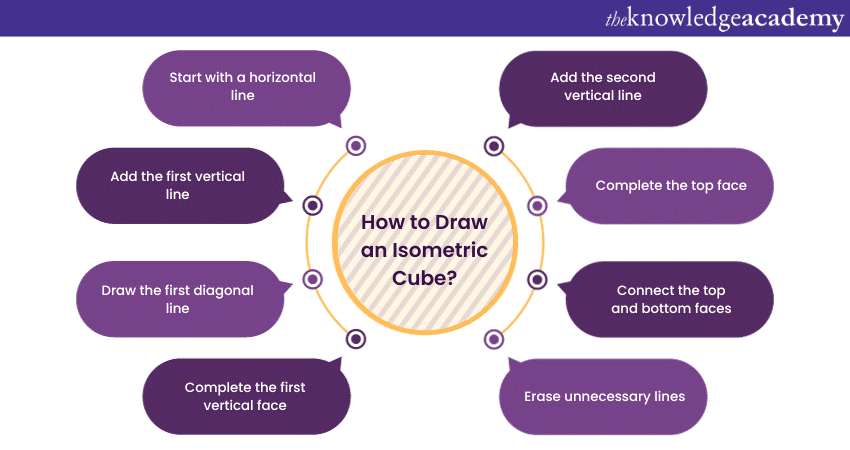
1) Start with a horizontal line: Draw a horizontal line on your paper. This will be the base of the cube.
2) Add the first vertical line: From one end of the horizontal line, draw a vertical line extending upward. The length of this line will be one side of your cube.
3) Draw the first diagonal line: From the top end of the vertical line, draw a diagonal line going down and to the right. The length of this line will be the same as the first vertical line.
4) Complete the first vertical face: Connect the end of the diagonal line to the starting point of the horizontal line, forming the first vertical face of the cube.
5) Add the second vertical line: From the end of the horizontal line opposite the first vertical line, draw a vertical line upward. This line should be parallel to the first vertical line.
6) Complete the top face: Connect the top ends of the two vertical lines with a horizontal line, completing the top face of the cube.
7) Connect the top and bottom faces: Connect the corresponding vertices of the top and bottom faces with diagonal lines, forming the remaining vertical faces of the cube.
8) Erase unnecessary lines: Erase any unnecessary construction lines within the cube. You should be left with a clean isometric representation of a cube.
Ready to master design patterns? Elevate your skills with our Design Patterns Training. Register now for a transformative learning experience!
Isometric Drawing vs one-point perspective
Isometric Drawing and one-point perspective are both methods used in art and technical drawing to represent three-dimensional objects, but they differ in their approach to creating a sense of depth and space.
Isometric Drawing
1) Equal Dimensions: All three axes (length, width, and height) are equally foreshortened. Lines parallel to these axes are drawn at equal angles (typically 30 degrees).
2) Lack of Depth: Isometric Drawings lack the depth and vanishing points associated with perspective drawings. Parallel lines remain parallel and do not converge.
3) Simplicity and Clarity: Isometric Drawings are known for their simplicity and clarity. Objects are represented without distortion along any axis.
4) Common in Technical Drawings: Commonly used in technical drawings, architectural illustrations, and engineering diagrams. Useful for representing objects with accuracy and clarity.
One-point perspective
1) Vanishing Point: Dependent on a single vanishing point on the horizon. Lines converge towards this vanishing point, giving a sense of depth.
2) Foreshortening: Objects closer to the viewer appear larger, and those farther away appear smaller. Vertical lines remain parallel, while horizontal lines converge.
3) Realism and Depth: One-point perspective is often used in realistic and naturalistic art. Creates a more natural sense of depth and space.
4) Common in Fine Art: Widely used in fine art, especially in paintings and drawings, to create realistic scenes. Emphasises the illusion of depth and spatial relationships.
Unleash your creativity with our Logo Design Training! Elevate your skills and craft impactful logos!
Advantages of Isometric Drawing
Isometric Drawing offers several advantages, particularly in technical and engineering contexts, where accurate and clear representation of three-dimensional objects is essential. Here are some of the advantages of Isometric Drawing:

1) Clarity and understanding: Isometric Drawings offer a straightforward and clear representation of three-dimensional objects. This simplicity aids in conveying the spatial relationships between different elements without the complications introduced by perspective drawing.
2) Accuracy in measurement: Isometric Drawings allow for precise measurement of distances and proportions along all three axes. This accuracy is crucial in technical and engineering contexts where precise design specifications are required.
3) Simplicity in construction: Constructing Isometric Drawings is generally simpler compared to more intricate perspective drawings. The method is less mathematically complex, making it more accessible for manual drafting or with the use of basic drafting tools.
4) Consistency across views: Isometric Drawings maintain consistency when representing the same object from different angles. The proportions and relationships between dimensions remain constant, contributing to a standardised representation.
5) Technical communication: Isometric Drawings are a common language in technical and engineering fields. They serve as effective tools for communicating design concepts, plans, and construction details among professionals, facilitating a shared understanding of complex structures.
6) Ease of visualisation: Isometric Drawings provide an accessible means for individuals to visualise how various components fit together in three-dimensional space. This visualisation aids in problem-solving and decision-making during the design and planning stages.
7) Reduced distortion: Unlike some perspective drawings that can introduce distortion, Isometric Drawings aim to maintain a more accurate representation of an object. This lack of distortion is valuable in situations where precise depiction is necessary.
Examples of Isometric Drawing
Isometric Drawings are commonly used in various fields to represent three-dimensional objects. Here are a few examples of Isometric Drawings:
1) Technical illustrations: Isometric Drawings are often used in technical manuals and instructional materials to illustrate the assembly or disassembly of machinery and equipment. These drawings help users understand the structure and function of complex systems.
2) Architectural design: Architects use Isometric Drawings to represent buildings and structures. These drawings provide a clear view of the spatial relationships between different architectural elements, such as rooms, stairs, and other features.
3) Engineering diagrams: Engineers use Isometric Drawings to depict components, mechanisms, and systems. These drawings are valuable for planning and communicating the design of mechanical and structural elements.
4) Product design: Isometric Drawings are commonly employed in product design to showcase the form and function of consumer goods. Designers use them to present a detailed view of products from different angles.
5) Piping and plumbing layouts: In industrial and construction settings, Isometric Drawings are used to illustrate the layout of pipes and plumbing systems. These drawings help in planning and installation by providing a clear representation of how the components fit together.
Ignite your creativity with Sketchbook Essential Training! Uncover the secrets to expressive sketching. Join now and bring your ideas to life!
Conclusion
In conclusion, this blog aims to provide a comprehensive understanding of Isometric Drawing—from its historical roots to its practical applications. By exploring its advantages and presenting illustrative examples, readers will gain insight into the importance of Isometric Drawing as a valuable tool in fields ranging from engineering to design.
Join our Animation and Design Training for a journey into the world of dynamic creativity!
Frequently Asked Questions
Upcoming Office Applications Resources Batches & Dates
Date
 Animation Course
Animation Course
Fri 3rd Jan 2025
Animation Course
Fri 7th Mar 2025
Animation Course
Fri 2nd May 2025
Animation Course
Fri 4th Jul 2025
Animation Course
Fri 5th Sep 2025
Animation Course
Fri 7th Nov 2025
 If you wish to make any changes to your course, please


