


 Top Rated Course

We may not have the course you’re looking for. If you enquire or give us a call on 01344203999 and speak to our training experts, we may still be able to help with your training requirements.
How to Use Windows Server Migration Tools?
Eliza Taylor 18 February 2025Unlock the Power of Windows Server Migration Tools: In this comprehensive blog, you'll delve deep into the core concepts, including how to prepare for migration, install the tools, carry out seamless server migration, and complete post-migration tasks. Your journey to mastering Windows Server Migration Tools begins here, ensuring efficient and reliable server migrations.
Training Outcomes Within Your Budget!
We ensure quality, budget-alignment, and timely delivery by our expert instructors.
Are you planning to migrate your Windows Server to a new hardware or operating system? Windows Server Migration Tools can simplify the process and help you seamlessly transfer your roles, features, data, and settings from one server to another.
These tools help you transfer your data from one server to another and ensure the process is smooth and does not affect the company's data. In this blog, we will guide you through using Windows Server Migration Tools effectively and the steps you need to follow to ensure seamless migration.
Table of Contents
1) Understanding Windows Server Migration Tools
2) What is Windows Server Migration Tools?
a) Preparing for migration
b) Installing Windows Server Migration Tools
c) Performing server migration
d) Post-migration tasks
3) Conclusion
Understanding Windows Server Migration Tools
According to the Microsoft Windows Server Administration Essentials Guide, Windows Server Migration Tools are the utilities Microsoft provides to simplify migrating server roles, features, data, and settings between Microsoft Windows Server features. These tools enable seamless transitions to new hardware or newer versions of Windows Server, minimising disruptions.
The key aspect of understanding the migration tools is knowing their capabilities. They support migrating various server roles and features like Active Directory, DHCP, DNS, Hyper-V, and more. This allows for transferring user accounts, group policies, file shares, and virtual machines.
It's important to note that these tools are designed for Windows Server environments and not for cross-platform migrations, as specified in the Windows Server Guide. Compatibility between the source and target servers should be assessed, and a detailed plan should be created.
Administrators can streamline the process, minimise downtime, and preserve configurations by using the migration tools. These provide a convenient solution for efficient server migration within the Windows Server ecosystem.
What is Windows Server Migration Tools?
You must follow the below steps to effectively migrate the Windows servers.
Preparing for migration

Before embarking on this process using Windows Server Migration Tools, thorough preparation is essential to ensure a successful and smooth transition. This section will delve into the key steps involved in preparing for migration.
a) Gathering requirements: Start by clearly defining the requirements and objectives of the project. Identify the server roles, features, data, and settings that need to be migrated. Consider the timeline, budget, and any specific constraints or limitations.
b) Assessing compatibility: Evaluate the compatibility between the source and target servers. Ensure that the target server's hardware and operating system requirements are met. Verify if any specific dependencies or prerequisites exist for the server roles and features being migrated.
c) Creating a migration plan: Develop a comprehensive plan that clearly outlines the entire process from start to finish. Define the sequence, prioritise the server roles and features, and establish a timeline for each step. Consider potential risks and challenges, and devise contingency plans to mitigate unforeseen issues.
Which Edition is Right for You? Compare Windows Server Standard and Datacenter Now!
d) Backing up data: Before initiating the migration, it is crucial to back up all critical data and configurations from the source server. This ensures that in case of any unforeseen complications, data loss can be minimised, and the system can be restored to its previous version if necessary.
e) Communication and coordination: Effective communication and coordination are vital during migration. Ensure all stakeholders know these plans and any potential disruptions or downtime. Coordinate with relevant teams, such as network administrators and application owners, to address any interdependencies or specific requirements.
f) Informing users: If the migration is likely to impact users or services, it is important to communicate the upcoming changes in advance. Provide clear instructions and timelines to minimise user disruptions and ensure a smooth transition.
g) Testing in a lab environment: Consider setting up a lab environment to test the migration process before implementing it in a production environment. This allows one to identify and resolve potential issues or conflicts, ensuring a higher likelihood of success during the process.
Take your IT career to new heights with our Identity With Windows Server 2016 M55344AC course. Sign up now and unlock your potential!
Installing Windows Server Migration Tools
Installing these tools on both the source and target servers is the first step to starting the server migration process. This section will offer you a detailed explanation of how to download and install these tools.
a) Downloading the tools: Visit the official Microsoft website or the Windows Server Update Services (WSUS) to download the migration tools package. Ensure you download the version compatible with the operating system and architecture of both the source and target servers.
b) Extracting the tools: Once the download is complete, extract the contents of the package to a location on the source server. This will create a folder containing the necessary tools and files for the process.
c) Running the Installation Wizard: Locate the extracted folder and run the installation wizard to initiate the installation process. The wizard will then guide you through the necessary steps to install these tools.
d) Accepting the license terms: During the installation process, you will be asked to review and accept the Microsoft Windows Server licensing terms. Read through the terms carefully and, if in agreement, accept them to proceed with the installation.
e) Selecting the installation type: The installation wizard will provide options for the installation type. Choose the appropriate option based on your requirements. You may have the option to perform a typical installation or customise the installation to select specific features.
f) Specifying the installation location: Specify the destination folder where you want to install these tools. The default location is usually selected, but you can choose a different location if desired.
g) Completing the installation: Once you have made the necessary selections, proceed with the installation by clicking on the "Install" or "Next" button. The installation process is now set to begin, and you may need to wait for a few moments for it to complete.
h) Verifying the installation: After the installation is finished, it is advisable to verify that the migration tools are installed correctly. Ensure that the necessary files and tools are present in the installation directory.
i) Repeat the installation process on the target server: Installing the migration tools on the target server is essential to conduct this process successfully. Repeat the installation process described above on the target server following the same steps.
Elevate your IT expertise with our Administering Microsoft Endpoint Configuration Manager 55348AC course. Register today and master the art of endpoint management!
Performing server migration
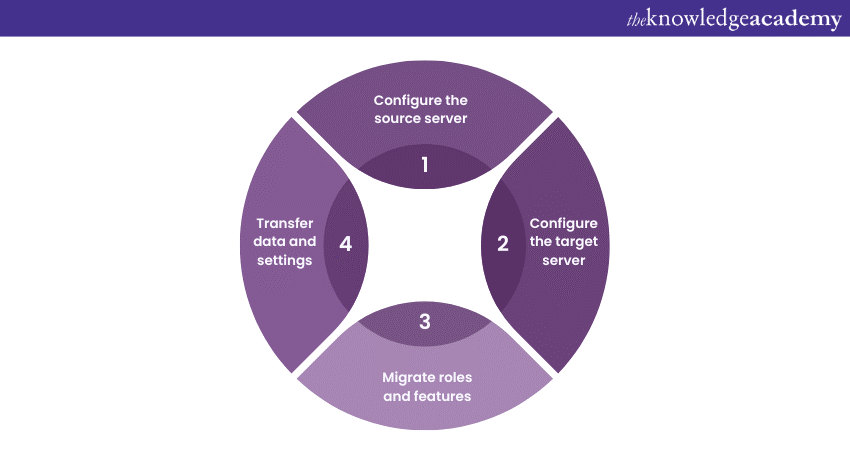
Once you have installed Windows Server Migration Tools on both the source and target servers, you are ready to proceed with the process. This section will guide you through the steps involved in configuring the source and target servers, migrating roles and features, and transferring data and settings.
a) Configure the source server: Begin by configuring the source server for migration. This involves preparing the server roles, features, data, and settings you intend to migrate. Ensure the source server is stable and any necessary updates or patches have been applied.
b) Configure the target server: Next, configure the target server to receive the migrated roles, features, data, and settings. Ensure that the target server meets the hardware and software requirements for the migrated components. Install the necessary prerequisites and updates to align the target server with the source server.
c) Migrate roles and features: Using these tools, migrate the desired server roles and features from the source server to the target server, keeping in mind the difference between WSUS and SCCM. Follow the step-by-step instructions provided to select the roles and features you wish to migrate. These tools will handle the transfer of configurations, settings, and dependencies associated with the selected roles and features.
d) Transfer data and settings: After migrating the roles and features, transfer the relevant data and settings from the source server to the target server. This may involve migrating user accounts, group policies, file shares, databases, and other critical data. Use these tools to select and transfer the necessary data, ensuring a smooth transition to the target server.
Throughout this process, it is essential to monitor the status and progress closely. The tools provide real-time feedback on the process, highlighting any errors or warnings that may require attention. Address any issues promptly to ensure a successful migration.
It is advisable to perform post-migration tests and checks to verify the integrity and functionality of the migrated roles, features, data, and settings. Test the accessibility of services, ensure user accounts function correctly, and validate that applications and databases work as expected on the target server.
If there are any errors or issues during the process, consult the documentation and resources provided by Microsoft for troubleshooting and resolving common problems, as detailed in the Windows Server Troubleshooting Guide. Take advantage of online forums and communities to seek assistance from experts and fellow administrators who may have encountered similar challenges.
Are you ready to take control of your organisation's IT Infrastructure and Asset Management? Join our Administering Configuration Manager - Fundamentals And Asset Management (55313AC) course today!
Post-migration tasks
After completing the process using Windows Server Migration Tools, there are several important post-migration tasks that should be carried out to ensure the smooth functioning of the migrated roles, features, data, and settings.
a) Verification and testing: Once the migration is complete, it is crucial to thoroughly verify and test the migrated components on the target server. Test the accessibility of services, applications, and databases to ensure they function as expected. Validate user accounts, permissions, and group policies to ensure proper functionality.
b) System optimisation: Optimise the target server to maximise its performance and efficiency. Review the server configurations and settings, ensuring they align with best practices and performance guidelines. This may involve adjusting resource allocation, network settings, and security configurations to optimise the server's performance in its new environment.
c) Monitoring and maintenance: Implement a robust monitoring and maintenance strategy for the migrated server. Configure monitoring tools and alerts to keep track of system performance, resource utilisation, and any potential issues. Establish a regular maintenance schedule to apply updates, patches, and security fixes to the server to ensure its stability and security.
d) Documentation and knowledge transfer: Document the migration process, including any challenges, workarounds, or configurations implemented during the process. This documentation will be valuable for future reference and knowledge transfer to other team members or administrators. Include details such as the migration plan, specific steps, and any post-migration tasks performed.
e) User communication and training: Inform users and stakeholders about the completion of the process and any changes or new procedures they need to be aware of. Provide training or informational materials to help users adapt to the migrated environment. Address any user concerns or questions to ensure a smooth transition and minimise any potential disruptions.
f) Backup and disaster recovery: Implement a comprehensive backup and disaster recovery strategy for the migrated server. Regularly back up critical data, configurations, and settings to ensure they can be restored if the systems fail or data is lost due to theft or hacking. Test the backup and recovery procedures to ensure their effectiveness and reliability.
g) Ongoing support and troubleshooting: Continue to support users and address any post-migration issues or concerns that may arise. Troubleshoot and resolve any unexpected problems or conflicts promptly. Engage with the Microsoft support community or seek assistance from experts if needed.
Stay compliant and save costs! Download the Microsoft Windows Server Licensing Guide and find out the best options for your Windows Server deployment.
Conclusion
Windows Server Migration Tools streamline server migration, ensuring a smooth transition with minimal disruptions. Thorough preparation, careful configuration, and post-migration tasks guarantee the stability and functionality of the migrated components. With these tools, organisations can upgrade their server infrastructure efficiently, maintaining system integrity and performance.
Supercharge your IT skills with our Microsoft Windows Server Training courses. Sign up now!
Upcoming Microsoft Technical Resources Batches & Dates
Date
 Identity with Windows Server 2016 M55344AC
Identity with Windows Server 2016 M55344AC
Mon 5th May 2025
Identity with Windows Server 2016 M55344AC
Mon 4th Aug 2025
Identity with Windows Server 2016 M55344AC
Mon 6th Oct 2025
Identity with Windows Server 2016 M55344AC
Mon 8th Dec 2025
 If you wish to make any changes to your course, please


