We may not have the course you’re looking for. If you enquire or give us a call on +41 315281584 and speak to our training experts, we may still be able to help with your training requirements.
We ensure quality, budget-alignment, and timely delivery by our expert instructors.

Imagine you're managing a massive spreadsheet of customer orders, and somehow, someone has entered "purple" as a quantity and "banana" as a phone number. Sounds like a nightmare, right? This is where Data Validation comes in – but What is Data Validation in Excel? It’s your spreadsheet’s bouncer, allowing only valid data to be entered. By setting rules, it blocks incorrect data and keeps your sheet accurate and consistent.
In this blog, we’ll cover everything about Data validation in Excel, from basic usage to advanced techniques, editing, and removing rules. Ready to take control of your spreadsheets and make Excel work smarter for you? Let’s dive in!
Table of Content
1) What is Data Validation in Excel?
2) How to Use Data Validation in Excel?
3) Advanced Data Validation Techniques
4) How to Copy Excel Data Validation Rule to Other Cells?
5) How to Edit Data Validation in Excel?
6) How to Remove Data Validation in Excel?
7) How to Find Cells with Data Validation in Excel?
8) Conclusion
What is Data Validation in Excel?
Data Validation in Excel is a powerful feature that allows users to control the type of data or the values that others can enter a cell.Defining specific criteria or rules for data entry helps maintain data accuracy and consistency across a worksheet. Data Validation restricts data to numbers, dates, or lists, ensuring only valid entries are allowed, reducing errors, and enhancing data quality.
Excel's Data Validation tools are especially useful when managing large datasets, where manually verifying each entry would be time-consuming. From ensuring date ranges to preventing duplicate entries, Data Validation enhances workflow efficiency and helps maintain data integrity.
How to Use Data Validation in Excel?
Follow these simple steps to apply Data Validation in Excel:
Step 1: Select the Cells
Highlight the cells where you want to enforce the Data Validation rule.
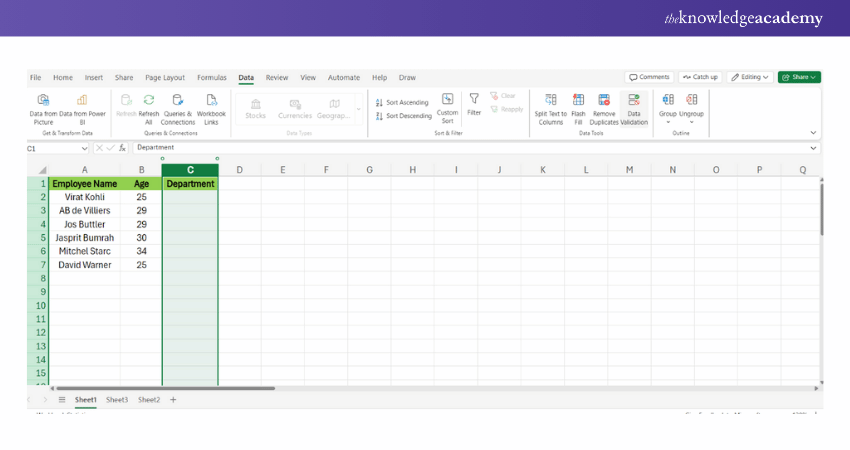
Step 2: Open the Data Tab
Go to the Excel ribbon at the top and click on the 'Data' tab.
Step 3: Click on Data Validation
In the 'Data Tools' group, click 'Data Validation.' A dialogue box will appear.
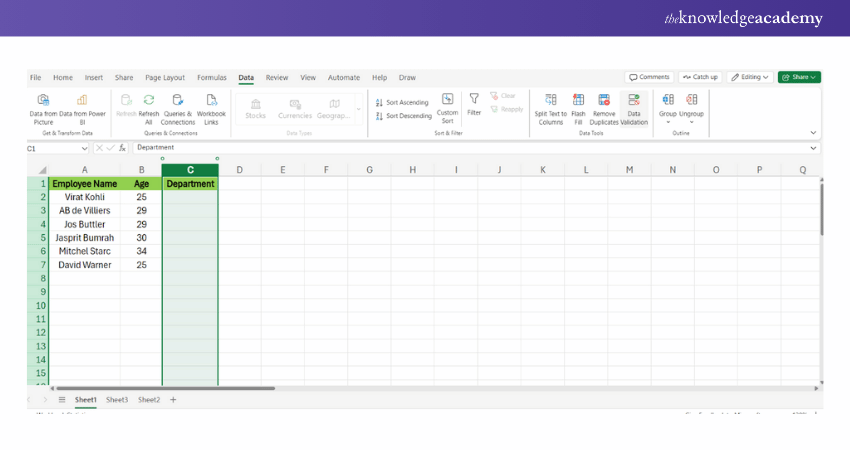
Step 4: Choose Validation Criteria:
In the dialogueue box, under the 'Settings' tab, select the type of Data Validation you need (e.g., Whole number, Decimal, List, Date, etc.).

Step 5: Set Parameters
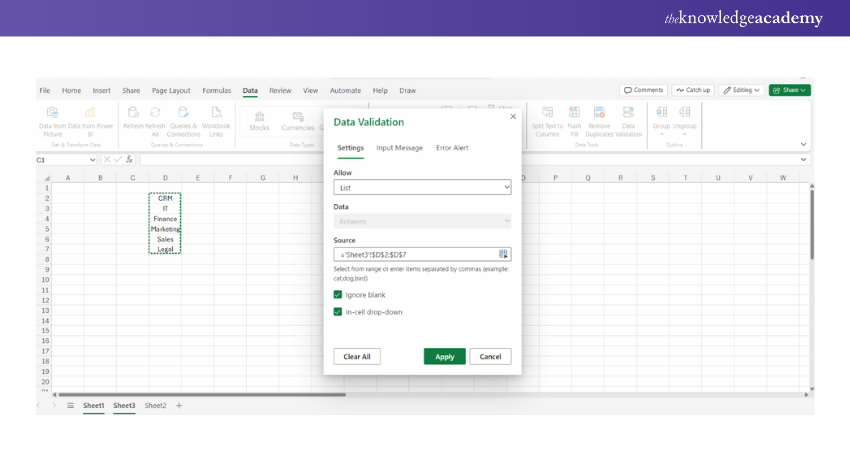
Depending on the chosen criteria, set specific parameters (e.g., a range of numbers and a list of options).
Step 6: Add Input Message (optional)
If you want to provide users with instructions, go to the 'Input Message' tab and add a message that will appear when the cell is selected.
Step 7: Set Error Alert (optional)
In the 'Error Alert' tab, customise the error message that users will see if they enter invalid data.
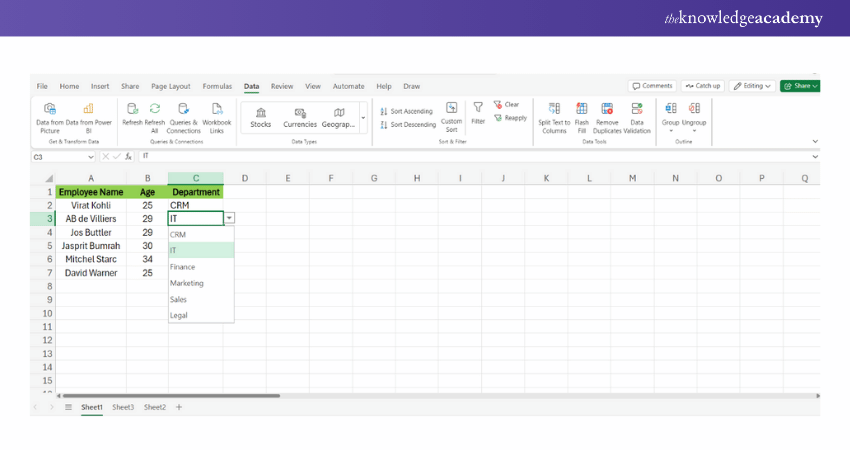
Step 8: Click Apply
After setting the desired rules and messages, click “Apply” to apply the validation.
Advanced Data Validation Techniques
While basic Data Validation is helpful, Excel also offers advanced techniques that allow for more sophisticated rules and logic
a) Custom Formulas: You can use custom excel formulas and functions to create more complex validation rules. For example, using the formula =ISNUMBER(A1) ensures that a cell contains a number.
b) Dynamic Lists: Instead of a static list, you can link the validation list to a dynamic range. This means as the range changes (adding or removing entries), the validation list automatically updates.
c) Error Alerts: Excel allows you to customise error messages when invalid data is entered. You can provide users with helpful tips or specific instructions.
d) Dependent Dropdowns: You can create cascading or dependent dropdown lists, where the options in one dropdown change based on the selection in another. This can be achieved through the use of indirect references.
Discover vital Excel functions for Business Analytics with our Business Analytics With Excel Masterclass – sign up today!
How to Copy Excel Data Validation rule to other cells?
If you've set up Data Validation for one cell and want to apply the same rules to other cells, there's no need to recreate the rule from scratch. Here’s how to copy the validation rule in Excel:
1) Select the cell with the validation rule and press Ctrl + C to copy it.
2) Select the other cells you want to validate. To select non-adjacent cells, hold down the Ctrl key while clicking the cells.
3) Right-click the selected cells, choose 'Paste Special', and then select the 'Validation' option.
4) Alternatively, use the shortcut Ctrl + Alt + V, then press N, and click OK.
Tip: Instead of just copying Data Validation to other cells manually, consider converting your dataset into an Excel table. When you add more rows to the table, Excel automatically applies your validation rule to these new entries, streamlining the process.
How to Edit Data Validation in Excel?
Editing Data Validation in Excel allows you to easily update or modify the criteria applied to your cells, ensuring accuracy and flexibility as your data requirements change. Here are the simple steps:
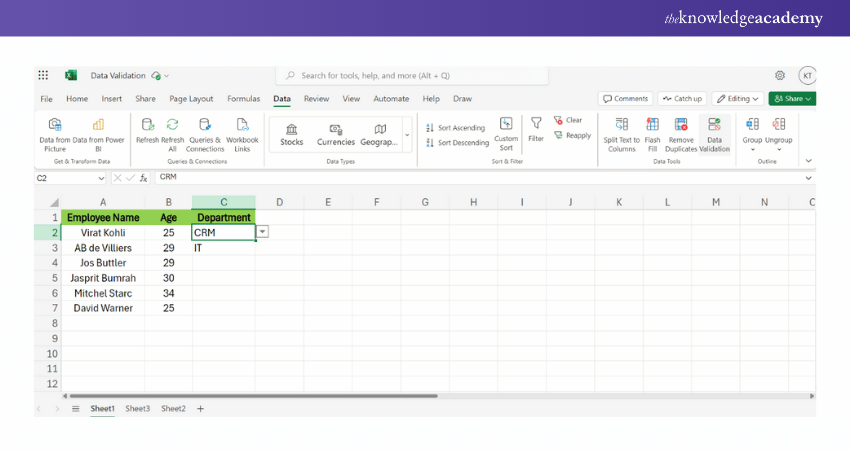
Step 1: Select the Cell(s):
Click on the cell(s) where you’ve already applied Data Validation.
Step 2: Open the Data Validation Dialogue:
a) Navigate to the Data tab in the Excel ribbon.
b) Click on Data Validation in the Data Tools group.
Step 3: Edit the Validation Rule:
a) The Data Validation dialogue box will open.
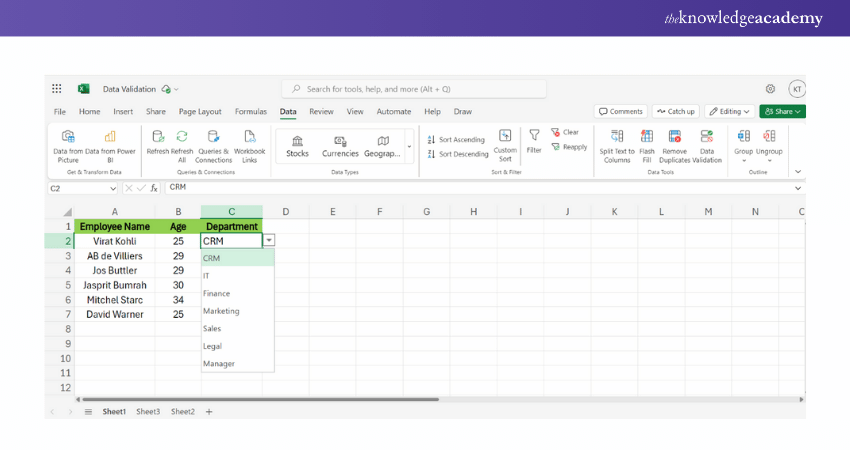
b) Under the Settings tab, modify the criteria as needed (e.g., change the validation type, set new parameters, or update the list of values).
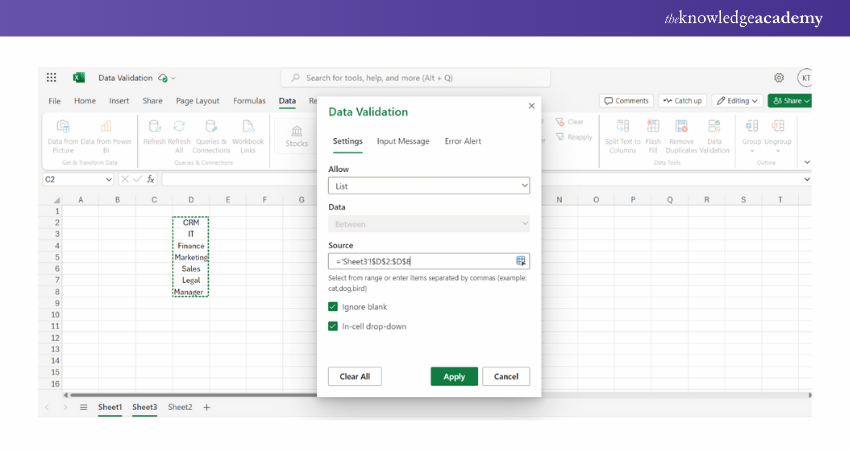
Step 4: Click Apply:
After making your desired changes, click “Apply” to apply the updated validation rule to the selected cells.
How to Remove Data Validation in Excel?
Here are the simple steps to remove Data Validation in Excel, ensuring your cells are no longer restricted by previous rules.
Step 1: Select the Cells:
Highlight the cells from which you want to remove the Data Validation rules.
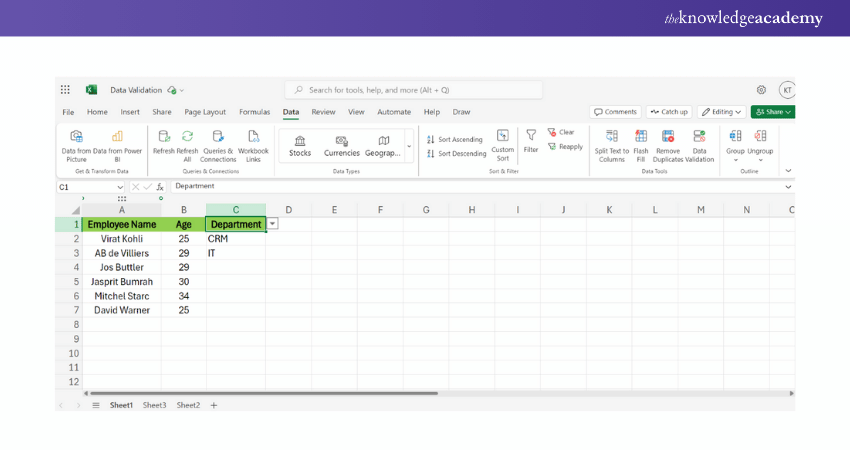
Step 2: Open the Data Validation Dialogue:
a) Go to the Data tab in the Excel ribbon.
b) Click on Data Validation in the Data Tools group.
Step 3: Clear the Validation Rule:
In the Data Validation dialogue box, click on the Clear All button.
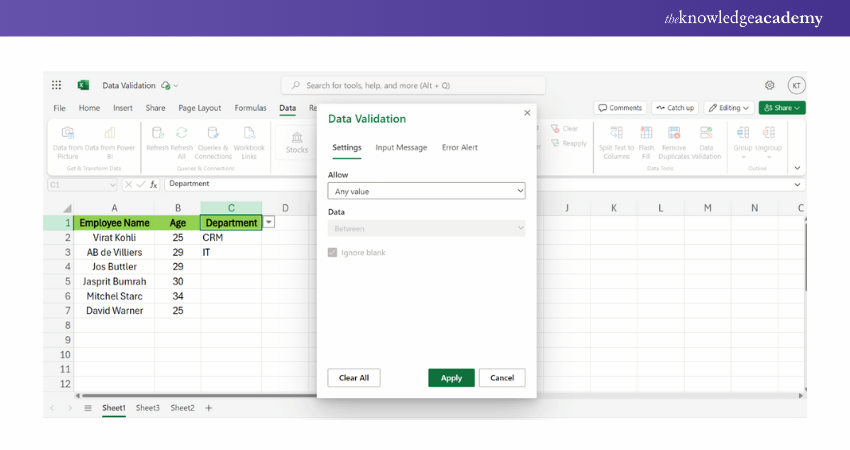
Step 4: Click Apply:
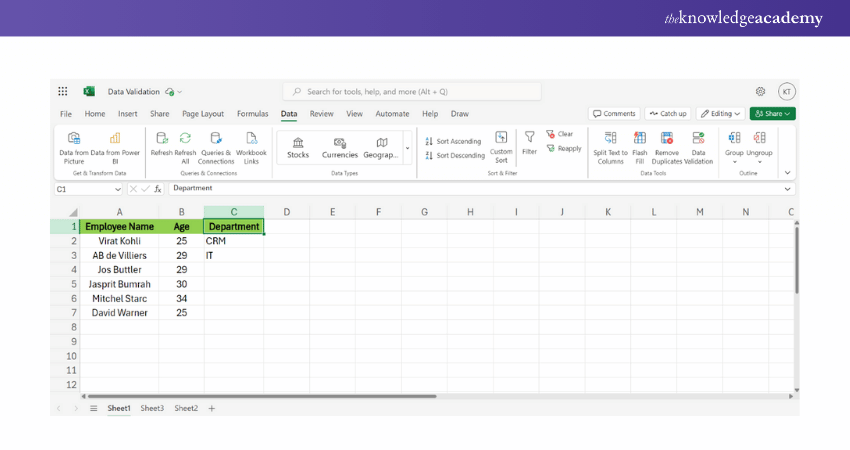
Press “Apply” to remove the Data Validation rule from the selected cells.
How to Find Cells with Data Validation in Excel?
Here are the steps to quickly find cells with Data Validation in Excel, allowing you to easily review or modify them.
Step 1: Use the Go To Special tool:
Press Ctrl + G on your keyboard to open the Go To dialogue box.
Step 2: Open Go To Special:
In the Go To dialogue, click on the Special button.
Step 3: Select Data Validation:
In the Go To Special dialogue box, select Data Validation.
Step 4: Choose 'All' or 'Same':
a) Select All if you want to find any cell with Data Validation.
b) Select Same if you want to find cells with the same specific validation rule.
Step 5: Click OK:
Excel will highlight all the cells with Data Validation applied, making it easy for you to locate and manage them.
Enhance your professional skills with our Microsoft Office Training – register today!
Conclusion
Understanding What is Data Validation in Excel is key to keeping your data accurate and consistent. With just a few rules in place, you can block out errors and safeguard your data's integrity. It’s like having a quality gatekeeper for your spreadsheets, ensuring smooth and reliable data management!
Learn to create and prepare Gantt charts by registering for our Excel Training With Gantt Charts course!
Frequently Asked Questions
How do I Apply Data Validation in Excel?

To apply Data Validation, select the cells, go to the 'Data' tab, click on 'Data Validation,' and choose the desired criteria, such as whole numbers, dates, or a custom list.
Can I Customise the Error Messages for Invalid Data Entries?

Yes, Excel allows you to customise error messages. In the 'Error Alert' tab of the Data Validation dialogue, you can add a title and a custom message to guide users when they input invalid data.
What are the Other Resources and Offers Provided by The Knowledge Academy?

The Knowledge Academy takes global learning to new heights, offering over 3,000 online courses across 490+ locations in 190+ countries. This expansive reach ensures accessibility and convenience for learners worldwide.
Alongside our diverse Online Course Catalogue, encompassing 19 major categories, we go the extra mile by providing a plethora of free educational Online Resources like News updates, Blogs, videos, webinars, and interview questions. Tailoring learning experiences further, professionals can maximise value with customisable Course Bundles of TKA.
What is The Knowledge Pass, and How Does it Work?

The Knowledge Academy’s Knowledge Pass, a prepaid voucher, adds another layer of flexibility, allowing course bookings over a 12-month period. Join us on a journey where education knows no bounds.
What are the Related Courses and Blogs Provided by The Knowledge Academy?

The Knowledge Academy offers various Earned Value Management Courses, including the Earned Value™ Management Foundation and Practitioner Course, and the Earned Value™ Management Foundation Course. These courses cater to different skill levels, providing comprehensive insights into Operations Management.
Our Project Management Blogs cover a range of topics related to Earned Value Management, offering valuable resources, best practices, and industry insights. Whether you are a beginner or looking to advance your Project Management skills, The Knowledge Academy's diverse courses and informative blogs have got you covered.
Upcoming Office Applications Resources Batches & Dates
Date
 Excel for Accounting Course
Fri 28th Mar 2025
Fri 23rd May 2025
Fri 25th Jul 2025
Fri 26th Sep 2025
Fri 28th Nov 2025


 Top Rated Course


 If you wish to make any changes to your course, please


