


 Top Rated Course

We may not have the course you’re looking for. If you enquire or give us a call on + 1-866 272 8822 and speak to our training experts, we may still be able to help with your training requirements.
How to Create a Project in Jira: Explained in Detail
Sienna Roberts 09 August 2023Unveil the complete process of creating a project in Jira in this step-by-step blog. Discover how to set up project components and define issue types. Learn the art of configuring workflows and master the skill of tracking progress and generating insightful reports. Get ready to excel in Jira project management.

Training Outcomes Within Your Budget!
We ensure quality, budget-alignment, and timely delivery by our expert instructors.
Table of Contents

Jira, a cogent and popular Project Management Software developed by Atlassian, has become the go-to platform for Agile teams seeking seamless collaboration and efficient task management. For those new to Jira Project Management or looking to harness its full potential, understanding How to Create a Project in Jira is the essential first step.
According to the developers Atlassian, using Jira cuts down the cycle time in any project by 50%. This sequential guide will walk you through the process of setting up a project in Jira, providing you with the tools and knowledge to organise your work effectively, customise workflows, and collaborate with your team effortlessly. Discover how to create a project in Jira and unlock a world of streamlined Project Management possibilities by reading this article.
Table of Contents
1) Introduction to Jira Projects
2) Accessing Jira and creating a new project
3) Setting up project components and issue types
4) Configuring workflows and Agile boards
5) Inviting team members and encourage collaborative working style
6) Managing project boards and work
7) Tracking progress and generating reports
8) Conclusion
Introduction to Jira Projects
Jira is a dynamic and vigorous Project Management tool recognised for its ability to streamline workflows, enhance collaboration, and improve team productivity. In Jira Software, a Project acts as a container that houses various tasks, issues, and pieces of work related to a specific endeavour. Whether it's software development, marketing campaigns, or business projects, Jira Projects provide a dedicated space for teams to plan, track progress, and manage tasks effectively. Each Jira Project is uniquely customisable, enabling teams to tailor it to their specific needs and methodologies.
Project administrators can define workflows, establish issue types, and configure permissions based on their team's workflow and organisational requirements. This level of flexibility ensures that Jira Projects adapt seamlessly to the diverse needs of different teams and projects. Furthermore, Jira Projects promote collaboration by allowing team members to collaborate, share information, and provide feedback within the context of the project. This transparency and real-time communication lead to enhanced teamwork and efficient issue resolution. Jira Projects serve as the foundation for effective Project Management, providing teams with the tools and structure they need to deliver successful outcomes and achieve their goals efficiently.

Accessing Jira and Creating a New Project
Before you can create a new Project in Jira, you need to have access to a Jira instance. If you don't have one already, you can sign up for a Jira Cloud account or set up a Jira Server or Data Center instance. Once you have access to Jira, follow these steps to create a new project:
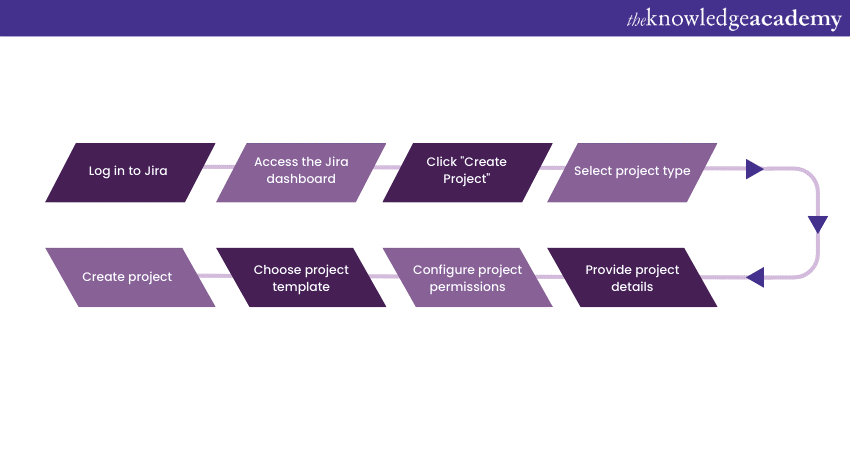
a) Log in to Jira: Go to your Jira URL and log in with your credentials.
b) Access the Jira dashboard: After logging in, you will be taken to the Jira dashboard, which serves as the central hub for your projects and tasks.
c) Click "Create Project": On the Jira dashboard, locate the "Create Project" button, usually found on the left-hand side or in the top navigation bar. Click on it to initiate the project creation process.
d) Select project type: Jira offers various project templates designed for different types of work, such as software development, task management, project tracking, and more. Choose the project type that best aligns with your team's objectives and workflow.
e) Provide project details: Next, you'll be prompted to provide essential project details, including, project name, project key, project lead and project description. The project name should be a descriptive name that reflects the purpose of the project. Project key is a unique identifier for your project, often used as an abbreviation. Jira will suggest a key based on your project name, but you can customise it if needed. Assign a project lead who will be responsible for managing the project. Lastly, provide a short description of the project's scope, goals, or any other relevant information.
f) Configure project permissions: In this step, you can configure project permissions to control who can view, edit, and manage issues within the project. Jira offers several default permission schemes, or you can create custom ones based on your team's requirements.
g) Choose a project template: Depending on the project type you selected earlier, you may be presented with a choice of project templates tailored to specific methodologies, such as Scrum or Kanban. Select the template that aligns with your team's preferred way of working.
h) Create project: Once you have provided all the necessary details and configured the project settings, click "Create" to confirm the creation of your new Project in Jira.
Level up your Jira skills and become a Jira expert with our immersive Jira Masterclass Course today!
Setting up project components and issue types
In Jira, customising project components and defining issue types are vital steps to ensure that your project aligns precisely with your team's workflow and requirements. These features enhance the organisation and management of tasks within your project, enabling seamless collaboration and efficient tracking. Let's dive into how to set up project components and issue types in Jira below:
Project components
Project components are sub-sections or features of your project. They can represent different modules, functionalities, or areas of focus within your project. Setting up components helps in organising and categorising issues more effectively. To add components to your project, follow the following steps:
a) Go to project settings: From the project sidebar, navigate to "Project Settings."
b) Select "Components": Under "Project Settings," click on "Components" to access the components management page.
c) Add components: Click on the "Add Component" button and provide a name, description, and lead for each component you want to create.
d) Save changes: Once you have added all the components, save your changes.
Issue types
Jira supports different types of issues, such as tasks, bugs, user stories, and more. Customising issue types allows you to tailor Jira to your team's specific workflow and requirements. Follow these steps to manage issue types for your project:
a) Go to project settings: From the project sidebar, go to "Project Settings."
b) Select "Issue Types": Under "Project Settings," click on "Issue Types" to view and manage existing issue types.
c) Add or edit issue types: From the “issue types” management page, you can add new issue types or edit the ones already existing to suit your project needs.
d) Save changes: Once you have configured the issue types, save your changes to update your project's settings.
Take charge of your projects and excel in your career with our Project Management Masterclass. Join now to become a skilled Project Manager!
Configuring workflows and Agile boards
Workflows and agile boards are crucial aspects of managing projects in Jira, especially for teams following agile methodologies like Scrum or Kanban.
Workflows
A workflow represents the series of steps that an issue goes through during its lifecycle, from creation to completion. Each step in the workflow can have specific conditions and transitions that determine how an issue moves through the process. Configure workflows for your project involves the following steps:
a) Go to project settings: From the project sidebar, access "Project Settings."
b) Select "Workflows": Under "Project Settings," click on "Workflows" to manage your project's workflows.
c) Edit or create a workflow: You can amend an existing workflow or create a new one from scratch. Jira provides a visual editor to help you define the workflow steps, conditions, and transitions.
d) Publish the workflow: Once you have configured the workflow to your satisfaction, publish it to make it active for your project.
Agile boards
Agile boards, such as Jira Scrum or Jira Kanban Boards, provide a visual characterisation of your team's work in progress. They allow you to track and manage issues efficiently and ensure a smooth flow of work. To set up an agile board for your project, these are the following steps:
a) Go to project settings: From the project sidebar, navigate to "Project Settings."
b) Select "Boards”: Under "Project Settings," click on "Boards" to access the boards management page.
c) Create a new board: Click on the "Create Board" button and select the board type that aligns with your team's agile methodology.
d) Configure the board: Customise the board settings, including the filter query, board name, and visibility options.
e) Save the board: Once you have set up the board according to your preferences, save it to make it available for your project.
Take charge of your success by upskilling in project management with our Running Small Projects Course. Join our course now!
Inviting team members and encourage collaborative working style
Now that you have set up your Project in Jira and configured essential settings, it's time for you to collaborate on the project by inviting team members.
a) Go to project settings: From the project sidebar, go to "Project Settings."
b) Select "People": Under "Project Settings," click on "People" to manage project membership.
c) Add team members: Click on the "Add People" button and enter the email addresses of the team members you want to invite to the project. You can also set their roles and permissions.
d) Send Invitations: Once you have added team members, send out the invitations to join the project.
Managing project boards and work
With your project set up and team members onboarded, you can now start managing your work in Jira using boards and issues.
a) Using Agile boards: If you have set up an agile board (Scrum or Kanban), use it to track the progress of your team's work. Update the board regularly, move issues through the workflow, and use features like sprints (for Scrum boards) to plan and manage work efficiently.
b) Creating and managing issues: Click on the "Create" button on your Jira dashboard or board to create new issues for your project. Provide all the necessary details for the issue, such as summary, description, issue type, priority, and more. Assign the issue to team members and set due dates as needed.
c) Collaborating and commenting: Encourage team collaboration by allowing team members to comment on issues. Comments provide a space for discussions, updates, and sharing relevant information related to the issue.
d) Linking and dependency management: In Jira, you can link related issues and manage dependencies to ensure smooth progress across different tasks. Use the "Link Issue" feature to create relationships between issues and visualise their interdependencies.
Tracking progress and generating reports
Jira provides various reporting features to help you track progress, analyse team performance, and gain insights into your project's health.
a) Dashboards: Customise your Jira dashboard to display relevant project metrics and reports. Use gadgets like burndown charts, velocity charts, and pie charts to monitor progress and trends.
b) Jira reports: Jira offers built-in reports that provide valuable information on project status, issue distribution, and team performance. Access reports such as "Issue Navigator," "Time Tracking," "Sprint Report" (for Scrum boards), and more.
c) Third-party plugins: Jira's marketplace offers a wide range of third-party plugins and integrations that extend its reporting capabilities. Explore available plugins to find tools that match your specific reporting needs.
Looking to switch careers and become a Project Manager? Enlist in our Project Management for Non-Project Managers course now!
Conclusion
Creating a Project in Jira is a straightforward process that sets the foundation for effective Project Management and collaboration. By following the outlined steps, you will successfully create a project, customise it to suit your team's workflow, and start tracking and managing your work efficiently. As you gain experience with Jira, you can explore its advanced features, integrations, and reporting capabilities to further enhance your project outcomes. Happy working!
Unlock your true potential with our comprehensive Project Management Courses today!
Frequently Asked Questions
Upcoming Programming & DevOps Resources Batches & Dates
Date
 Java Programming
Java Programming
Mon 13th Jan 2025
Java Programming
Mon 10th Mar 2025
Java Programming
Mon 19th May 2025
Java Programming
Mon 21st Jul 2025
Java Programming
Mon 15th Sep 2025
Java Programming
Mon 17th Nov 2025
Java Programming
Mon 15th Dec 2025
 If you wish to make any changes to your course, please


