We may not have the course you’re looking for. If you enquire or give us a call on + 1-866 272 8822 and speak to our training experts, we may still be able to help with your training requirements.
Training Outcomes Within Your Budget!
We ensure quality, budget-alignment, and timely delivery by our expert instructors.

Microsoft Excel is one of the most widely used spreadsheet software, with over 750 million users worldwide. Numerous organisations use this MS Excel software for performing administrative, project management, accounting, operational, and multiple other tasks.
As these industries have enormous data to handle, they use various measures to ease the management process. Hence, powerful tools like VBA are used to automate the process to save ample time and money. One of the most effective programming methods is the loop. With just a few lines of code, a loop in Excel VBA lets you to iterate through a set of cells.
Further, this blog will discuss VBA, , how to add Excel VBA For Loop , and how to use various other Loop functions in Excel with a few examples.
Table of Contents
1) What are VBA For Loops in Excel and why they are used?
2) How do VBA For Loops in Excel work?
3) How to Insert VBA For Loops in Excel Using the Visual Basic Editor
4) VBA Loops in Excel: For Next, Do While, Do Until, For Each
5) Conclusion
What are VBA For Loops in Excel and why they are Used?
We know that loops are a concept in a programming language that allows a program to repeat itself. They help you change your code by reducing the number of specially-coded actions written to improve the speed and efficiency of your applications. Loops are considered to be flexible, giving the option to repeat certain actions; a set number of times. A loop can also be combined with other statements, like For and If.These help determine how often and for how much duration a script should be running.
A ‘For’ Loop, in VBA, replicates an action or a set of actions for a set number of times in a sequence. For instance, if there is a macro (coded in VBA) to insert values into a column, then you can use a ‘For’ loop by filling each cell (ex. A1, A2, A3, etc.) sequentially until an end value is reached.

For example, the VBA code shown above shows such an action. In this case, the VBA macro is designed to output values into cells in column A1 to A10, and the increment increases in single-digit. Once the 10th value is reached, the script stops running. The example shown here is a basic one, but the ‘For’ Loops is quite powerful enough to perform any action you want it to in Excel repeatedly.
How do VBA For Loops in Excel work?
Let us say that you have an idea in your mind as to how your VBA macro should actually work. By introducing a ‘For’ Loop into the mix of code enables you to set a part of your code to repeat itself a certain number of times based on the condition given by you. With the help of a simple example, we will explain this process. As VBA For Loops in Excel comes in handy for performing finite repetitive actions, let us consider that when you press a button, a pop-up has to appear.
On pressing the button, a pop-up box gets displayed a definite number of times in sequence using a defined variable Var_button as the end number (in this program, using the value 10). This pop-up box will start displaying the current variable beginning from zero. Further, it repeats 9 times more until the Var_button variable having value 10 has reached.
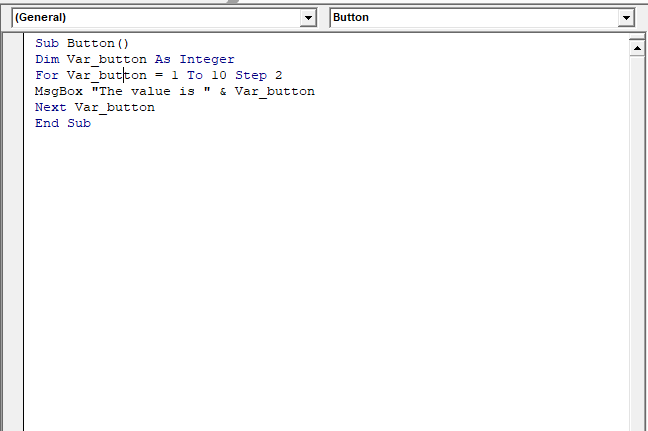
By pressing the button, the action of the loop begins. Since, the test has a start and an end variable, the loop with eventually have a number of runs that are finite before it finishes. By default, increasing the value by 1, but this value can be altered by adding another variable called the Step value. For example: changing the step value to 2 would mean only 5 pop-ups will appear.
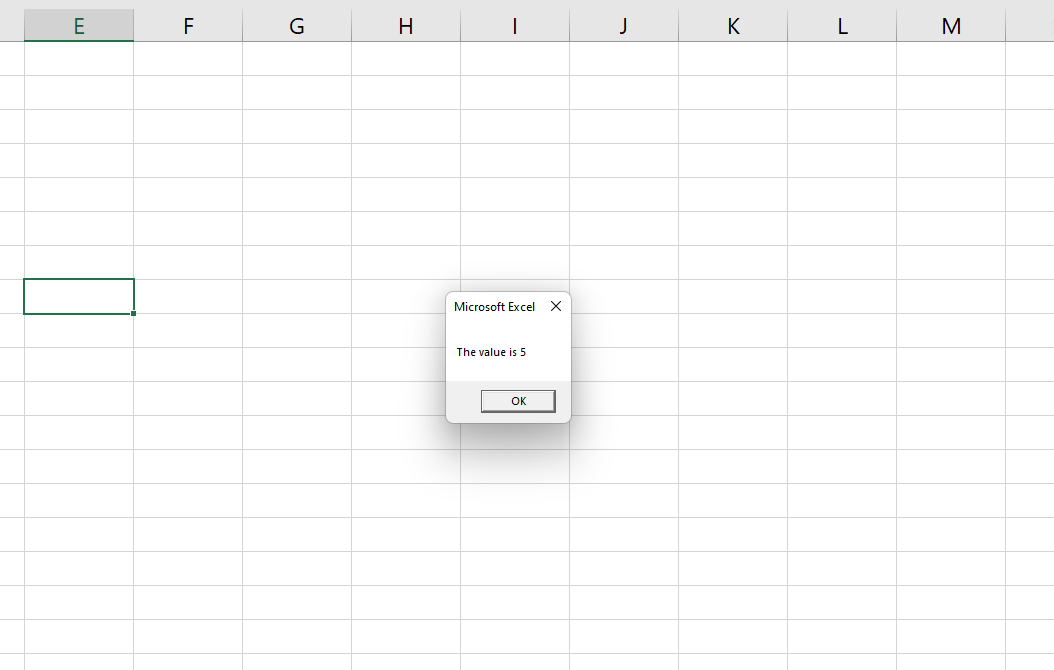
Once the end value given in the loop has been reached, the loop will exit, which results in the macro stopping. If you want, you can also add additional actions that need to be performed at this point. For instance, changing the value of another cell or creating a different pop-up message. You can also use a nested For Loop within other logical statements like a ‘Do While’ or ‘If statement’.
The example discussed above contains all typical criteria required to complete a For Loop using VBA. The code will determine the number of times that action has been performed in the sequence (Var_button) and the increment value needed to iterate through the sequence (Step). The only exception to this example is the button that is needed to start the macro. You do not have to link your macro code to a button press, as you can simply begin this loop and activate the macro manually by going to Developer>Macros>Run.
How to Insert VBA For Loops in Excel using the Visual Basic Editor
In a Visual Basic Editor, you can create, test and run a VBA For Loop in Excel. It is Excel’s built-in VBA editor that enables you to create your own macros with the help of VBA or using the Macro Recorder tool to edit the existing macros that are created. To start creating a VBA macro in the Visual Basic Editor using For Loop, you can pay attention to these steps:
Step 1: Open VBA Editor in Excel
Start by opening the Visual Basic Editor in the MS Excel workbook. You can open this by using the shortcut Alt + F11 from your keyboard. If the Developer tab is already enabled on the ribbon bar in the settings menu of your Excel, you can also go to Developer > Visual Basic to open the editor.

Step 2: Create a new VBA Module in VBA Editor
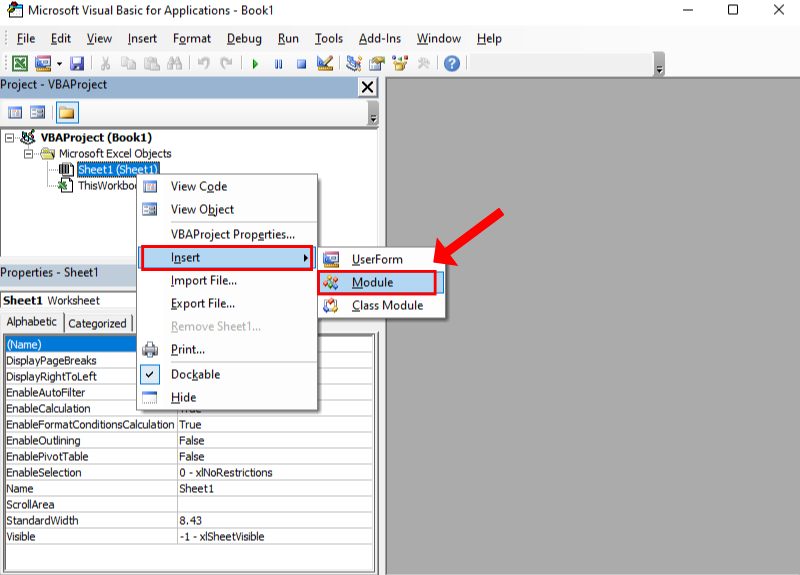
A new Window will be opened by the VBA Editor at this point. The next step should be to insert the VBA For Loop (and any additional code) as a new VBA module. The purpose of the Modules is to organise VBA code into groups. To do this, select the workbook that is listed on the left tree menu and right-click on your mouse. From the drop-down menu, select Insert > Module.
Step 3: Insert your VBA For Loop code in VBA Editor
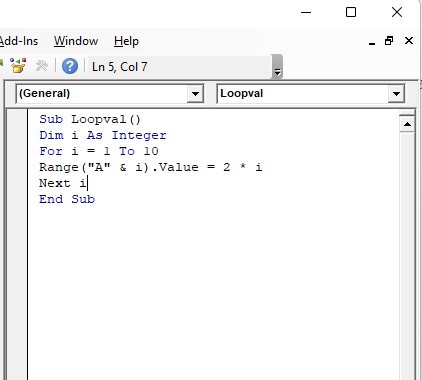
A new window will appear on the right, where you can either write or insert your VBA code, that contains the For loop. For example, the below code will output sequential values into cells A1 to A10 on any opened worksheet:
Sub Loopval()
Dim i As Integer
For i = 1 To 10
Range("A" & i).Value = 2 * i
Next i
End Sub
Step 4: Rename your module and run the code
Once you have input the code, you need to rename the module that contains this code so that it can be referred to later. To perform this, select the module name present on the left of the tree menu, and then rename it to a new module name in the Properties box as shown below.
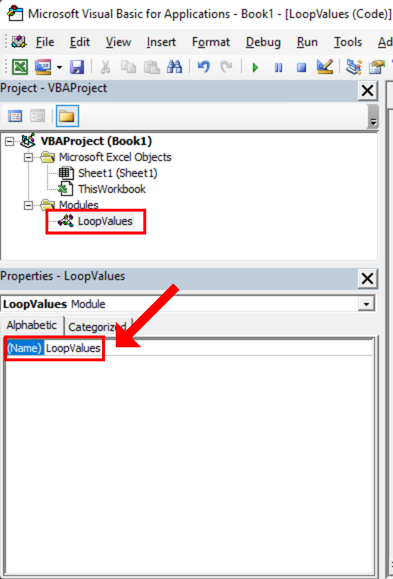
Once you are ready to run the code to show the output, click on the Run Sub/User Form button. This will execute your code in the active worksheet, allowing you to see the macro run.

Once your VBA code is working as intended, you can then move forward to save your workbook, including the macro. If the code does not work, a debug message will be shown, and you have to rectify the issue further.
Step 5: Save the workbook in Excel
Once your VBA macro is ready, you will need to save your Excel workbook as a Macro-enabled workbook in XLSM format. To perform this, click on File>Save As or press Ctrl +S from your keyboard.
Step 6: Run your VBA code in VBA Editor
Once you have saved your workbook, your macro that contains a VBA For Loop is ready to be executed. To perform this, open the Macro window using the keyboard shortcut Alt+F8.
Select your macro that matches the Module name from the list provided, and then press Run. Alternatively, if there is a situation where your VBA For Loop is scheduled to activate based on any other action (such as reaching a cell value, pressing a button, etc.) you will need to carry out this action to begin the process.
Update your skills in Microsoft Excel by joining the Microsoft Excel VBA and Macro Training, now!
VBA Loops in Excel: For Next, Do While, Do Until, For Each
If you want to get the most out of both Excel and VBA, you should know how to use different loops effectively. Loops in VBA enable you to look through a set of objects or values and analyse them one at a time. In addition, you can also carry out a specific task for each loop. We will take a couple of examples of using VBA loops in Excel.
Let us assume that there is a dataset available with you, and you wish to highlight all even row cells. You can make use of loops in VBA to go through the range and analyse the row number of each cell. If the row number turns out to be even, then give any suitable colour (say green), else you output any other colour. The above logic of the loop sounds simple in Excel VBA; one can also do this using conditional formatting.
In a real-life scenario, you can build many codes using VBA loops in Excel that can help automate tasks. For this, you need to know about the different types of loops that exist in Excel VBA and their correct syntax. This section will demonstrate the different types of loops in Excel VBA with an example for each of them:
For Next Loop
The For Next loop has a logic that looks through a set of codes for running it a particular number of times. You can also provide the number of times you want to run the loop and specify what the code has to do each time during the running of the loop. The syntax of the For Next loop is given below:
For counter = Start to End [Step Value]
[Code Block to Execute]
Next [counter]
The counter (or any other variable) in the For Next loop is used to run the loop. This variable will allow you to run this loop a specified number of times. The start and end values specify the range of values that the loop variable will take. The Step keyword is optional and allows you to specify the increment or decrement by which the loop variable will change on each iteration.
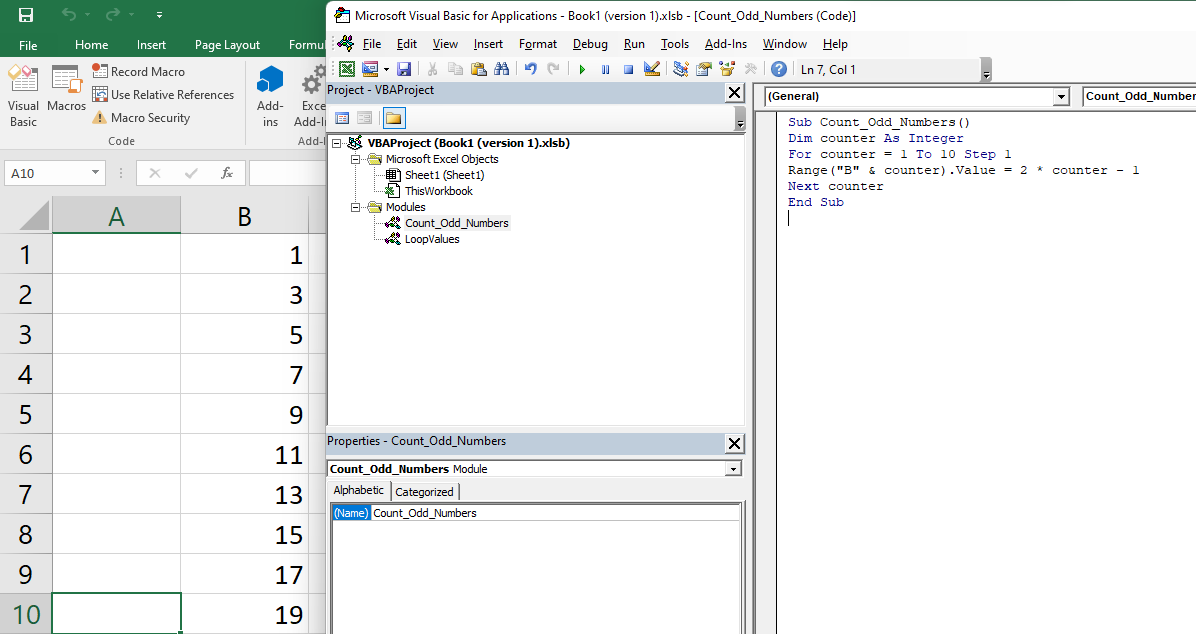
Example: Here is an example of a For Loop that displays odd numbers from 1 to 20:
Once you open a VBA editor in Excel, you can Insert > Modules and rename the modules to differentiate the actions used to apply the code in the Excel sheet. As you can see in the image below, we have written a code in the VBA editor to apply a For Loop - to display odd numbers from 1 to 20 in column B of the specified Excel Sheet.
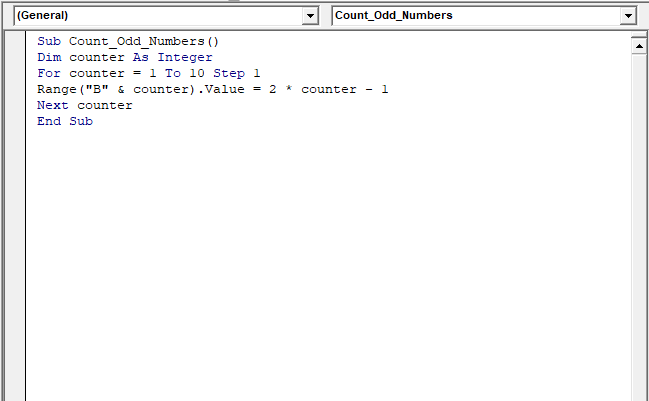
[Note that you can toggle between the modules using the keyboard shortcut Ctrl + R or click on the Project Explorer option under the View ribbon in the VBA editor]
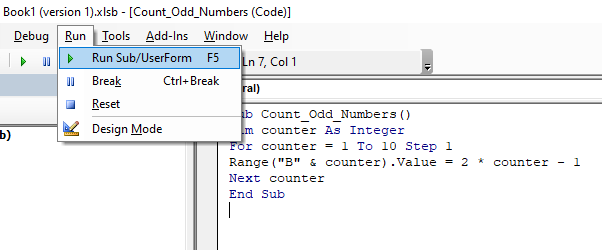
Make sure the code written by you is correct, and click on Run > Run Sub/UserForm to execute the code. You can also use the shortcut F5 option on keyboard to run a program or code.
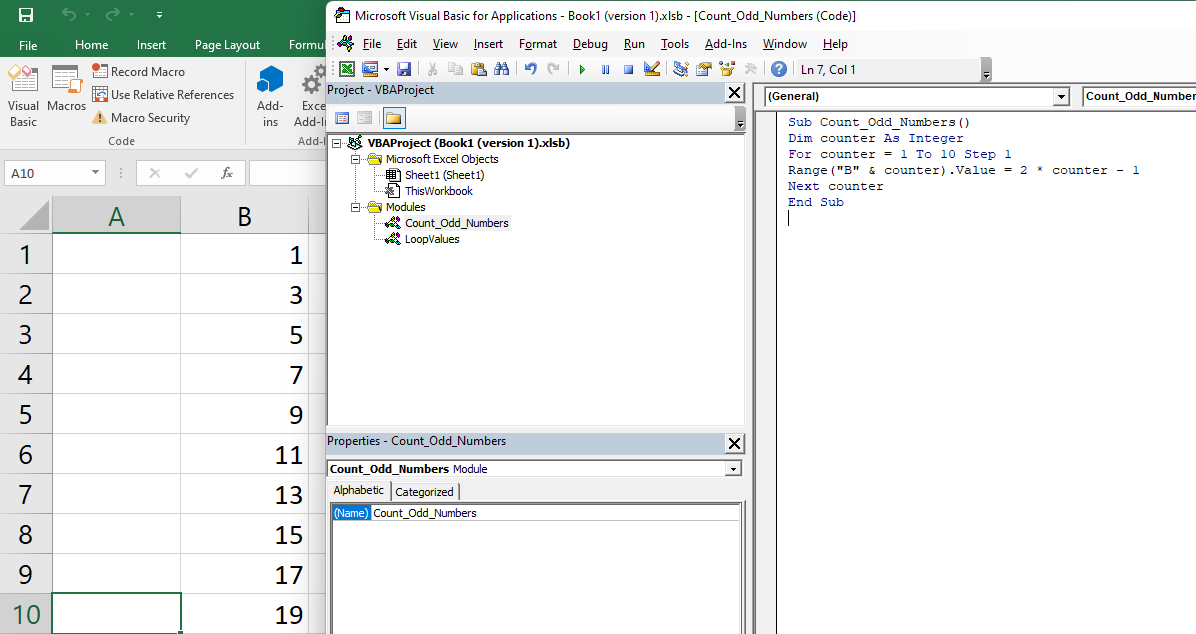
Once the code runs, you can see the changes executed in Excel. As shown in the below image, the specified odd number values (1 To 20) have been automatically updated using the (For Loop function) VBA code.
[You can also use F8 or Debug option to locate and fix errors, unintended features, and bugs in the VBA code]
Do While Loop
The second loop to discuss is the Do While loop, which helps to check for a condition and run the loop while seeing that the condition is met (or is TRUE). There exist two types of syntax in the Do While loop:
Do [While condition]
[Code block to Execute]
Loop
And
Do
[Code block to Execute]
Loop [While condition]
From the above two syntaxes, it is evident that in the first case, the While condition is first checked before the execution of any code block. Whereas in the second case, execution of the code block happens first, and the condition for While is then checked. That implies that even if the While condition is False in both cases, the code will run once in the second case.
Example: We use the same example to demonstrate the use of Do While loop for displaying odd numbers between 1 to 20.
As you can see in the image below, we have written a code in the VBA editor to apply a Do While Loop - to display odd numbers from 1 to 20 in column B of the specified Excel Sheet.
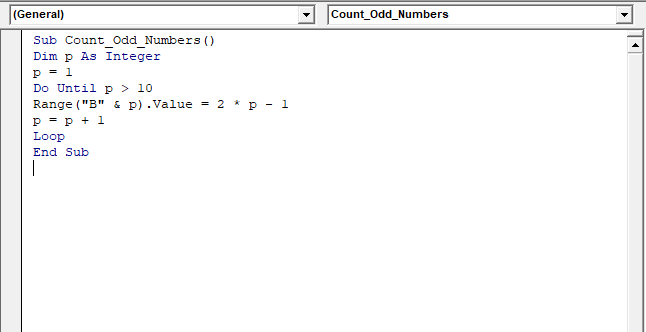
Once the code runs, you can see the changes executed in Excel. As shown in the below image, the specified odd number values (1 To 20) have been automatically updated using the (Do While function) VBA code.
Do Until Loop
Do Until loop is very similar to the Do While loop. What happens in Do While loop is that the loop continues to run till the conditions that are given are met. On the other hand, in Do Until loop, the loop is run until the specified condition is met. There exist two types of syntax in the Do Until loop:
Do [Until condition]
[Code block to Execute]
Loop
And
Do
[Code block to Execute]
Loop [Until condition]
From the above two syntaxes, it is evident that in the first case, the Until condition is first checked before the execution of any code block. Whereas in the second case, execution of the code block happens first, and the condition for Until is then checked. That implies that even if the Until condition is True in both cases, the code will run once in the second case.
Example: We refer the same example used on above to demonstrate the use of Do Until loop for displaying odd numbers between 1 to 20.
As you can see in the image below, we have written a code in the VBA editor to apply a Do Until Loop - to display odd numbers from 1 to 20 in column B of the specified Excel Sheet.
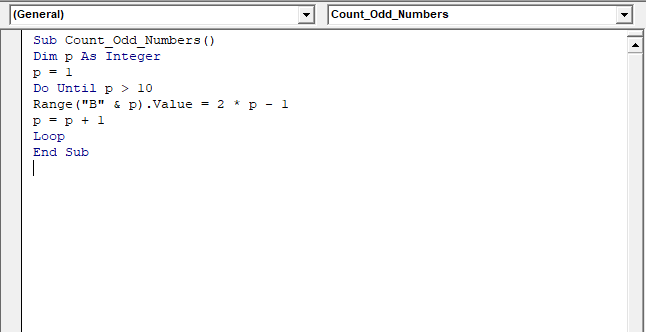
Once the code runs, you can see the changes executed in Excel. As shown in the below image, the specified odd number values (1 To 20) have been automatically updated using the (Do Until function) VBA code.
For Each
The fourth loop in VBA is the For Each loop that loops through a set of collections. We have some examples of collection in Excel VBA:
1) A collection of all open Workbooks.
2) A collection of all the worksheets in a Workbook.
3) A collection of all shapes or charts present in the workbook.
4) A collection of all cells present in the range of selected cells.
By using the For Each loop, you can look through each of the objects present in a collection and perform a particular action on it. For instance, you can see all the worksheets in a workbook and protect them or go through all the cells in the selection and change the formatting. With the For Each loop (also known as For Each-Next loop), you do not have to know the presence of the number of objects in a collection. For Each loop will automatically go through each of the objects and perform the required action.
The syntax of the For Each (For Each-Next) loop is given below:
For Each element In collection
[Code Block to Execute]
Next [element]
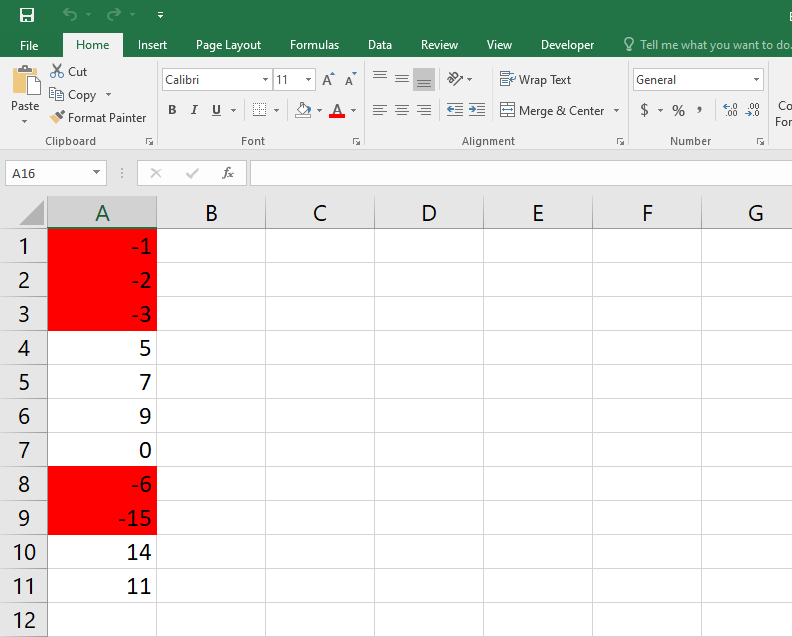
Example: The below example will demonstrate the use of For Each loop to go through all the cells in the selection and make those cell colour as red that contain negative numbers. We have an existing excel sheet which contains a list of numbers from cell A1 to A11.
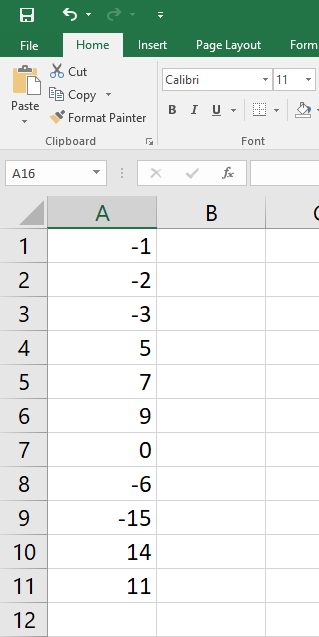
As you can see in the image below, we have written a code in the VBA editor to highlight cells in red which contain negative numbers present in column A of the specified Excel Sheet.
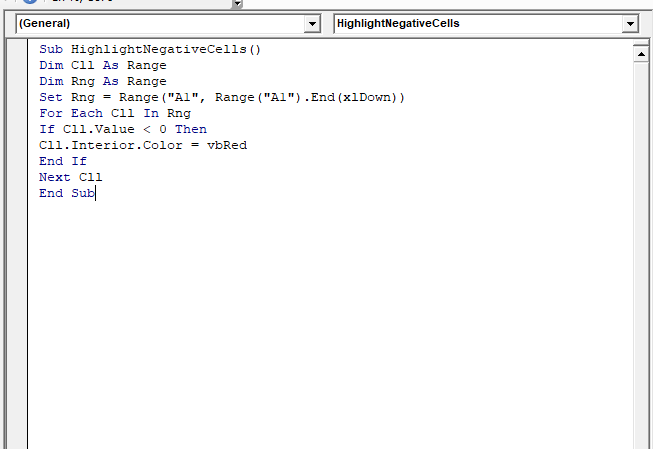
In the code written above, the For Each-Next loop will go through the collection of cells in the selection. Further, the IF statement is used to find whether a particular value in the cell has a negative number or not. In case, it finds a negative number, that cell will be given a red colour or else it will go to the next one.
Once the code runs, you can see the changes executed in Excel. As shown in the below image, the cells having the negative numbers have been automatically highlighted in red using the (For Each function) VBA code.

Conclusion
We have used multiple examples with different codes in the VBA editors to make it simple to understand the Excel VBA For Loops. The process of adding VBA For Loops in Excel using Macros can be tried and executed by you to find out how it works.
By reading this blog, you should be able to understand how to add VBA For Loops in Excel using the Visual Basic Editor. Having or learning a coding language (VBA) will make things easier when using Excel with enormous data helping you avoid monotonous work.
Apply for the Visual Basic For Applications VBA Training course to learn how to automate routine and repetitive tasks.
Frequently Asked Questions
Upcoming Office Applications Resources Batches & Dates
Date
 Microsoft Excel Course
Fri 10th Jan 2025
Fri 14th Feb 2025
Fri 11th Apr 2025
Fri 23rd May 2025
Fri 8th Aug 2025
Fri 26th Sep 2025
Fri 21st Nov 2025


 Top Rated Course


 If you wish to make any changes to your course, please


