We may not have the course you’re looking for. If you enquire or give us a call on 0800 446148 and speak to our training experts, we may still be able to help with your training requirements.
We ensure quality, budget-alignment, and timely delivery by our expert instructors.

Have you ever struggled with composing documents in multiple languages or wished the User Interface was in your native tongue? By learning How to Change Language in Microsoft Word, you can adapt your experience to better your needs better. This flexibility not only helps your method of operation but also helps to keep your documents accurate as well as culturally acceptable.
Are you curious about features on Microsoft Word and how to change the language to utilize its multilingual capabilities? This blog explores necessary steps, from adjusting the display language to setting proofing languages for specific texts. Read this blog to transform your MS Word experience and ensure effective communication across various languages and regions.
Table of contents
1) Why change the Language in Microsoft Word?
2) Changing the display language
3) How to change MS Word language on a Mac?
4) Proofing language settings
5) User Interface language
6) Multilingual editing
7) Conclusion
Why change the Language in Microsoft Word?
Adjusting the language settings in Microsoft Word presents numerous benefits. It allows for precise content creation in various languages, fostering clear communication. Working with teams that speak different languages is made easier, as it enables mutual understanding and valuable contributions.
Conforming to particular linguistic norms demonstrates respect for cultural diversity. Additionally, personalising Word’s interface tailors your workflow, enhancing productivity. Ultimately, modifying the language preferences in Microsoft Word promotes enhanced interlingual interaction, encourages teamwork, and polishes your writing for diverse objectives.

Changing the display language
Changing the display language in Microsoft Word refers to modifying the language used for menus, buttons, and commands. This is especially useful when you're more comfortable or proficient in a language other than the default. Here's how to do it:
For Word 2016 and 2019
a) Open Word: Launch the Microsoft Word application on your computer.
b) Access options: Click on the "File" tab in the window's upper left corner.
c) Choose options: From the dropdown menu, select "Options" at the bottom. This opens the Word Options dialog box.
d) Navigate to language settings: Within the Word Options dialog box, find and click on the "Language" tab.
e) Select editing languages: You'll see a list of languages in the "Choose Editing Languages" section. Click the "Add additional editing languages" dropdown to add your desired language.
f) Adjust language preferences: Choose your preferred language from the list and move it to the top of the language list using the up arrow button.
g) Apply and restart: After arranging the languages, click "OK" to apply the changes. You'll be prompted to restart Word so the new display language takes effect. Save any open documents before continuing.
Need to switch languages? Learn how to change the language in Microsoft Word quickly and easily. Click here for a step-by-step guide!
For Microsoft 365

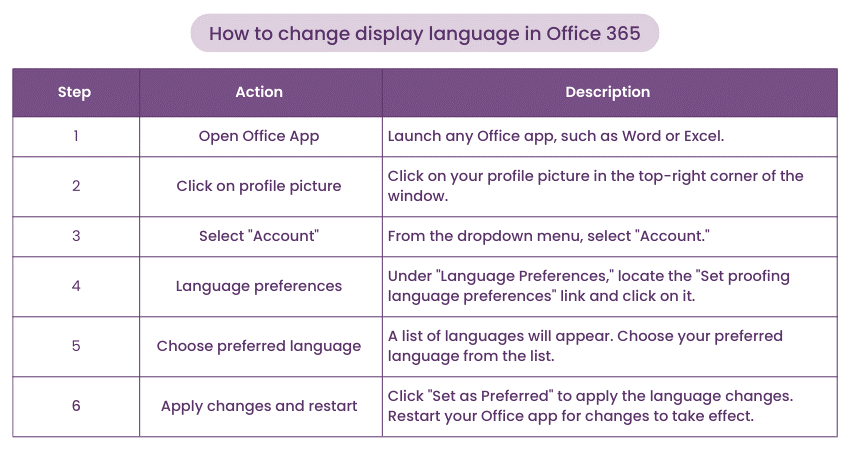
a) Open an Office app: Launch any Microsoft 365 app, such as Word.
b) Access account settings: Click on your profile picture in the window's top-right corner.
c) Go to account: From the dropdown menu, select "Account."
d) Language preferences: Under "Language Preferences," you can "Set your proofing language preferences." Click on this.
e) Select preferred language: Choose your desired Language from the list and select "Set as Preferred."
f) Restart for changes: To apply the changes, restart your Office applications. You should sign out and sign in again for the changes to take full effect.
Need to switch languages? Learn how to change the language in Microsoft Word quickly and easily. Click here for a step-by-step guide!
How to change MS Word language on a Mac?
The procedure for setting the language differsfrom that of Microsoft Word's macOS version. Here are the steps to change the Language in Microsoft Word for Mac:
a) Open Microsoft Word: Open the Microsoft Word application on your Mac
b) Go to Preferences: Click "Word" in the top menu bar, and then click "Preferences."
c) Select language: In the Preferences panel, select "Spelling and Grammar."
d) Set language: Click on "Dictionaries" and select your preferred language from the list.
e) Apply changes: Click "OK" to apply the updated language settings.
To change the language for a specific document
a) Go to tools: Click on the "Tools” in the menu bar
b) Select language: Click on "Language"
c) Set languages: Select your desired language
d) Apply changes: Click “OK" to apply new language settings
Proofing language settings
Setting the proof language in Microsoft Word is a vital aspect of ensuring accurate spelling and grammar checks for your documents. It involves specifying the language you want Word to use when reviewing and suggesting corrections. Here's a comprehensive guide on how to set proofing languages
Setting Proofing Language for the entire document
a) Open document: Open the document you want to work on in Microsoft Word.
b) Review tab: Navigate to the "Review" tab located in the top menu.
c) Language options: Click on the "Language" button, usually situated on the left side of the ribbon.
d) Set proofing language: A dropdown menu will appear. Select "Set Proofing Language."
e) Choose language: In the Proofing language dialogue box, choose your preferred language from the list.
f) Set as default: To apply this language to the entire document, click the "Default" button.
g) Confirm and close: Click "OK" to confirm your selection and close the dialogue box.
Setting proofing Language for specific text
a) Select text: Highlight the specific text for which you want to change the proofing language.
b) Right-click or review Tab: Right-click on the selected text and choose "Language," or navigate to the "Review" tab and click on "Language."
c) Choose proofing language: Similar to the previous method, select your desired proofing language from the list.
Join our Microsoft Office 365 Training and enhance your Microsoft Office skills now!
User Interface language
The User Interface language in Microsoft Word refers to the Language in which the menus, commands, and options are displayed. This means that when you change the User Interface language, you're customising how Word looks and interacts with you. Here's a detailed guide on how to change the User Interface language:
a) Open Word: Launch Microsoft Word on your computer.
b) Navigate to options: Navigate to the "File" tab located in the upper left corner, followed by choosing "Options" situated at the bottom. This action will open up the Word Options dialogue box.
c) Access language settings: In the Word Options dialogue, choose the "Language" tab from the list on the left.
d) Select display language: Under "Choose Display and Help Languages," you'll see a dropdown list of available languages. Choose the language in which you want the interface to be displayed.
e) Change Office display language: If you're using Office 365, you can also click the "Set Office Language Preferences" link to change the language for all Office apps, including Word.
f) Apply and restart: After selecting the desired language, click "OK." You'll be prompted to restart Word so the changes to take effect.
Multilingual editing
Multilingual editing in Microsoft Word refers to the process of working with documents that contain content in multiple languages. It involves adjusting the proofing language settings for specific portions of text to ensure accurate spell-checking and grammar correction.
Multilingual editing capability is very useful while handling documents containing quotes or phrases in different languages. It is also useful for sections written in languages different than the document's main Language. This ensures that each area is proofread using the proper language rules, maintaining accuracy and professionalism. Here's how you can effectively perform multilingual editing:

a) Open document: Begin by opening the document in Microsoft Word which contains content in different languages.
b) Select Text: Highlight the specific text that you want to assign a different proofing language to. This could be a sentence, a paragraph, or an entire section.
c) Proofing Language: Right-click on the selected text and choose "Language" from the context menu. Alternatively, you can navigate to the "Review" tab and click on the "Language" button.
d) Choose Language: From the dropdown menu, select the appropriate proofing language for the highlighted text. This ensures that the spell check and grammar correction tools consider the chosen language's rules.
e) Repeat as Needed: If your document contains multiple sections in different languages, repeat the process for each relevant section. Assign the correct proofing language to each portion to ensure accurate corrections.
Enhance your collaboration skills by joining our Microsoft Teams Course today and boost your productivity!
Conclusion
Now that you’re familiar How to Change Language in Microsoft Word, you can elevate your writing and communication skills. By adhering to these guidelines, you can effortlessly switch between languages. Learn to configure Word to suit any language preference and revel in the creation of more efficient, personalised documents.
Unlock your full potential with our Microsoft Word Masterclass and become a word-processing wizard today!
Frequently Asked Questions

To switch languages on your Microsoft Word keyboard, press “Alt + Shift" or " Windows + Spacebar" to toggle through installed language options.

Word may be edited in a different language because the proofing language setting was changed. Also, the text might have been copied from another source with a different language setting.

The Knowledge Academy takes global learning to new heights, offering over 30,000 online courses across 490+ locations in 220 countries. This expansive reach ensures accessibility and convenience for learners worldwide.
Alongside our diverse Online Course Catalogue, encompassing 17 major categories, we go the extra mile by providing a plethora of free educational Online Resources like News updates, Blogs, videos, webinars, and interview questions. Tailoring learning experiences further, professionals can maximise value with customisable Course Bundles of TKA.

The Knowledge Academy’s Knowledge Pass, a prepaid voucher, adds another layer of flexibility, allowing course bookings over a 12-month period. Join us on a journey where education knows no bounds.

The Knowledge Academy offers various Microsoft Office Training, including Microsoft Word Course, Microsoft PowerPoint Training, Microsoft SharePoint Training, Microsoft Office 365 Training and Microsoft Teams Training. These courses cater to different skill levels, providing comprehensive insights into Use Microsoft Teams.
Our Office Applications Blogs cover a range of topics related to Microsoft Office, offering valuable resources, best practices, and industry insights. Whether you are a beginner or looking to advance your Office Applications skills, The Knowledge Academy's diverse courses and informative blogs have you covered.
Upcoming Office Applications Resources Batches & Dates
Date
 Microsoft Word Course
Fri 17th Jan 2025
Fri 7th Mar 2025
Fri 23rd May 2025
Fri 12th Sep 2025
Fri 14th Nov 2025
Fri 12th Dec 2025


 Top Rated Course


 If you wish to make any changes to your course, please


