We may not have the course you’re looking for. If you enquire or give us a call on 800600725 and speak to our training experts, we may still be able to help with your training requirements.
Training Outcomes Within Your Budget!
We ensure quality, budget-alignment, and timely delivery by our expert instructors.
Learning How to Use Adobe Illustrator can unlock endless possibilities in digital art and design. This powerful software excels at creating intricate vector graphics that remain sharp at any size. Begin by getting comfortable with the user-friendly interface and mastering essential tools like the Pen, Shape, and Selection tools. As you advance, you’ll learn to utilise vector paths and apply vibrant colours, gradients, and detailed effects.
Understanding layers and artboards will further enhance your ability to organise and manage complex projects efficiently. Whether you’re designing logos, illustrations, or typography, mastering Adobe Illustrator is an invaluable skill in the creative industry.
Table of Contents
1) How to get Started on Adobe Illustrator?
2) Understanding the Adobe Illustrator Interface
3) Essential Tools to Create Projects on Adobe Illustrator
4) Working with Objects in Adobe Illustrator
5) Understanding Paths and the Pen Tool
6) Colour and Gradients Tool in Illustrator
7) Layers and Designs on Adobe Illustrator
8) Working with Brushes and Symbols
9) Exporting Your Work From Adobe Illustrator
10) Adobe Illustrator Fills and Strokes
11) Benefits of Using Adobe Illustrator
12) Seven Tips for Using Adobe Illustrator
13) Conclusion
How to get Started on Adobe Illustrator?
To start your journey on Adobe Illustrator, you will need a paid subscription plan, or you can also use Adobe Illustrator for free with its 7-day free trial plan. You can subscribe to the Adobe.com Creative Cloud subscription or individually to the Adobe Illustrator version CC to get started. Follow these steps to familiarise yourself with Adobe Illustrator:
Installing and Setting up Illustrator.
Installing Adobe Illustrator is your first step, to begin with, after downloading the software from the official Adobe website. Install the software by following the on-screen instructions. Sign in with your Adobe ID or create a new account if you don't already have one. After installation, you're ready to launch the software.
Creating a new Document
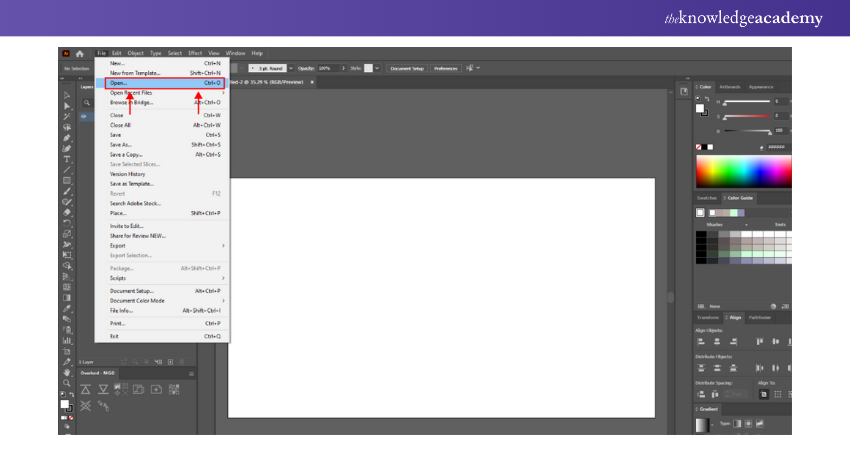
After launching Adobe Illustrator, the software opens to its workspace, a blank canvas ready for your creative ideas. Go to the "File" menu and select "New" to start a new project. You can define your document's dimensions, units, and colour mode here. Select the purpose of your design – whether it's for print, web, or other media – and choose the appropriate settings.
Understanding the Essential Tools
Adobe Illustrator offers a diverse set of tools that are fundamental to your design process. Familiarise yourself with these tools to manipulate shapes, lines, and objects effectively:
Selection Tool (V): The default tool for selecting and moving objects.
Direct Selection Tool (A): Used to choose individual anchor points and paths within objects.
Shape Tools: Tools like the Rectangle, Ellipse, and Polygon allow you to create basic geometric shapes.
Pen Tool (P): Essential for creating and editing paths, enabling you to craft intricate designs.
Type Tool (T): Used to add and manipulate text within your designs.
Learning how to utilise these basic tools forms the foundation of your proficiency in Adobe Illustrator.
Elevate your design abilities—explore our Adobe Training and learn from industry experts!
Understanding Adobe Illustrator Interface
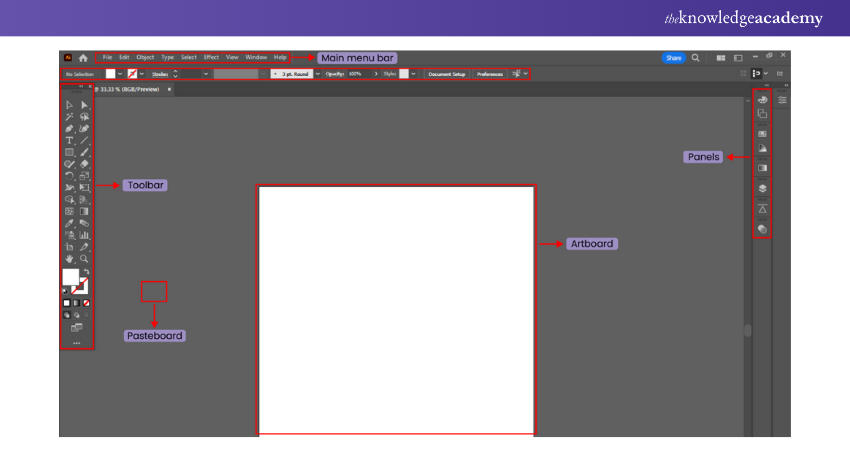
The Adobe Illustrator interface might need some time to get familiar with. The user-friendly interface offers plenty of options for beginners to advance levels. Some of the main elements of Illustrator’s interface are as follows:
Toolbar
The Toolbar includes essential tools for creating, editing, and manipulating objects. Each tool serves a specific purpose in your design process, from the Selection Tool to the Shape Tools and more.
Menu Bar
The Menu bar provides access to Illustrator's various menus and commands. Here, you'll find options for creating, editing and exporting your designs and customisation settings.
Control Bar
The Control bar is located below the Menu bar. The Control bar displays context-sensitive options for the selected tool. This feature enables quick customisation without the need to navigate through menus.
Panels
Panels offer access to features like Layers, Colour, and Swatches. You can organise and customise your workspace by docking panels to specific areas or collapsing them when not in use.
Essential Tools and Features of Adobe Illustrator
Adobe Illustrator has various features and tools to produce high-quality results. Some of the most used tools and features of Illustrator are as follows:
Selection Tools
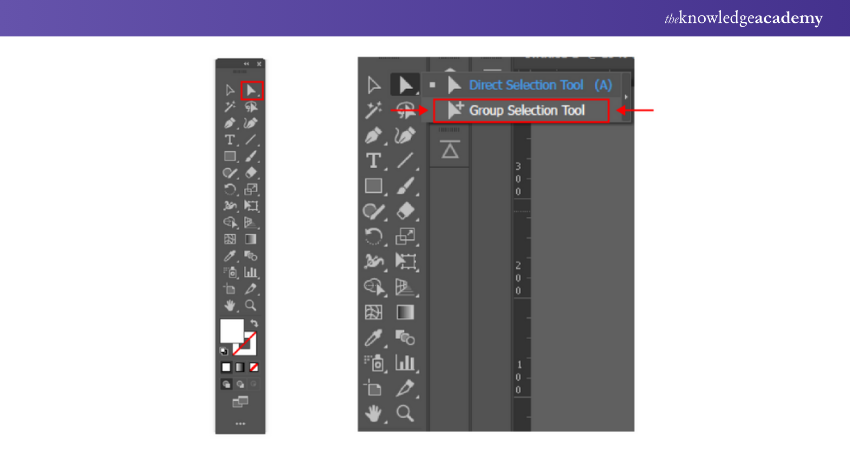
Adobe Illustrator offers various selection tools, like the ‘Selection tool’ (V), ‘Direct Selection Tool’ (A), and ‘Group Selection Tool’ (Shift + A). These tools help you to manipulate and edit individual objects, anchor points, and entire groups.
Pen Tool and Bezier Curves
The Pen Tool (P) is the most used tool for creating custom shapes and paths. Bezier curves help create smooth and precise curves by adding and adjusting anchor points and their control handles.
Shape Tools
Illustrator provides various shape tools like the ‘Rectangle Tool’ (M), ‘Ellipse Tool’ (L), and ‘Polygon Tool’. These tools allow you to easily create basic shapes, which can be customised and combined to form more complex designs per your requirements.
Type Tool and Working with Text
The ‘Type Tool’ (T) helps you add and edit your designs' text. You can adjust font properties, alignment, spacing, and even convert text into outlines for further customisation.
Working With Objects in Adobe Illustrator
You can create and work on different sketches and objects in Illustrator. Here’s how you can use the Object Tool on the Adobe Illustrator:
1) Creating Basic Shapes
Utilise the Shape Tools to quickly create basic geometric forms like rectangles, ellipses, and polygons. These shapes can be combined, modified, and aligned to form more complex designs.
2) Manipulating and Transforming Objects
The Transform and Control panels provide options to scale, rotate, skew, and precisely reflect objects. You can also duplicate objects and use the Align and Distribute Tools to arrange them evenly.
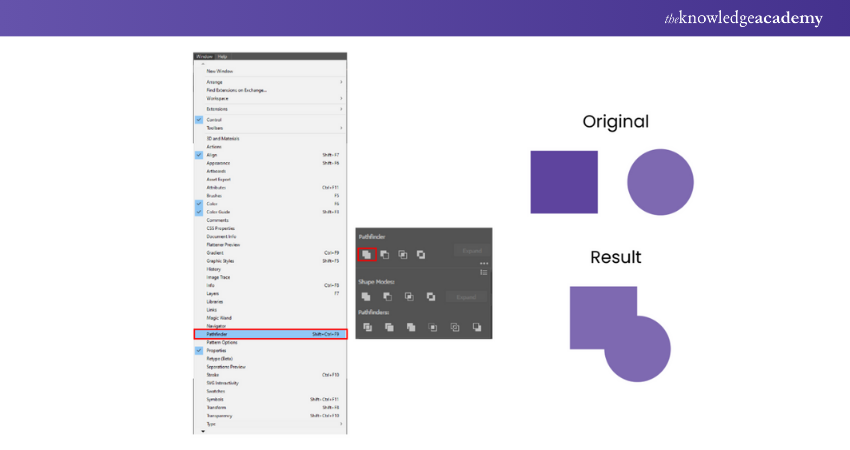
3) Using the Pathfinder Tool for Complex Shapes
The Pathfinder panel is a powerful toolset for creating complex shapes by combining or subtracting multiple objects. It lets you create intricate designs with ease. "Minus Front" and "Exclude" allow you to sculpt shapes, cutting away sections to reveal intriguing negative spaces.
4) Grouping and Ungrouping Objects
Grouping objects allows you to treat them as a single unit. Use the Group and Ungroup commands to manage and edit multiple objects together or separately. Ungrouping will enhance precision, enabling you to fine-tune details, adjust colours and modify shapes.
Understanding Paths and the Pen Tool
The Pen Tool on Adobe Illustrator is the most used feature; it helps you draw lines, curves and pointers in many other ways, as discussed below:
Drawing and Editing Paths
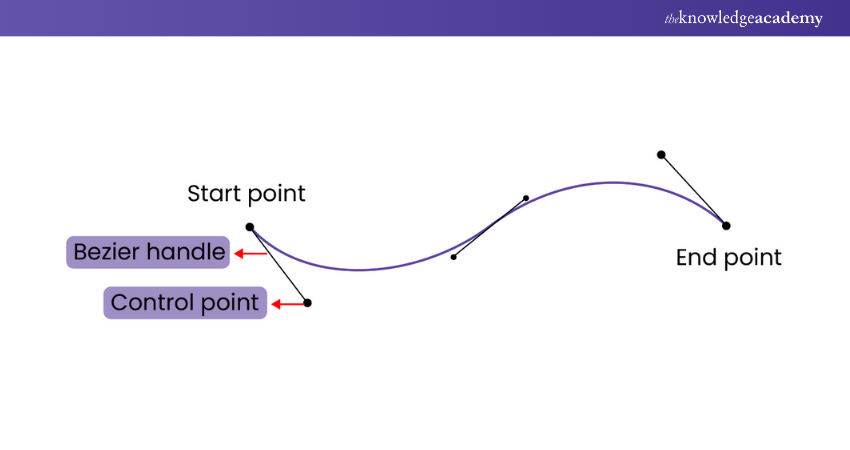
With the Pen Tool, you can draw paths by placing anchor points and adjusting their control handles. Click on the canvas to set your first anchor point (starting point of your path) and click again to place another anchor point (ending point of your path). The Illustrator will draw a straight line itself to connect the two points.
Bezier Curves
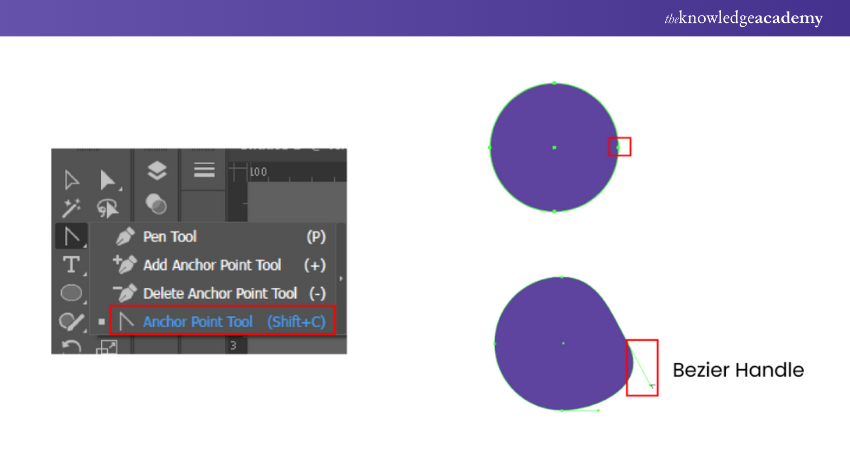
Click to place the first Anchor Point. Instead of releasing the mouse button, drag it in the direction you want the curve to bend. Practice adding, deleting, and adjusting anchor points and handles. Use the Direct Selection Tool (white arrow) to select Anchor Points and adjust their position or control handles.
Adding and Removing Anchor Points
You can modify paths by adding or removing anchor points. It helps in altering the shape and structure of your designs while maintaining flexibility.
Creating Custom Shapes with the Pen Tool
Place anchor points for straight lines and then, for curves, adjust the control handles to create a smooth transition between line segments and curves. Place the last anchor point directly over the starting point to close your custom shape and transform it into a closed object. The Illustrator will indicate the path as closed.
Colour and Gradients Tool in Illustrator
Adobe Illustrator offers a variety of colour and gradient options. You can colour your design to make it more visually appealing. Explore the ability of these tools and create extraordinary art with the help of the following steps.
Using the Colour Picker
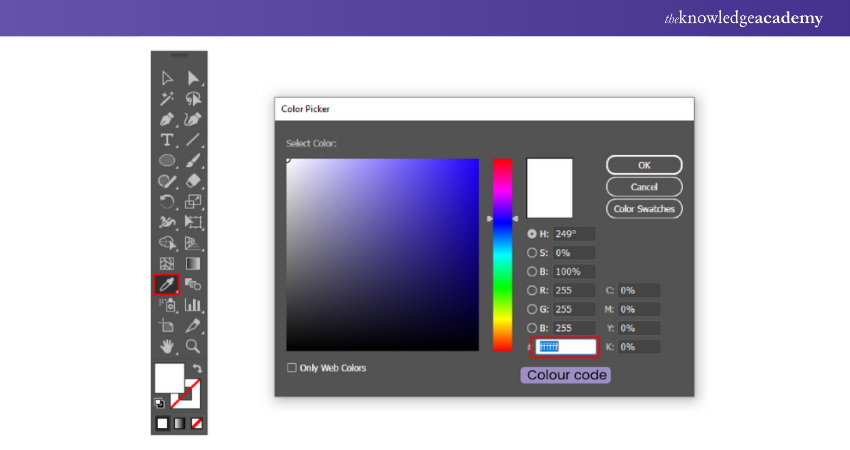
Use the Colour Picker Tool to select and apply colours accurately. Illustrator offers a wide range of Colours, including Pantone Colours, for print projects and more.
Applying and Editing Gradients
Gradients add depth and dimension to your designs. Learn to create linear, radial, and freeform gradients, and experiment with opacity and Colour stops.
Creating Custom Colour Swatches
Build a library of custom colour swatches to maintain consistency across your designs. Save the colours you frequently use and organise them for easy access.
Using the Recolour Artwork Tool
The Recolour Artwork tool lets you experiment with different colour schemes and adjust without manually selecting and changing individual elements.
Layers and Designs on Adobe Illustrator
You can add several layers and designs while working on a graphic in Illustrator. The following points will help you understand the Layer and Design Tools in Adobe Illustrator:
Organising Your Design with Layers
Organise and divide your design into logical sections by using layers. Each layer can hold specific elements, making managing and editing your artwork easier.
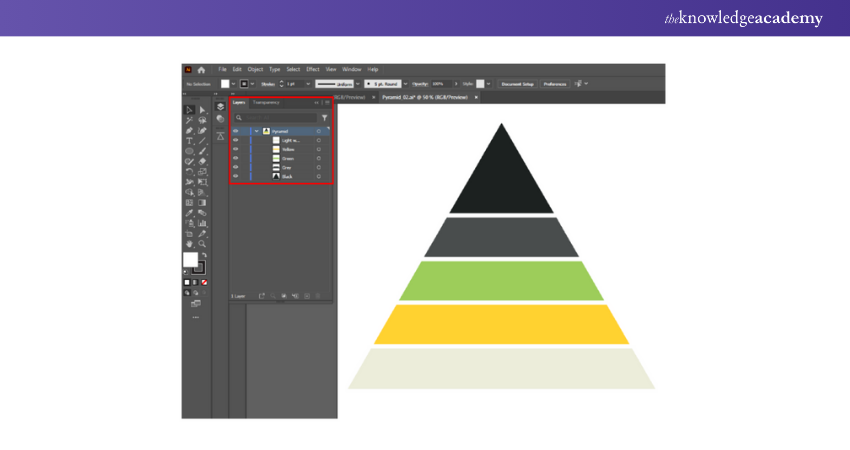
Locking and Hiding Layers
You can prevent accidental modifications by locking layers in your design. You can also hide layers to focus on specific parts of your design without distractions.
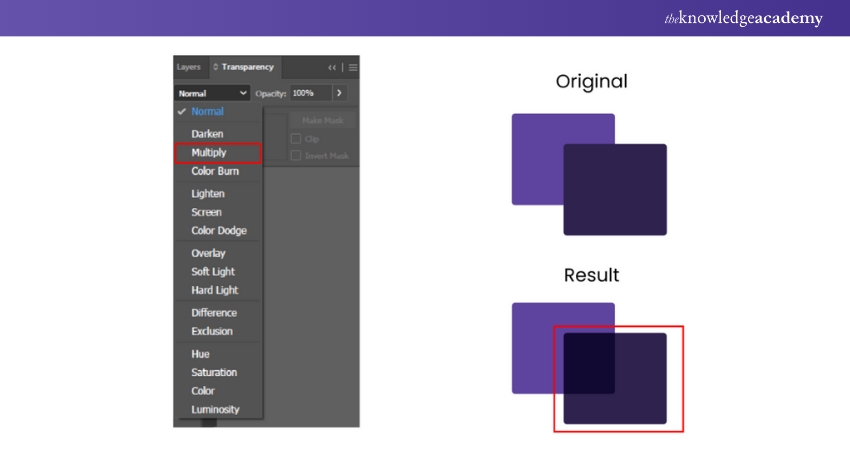
Adjusting Layer Transparency
Control the transparency of individual layers to achieve desired effects and create overlays in your design. You can set the transparency with the help of the ‘opacity slider’ in the transparency panel.
Working with Layer Groups
Grouping the related layers together will help you organise your design further. This is especially useful for complex projects with multiple elements.
Adding and Formatting Text
Utilise the Type Tool to add text to your design. Experiment with fonts, sizes, kerning, and leading to create visually appealing text elements.
Incorporating Images and Graphics
Import raster images or vector graphics into your design using the Place command. Illustrator supports various file formats, allowing you to integrate external elements seamlessly.
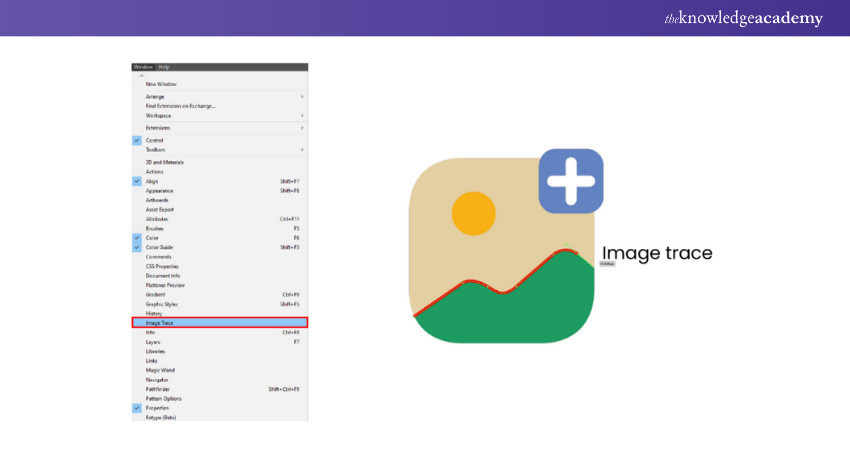
Using the Image Trace Tool for Raster-to-Vector Conversion
The Image Trace Tool converts raster images into vector paths, which you can edit and manipulate. It is particularly useful for turning hand-drawn sketches into digital artwork.
Applying Special Effects and Filters
Enhance your designs with effects like drop shadows, glows, and blurs. Illustrator's Effects menu provides a range of options to add depth and realism to your artwork.
Unlock the power of Adobe InDesign with our Adobe InDesign Course today!
Working with Brushes and Symbols
Brushes and symbols are among the most powerful tools in Adobe Illustrator, like the Pen Tool. There are different types of brushes like Art Brushes, Bristle Brushes and Pattern Brushes etc. Explore more about the Brush and Symbol Tools below:
1) Using the Brush Tool
The Brush Tool allows you to create unique strokes that resemble traditional art mediums like ink or watercolour - Customise brush settings to achieve the desired effect.
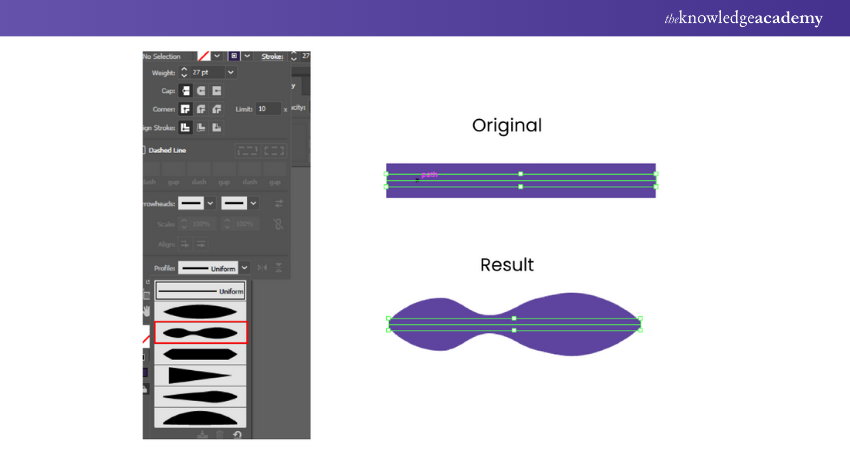
Creating and Editing Your own Brushes
Build your own custom Brushes for specific design needs. Experiment with different Brush shapes, sizes, and settings to achieve diverse results.
Using Symbols for Efficiency and Consistency
Symbols are reusable elements that can be placed throughout your design. They're perfect for logos, icons, and repetitive design elements that need consistency.
Exporting Your Artwork From Adobe Illustrator
Exporting is an essential tool to share and save files. You can export the image or graphic by saving it in the supported file format. Here’s everything you need to know about exporting your work on Adobe Illustrator.
Choosing the Right File Format
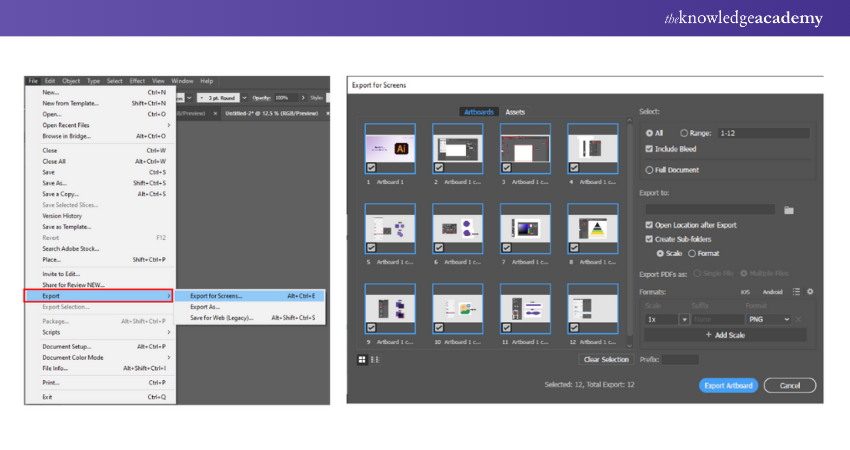
Select a supported file format based on the intended use of your design. Common formats include AI, PDF, EPS, SVG, and more. To open the export screen, click on ‘File’, ‘Export’, and ‘Export for Screens’.
Exporting for Print vs. Web
Adjusting the settings like the resolution – to 300 Dots Per Inch (DPI) or higher and colour mode – to CMYK (Cyan, Magenta, Yellow, Black) while exporting for print or web to ensure your design looks its best in different contexts.
Adjusting Settings for Optimal Output
Explore export settings to optimise your design's quality and file size. Balancing these factors is essential for a smooth user experience. While adjusting the setting, remember that - some formats, like JPEG, are excellent for photographs, while others, like PNG, support transparency and sharp graphics.
Using the Export for Screens Feature
Illustrator's Export for Screens feature simplifies the process of exporting multiple assets in different formats and sizes for various devices. While selecting the right format for exporting the file, you can also Specify the scale at which you want to export your assets. You can choose to export at 1x (actual size), 2x (retina), 3x, or set a custom scale.
Adobe Illustrator Fills and Strokes
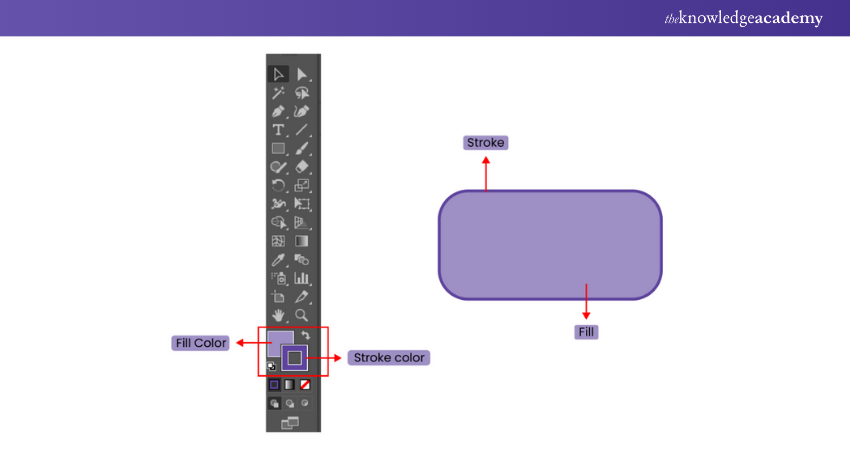
The Illustrator has two colouring options - Filler Colours and Strokes. If used efficiently, it can turn ordinary art into an extraordinary one. Know more about the Filler and Strokes Tools as we discuss them below:
1) Understanding Fills and Strokes
Fills refer to the interior colour of an object, while strokes pertain to the outline or border. Learning how to manage both effectively allows you to enhance the visual impact of your artwork.
2) Working With Gradients
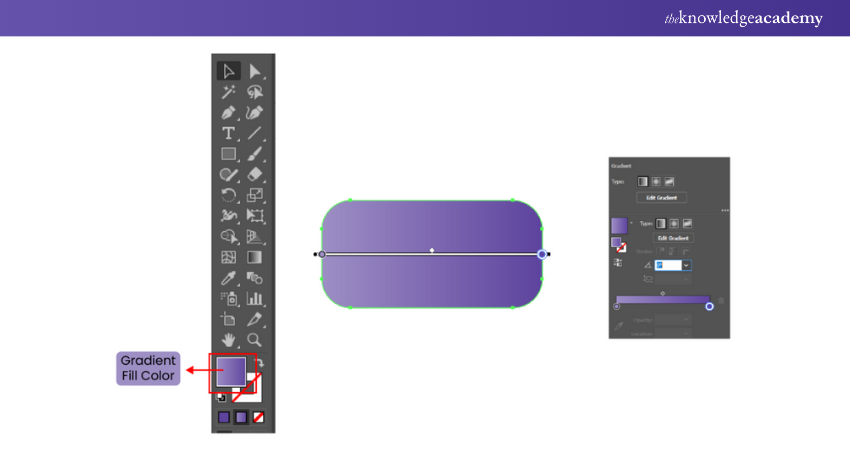
Gradients add dimension to your designs by blending multiple colours. Illustrator offers linear, radial, and freeform gradients that can be customised to suit your artistic goals. The true magic of gradients lies in customisation. You can set the opacity and transparency to achieve the best results.
Adding Strokes to Paths and Shapes
Strokes can magnify the edges of your shapes and paths. To generate high-quality designs, explore the stroke options such as thickness, alignment, and dashed lines to achieve various effects.
Learn and master visual effects with our Adobe After Effects Course – Join now!
Benefits of learning Adobe Illustrator
Learning Adobe Illustrator can be an incredible addition to your skillset because of its numerous benefits beyond just acquiring design skills. This powerful graphic design software offers a range of advantages, enhancing both your creative abilities and professional opportunities.
Unlock Creative Potential: Understanding How to Use Adobe Illustrator introduces you to a world of limitless creativity. You can bring your artistic illustrations to life through vector graphics, creating quality illustrations, logos, icons, and designs that reflect your unique style.
Professional Design Skills: Adobe Illustrator equips you with a valuable skill set that is in high demand across industries. Whether you're pursuing a career in graphic design, marketing, or even architecture, knowing How to Use Adobe Illustrator? can set you apart and enhance your employability.
Versatility and Flexibility: Adobe Illustrator is applicable in a wide range of industry work and careers. Illustrator allows you to adapt your skills to various design needs, from print media like brochures and business cards to web design elements and digital illustrations.
Precise and Scalable Artwork: With Adobe Illustrator vector graphics, your creations become crisp and sharp, regardless of size. This ability to scale designs without compromising quality is beneficial for producing professional-grade graphics for various platforms.
Industry-Standard Software: Adobe Illustrator is an industry-standard tool which is widely used by professionals worldwide. Learning this software can help you align yourself with a common language of design, enabling smoother collaboration and communication with colleagues and clients. Seven Tips for Using Adobe Illustrator
Becoming proficient in Adobe Illustrator can greatly improve your abilities in graphic design. Here are seven suggestions to assist you in utilising this potent tool efficiently:
1) Learn by Using Templates
Utilising templates for a quick start can speed up your design projects. They offer an organised beginning and can help you learn how to arrange elements effectively in your designs.
2) Set Your Preferred Workspace
Adjust your Illustrator workspace to fit your specific workflow preferences. Arrange toolbars and panels for quick access to frequently used tools, increasing productivity.
3) Familiarise Yourself With the Drawing Tools
Dedicate time to becoming skilled with the pen and other drawing tools. These play a key role in making accurate vector shapes and paths necessary for intricate graphic tasks.
4) Edit Photos
Utilise Illustrator's features to edit and improve photos. Gain knowledge on how to utilise filters, modify colours, and convert images into vector format to enhance the versatility of your designs.
5) Explore Typography
Immerse yourself in the realm of typography using Illustrator's wide range of type tools. Try out different font styles, design unique text layouts, and incorporate text seamlessly into your designs.
6) Use the Colour Guide
Utilise Illustrator’s Colour Guide to coordinate colours in your projects. It assists in choosing and implementing colour combinations that improve the attractiveness of your designs.
7) Learn Illustrator’s Exporting Options
Comprehend the various choices for exporting that are accessible. Understanding how to save files for different purposes, such as print or web, is essential for presenting your work in the correct format.
Conclusion
Adobe Illustrator can help you in many ways, from evolving your career to scaling up your business. Its stunning performance and abilities are one of the main reasons for its popularity and growing demand. We hope in this blog, you have learned How to Use Adobe Illustrator and its essential features and tools.
Discover the power of Adobe and elevate your art designs with our Adobe Illustrator Training – Register now!
Frequently Asked Questions

Yes, a beginner with no prior knowledge can use Adobe Illustrator. There are many beginner-friendly tutorials and courses available that guide users through the basics. With practice, anyone can learn to create stunning graphics and illustrations.

Adobe Illustrator is used for creating vector graphics, which are scalable without losing quality. It’s commonly used for designing logos, icons, illustrations, and typography. Additionally, it’s a powerful tool for creating complex artwork and digital graphics.

The Knowledge Academy takes global learning to new heights, offering over 30,000 online courses across 490+ locations in 220 countries. This expansive reach ensures accessibility and convenience for learners worldwide.
Alongside our diverse Online Course Catalogue, encompassing 19 major categories, we go the extra mile by providing a plethora of free educational Online Resources like News updates, blogs, videos, webinars, and interview questions. Tailoring learning experiences further, professionals can maximise value with customisable Course Bundles of TKA.

The Knowledge Academy’s Knowledge Pass, a prepaid voucher, adds another layer of flexibility, allowing course bookings over a 12-month period. Join us on a journey where education knows no bounds.

The Knowledge Academy offers various Adobe Courses, including the Adobe Illustrator Training, Adobe After Effects Course, and Adobe InDesign Course. These courses cater to different skill levels, providing comprehensive insights into Adobe Illustrator Tools.
Our Office Applications Blogs cover a range of topics related to Adobe, offering valuable resources, best practices, and industry insights. Whether you are a beginner or looking to advance your Office Applications skills, The Knowledge Academy's diverse courses and informative blogs have got you covered.
Upcoming Office Applications Resources Batches & Dates
Date
 Photoshop Course
Wed 12th Feb 2025
Wed 16th Apr 2025
Wed 18th Jun 2025
Wed 13th Aug 2025
Wed 15th Oct 2025
Wed 10th Dec 2025


 Top Rated Course


 If you wish to make any changes to your course, please


