We may not have the course you’re looking for. If you enquire or give us a call on 800600725 and speak to our training experts, we may still be able to help with your training requirements.
Training Outcomes Within Your Budget!
We ensure quality, budget-alignment, and timely delivery by our expert instructors.

Premiere Pro stands as a beacon in the realm of video editing software, favoured by seasoned videographers and filmmakers worldwide. However, many of them are still unaware of How to Use Adobe Premiere Pro efficiently.
According to Statista, Adobe Inc. made over 13.31 billion GBP in the year 2022. Adobe Premiere is a creation of this suite, which gained immense popularity thanks to its extensive editing functionalities and seamless integration with other Adobe products.
With its increasing popularity and advanced functionalities, it's crucial to learn how to use this tool in order to create visually engaging content. So, read this blog to learn How to Use Adobe Premiere Pro. Also, explore the essential steps for harnessing the full potential of this platform.
Table of Contents
1) Steps by step explanation of How to Use Adobe Premiere Pro
a) Setting up a new project in Adobe Premiere Pro
b) Understanding the interface of Adobe Premiere Pro
c) Importing media into Adobe Premiere Pro
d) Basic editing techniques in Adobe Premiere Pro
e) Exporting your finished video in Adobe Premiere Pro
2) Conclusion
Steps on How to Use Adobe Premiere Pro
Here is a brief explanation of the capabilities of Adobe Premiere Pro and how to use them:
Setting up a New Project in Adobe Premiere Pro
Kick off your editing journey by opening Adobe Premiere Pro. On the initial interface, opt for 'New Project' to establish a blank canvas for your creative endeavours. Within this dialogue box:
1) Naming your project: Assign a meaningful name, ensuring it provides a clear indication of the project's content or theme. This will simplify your workflow, especially when working on multiple projects.
2) Location: Define where your project files should reside. Whether it's on your computer's hard drive or an external device, ensure the chosen space has sufficient storage, especially if you anticipate working with high-resolution or extensive media.
3) Rendering engine: Enhanced playback and expedient export times are crucial for a seamless editing experience. The software prompts you to select a rendering engine. The ‘Mercury Playback Engine GPU Acceleration’ is typically the default choice, leveraging your computer's graphics capabilities for optimal performance.
4) Auto-save: It's always prudent to frequently save your work. Set up the auto-save feature to automatically store periodic iterations of your project. This ensures that even in the face of unforeseen software hiccups, your progress remains safeguarded.
Understanding the interface of Adobe Premiere Pro
Adobe Premiere Pro, with its multifaceted interface, is designed to provide a seamless video editing experience. At the core of this software lies a well-organised workspace broken down into distinct panels. Let's delve deeper into these integral components:

1) Project panel: At the heart of every masterpiece lies its raw materials. The Project Panel serves as the repository for all your media. Be it video clips, audio files or images, everything finds its place here. The panel offers a bird’s-eye view of all assets, making selection and organisation a breeze.
2) Source monitor: Diving into editing without a prior review can be a leap in the dark. The Source monitor acts as your initial screening area. Before committing any clip to the timeline, you can preview it here, ensuring you pick only the portions that resonate with your narrative.
3) Program monitor: As you piece your story together, witnessing it unfold is essential. The Program monitor provides real-time playback of the sequence you're actively editing. Think of it as your feedback mechanism, reflecting every edit, cut, transition, or effect you apply.
4) Timeline: This linear workspace is where the magic truly happens. The Timeline is where you arrange, sequence, trim, and edit your clips. Layered to accommodate both video and audio, it provides a visual representation of your project's flow, allowing for precise adjustments and modifications.
Transform your ideas into reality with Adobe Training! Explore innovative techniques and enhance your creative toolbox.
Importing media into Adobe Premiere Pro
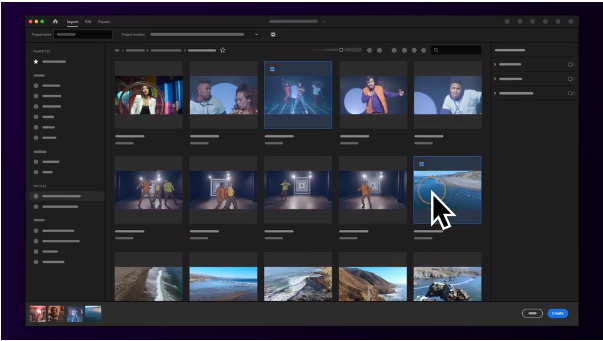
Before you embark on the creative journey of video editing, the first step is to introduce your raw materials into Adobe Premiere Pro. This software provides a couple of straightforward methods to get your content onboard:
1) Drag and drop: Perhaps the most intuitive method for many, especially those familiar with the drag-and-drop function in various applications. All you need to do is locate the media files on your computer and simply drag them, then drop them into the Project Panel within Premiere Pro. Once dropped, these files become part of your project's media library, ready for editing.
2) File import: For a more structured approach, especially when importing multiple files or folders, the File Import method might be preferable.
a) Begin by navigating to the top of the interface, and you will see the ‘File’ menu located in Premiere Pro.
b) From the dropdown, select Import. This action will open a dialogue box.
c) Within this box, you can browse through your computer's directories to locate the desired media.
d) Once found, select the file or files (you can choose multiple by holding down the 'Ctrl' key for individual files or 'Shift' for a range) and click 'Open' or 'Import'.
Wish to edit beautiful videos? Try our Adobe Premiere Pro Course!
Basic editing techniques in Adobe Premiere Pro
Once your media is imported into Adobe Premiere Pro, the real craft of storytelling begins. Understanding the fundamental editing techniques is crucial to producing a polished piece. Let's delve into these essentials:
1) Razor tool: Found in the tool panel (or by pressing the 'C' key), the Razor tool allows you to make cuts within a clip. Just clicking at the point where you wish to make a cut will segment a clip into separate pieces. This is particularly useful when you want to remove unwanted portions from the middle of a clip.
2) Selection tool: Accessible by default (or by pressing the 'V' key), the Selection tool permits you to manipulate the start and end points of a clip. Hovering over the edge of a clip in the timeline will let you click and drag to extend or reduce its duration. This is perfect for fine-tuning the in and out points of your clip.
3) Applying transitions: Navigate to the ‘Effects’ panel, typically located on the right-hand side of the interface. This panel has a folder labelled 'Video Transitions'. Open it to reveal a list of transition types. One of the most used tools is 'Dissolve', and within this, you'll find the classic 'Cross Dissolve'. Just drag your chosen transition between two adjacent clips on your timeline to apply.
4) Volume adjustment: In your timeline, you'll notice a line running through the middle of your audio clip; this is the volume level. Clicking and dragging it up or down will increase or decrease the volume, respectively.
5) Keyframes for fades: For a controlled volume adjustment, such as fading in or out, you can use keyframes. To do this, expand the audio clip in the timeline by clicking on the arrow next to its name. Right-click on the volume line at the point where you want the fade to start or end and select 'Add Keyframe'. Adding multiple keyframes will dictate the volume's rise and fall, creating smooth fades.
Learn to use gorgeous gradients with our Adobe Illustrator Training!
Exporting your finished video in Adobe Premiere Pro
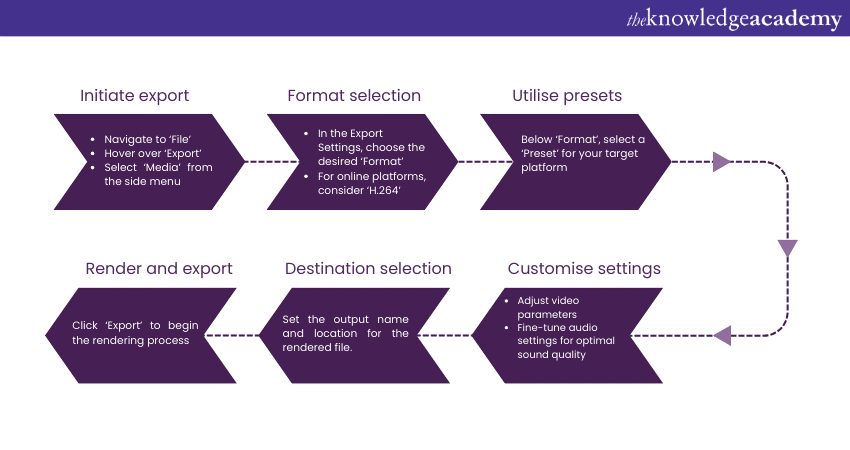
After investing time and creativity into sculpting your narrative in Adobe Premiere Pro, the final step is sharing your vision with the world. Exporting turns your project into a cohesive video file suitable for various platforms or purposes. Here's how to seamlessly transition from editing to exporting:

1) Initiating the export process: Once you've reviewed and are satisfied with your edit, using these steps:
a) Navigate to the top menu and click on ‘File’.
b) From the dropdown menu, hover over ‘Export’ to reveal its side menu.
c) Click on ‘Media’. This action will launch the Export Settings dialogue box, offering a myriad of customisation options.
2) Selecting the right format: Different platforms and uses might require different file types. Fortunately, Premiere Pro offers a plethora of options.
a) In the Export Settings dialogue box, you'll find the ‘Format’ dropdown. Here, you can select the file type best suited for your needs.
b) For those targeting online platforms, ‘H.264’ stands out as a prevalent choice. It offers good compression, ensuring high quality with reduced file sizes. This option makes it particularly apt for platforms like YouTube or Vimeo.
3) Choosing a preset: To further simplify the export process, especially for those who might be unsure of the intricate settings, Adobe Premiere Pro offers presets. Just below the ‘Format’ dropdown, you’ll see a ‘Preset’ dropdown. This contains predefined settings tailored for specific platforms or quality needs. For instance, if you’re exporting for YouTube, there’s a preset to match its recommended settings.
4) Rendering your video: Click on the ‘Export’ button located at the bottom of the Export Settings dialogue box once everything is set to your satisfaction. Premiere Pro will then begin the rendering process, converting your edited sequence into a single, cohesive video file.
Conclusion
Learning How to Use Adobe Premiere Pro can seem challenging initially, but this software is a gem for budding and professional video editors alike. Its vast array of tools, from basic trimming to intricate colour grading, unlocks endless creative avenues. The key is patience and consistent practice. So, experiment with projects, and let your creativity flourish with every edit you make happy editing.
Interested in printing your own material? Try our Adobe InDesign Course!


 Top Rated Course


 If you wish to make any changes to your course, please


