


 Top Rated Course

We may not have the course you’re looking for. If you enquire or give us a call on +44 1344 203999 and speak to our training experts, we may still be able to help with your training requirements.
How to Build a CSS Website?
Sophia Ellis 04 October 2023Unlock the secrets to crafting a stunning online presence with our blog: How to Build a CSS Website. From meticulous planning to going live, we navigate every step in this comprehensive journey. Dive into design nuances, secure your domain, and master HTML structuring. Elevate your site with expert styling tips, seamless navigation, and rigorous testing.

Training Outcomes Within Your Budget!
We ensure quality, budget-alignment, and timely delivery by our expert instructors.
Table of Contents
Websites play a pivotal role in connecting businesses, organisations, and individuals with their audiences. An effectively designed website not only showcases information but also delivers an exceptional User Experience. By understanding how to create a CSS Website, developers can enhance user engagement and design responsive and visually appealing web pages.
According to Talent.com, the average salary of a Web Developer in the UK is £38,988 annually. Learning how to create a website is an invaluable skill with promising career prospects. In this blog, you will learn how to build a CSS Website from scratch, from planning to going live. Let's delve in deeper to learn more!
Table of Contents
1) Building a CSS Website
a) Planning and design
b) Domain and hosting
c) Setting up the HTML structure
d) Styling the website
e) Navigation
f) Testing
g) Finalising and polishing
h) Going live
2) Conclusion
Building a CSS Website
Cascading Style Sheets (CSS) is an essential technology used in Web Development to control the presentation and layout of a website. It plays a critical role in splitting the content of a webpage from its design, enabling developers to create visually appealing and consistent websites.
Building a website with CSS involves several essential steps to create a visually appealing and functional online presence. Each stage contributes to a successful website, from planning and design to testing and going live. Let's explore them in detail:
Planning and design
The first crucial step in building a website with CSS is planning and designing its structure and layout. This stage lays the foundation for the entire development process. Follow these steps to effectively plan and design your CSS Website:
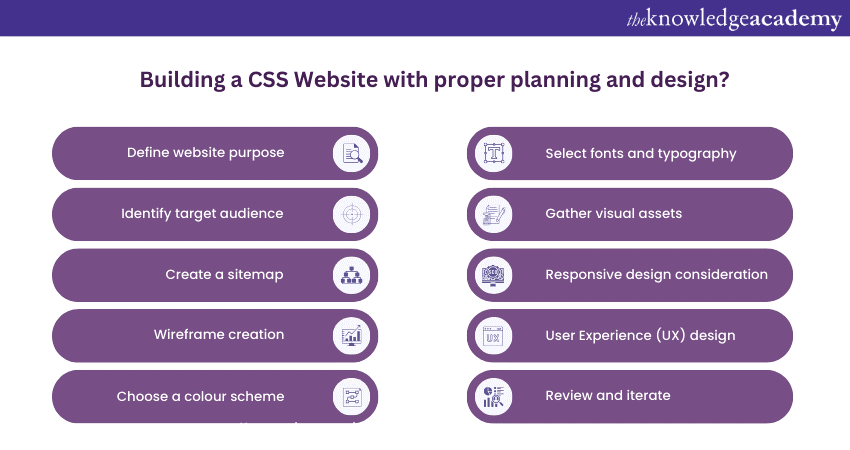
1) Define website purpose: Determine the primary goal of your CSS Website. Is it for personal blogging, e-commerce, portfolio showcasing, or something else? Understanding the purpose will guide the entire development process.
2) Identify target audience: Identify the specific audience or users you want to cater to. Understanding your target audience will help you customise the content and design to meet their needs.
3) Create a sitemap: Develop a sitemap that outlines the hierarchical structure of your CSS Website. This visual representation will show how different pages are connected and help you plan the navigation.
4) Wireframe creation: Design rough sketches or wireframes of your website's layout. Wireframes help you envision the placement of elements, such as headers, navigation bars, and content sections, without focusing on visual details.
5) Choose a colour scheme: Select a colour system that completes your brand and echoes with your target audience. Colours play a significant role in building a cohesive and appealing design.
6) Select fonts and typography: Choose appropriate fonts and typography for your website. Ensure they are legible and align with your brand's personality.
7) Gather visual assets: Collect images, graphics, and other visual assets that will be used on your website. High-quality and relevant visuals enhance the overall User Experience.
8) Responsive design consideration: In today's mobile-centric world, ensure your website design is responsive and adapts seamlessly to various screen sizes and devices.
9) User Experience (UX) design: Focus on creating a user-friendly and intuitive design. Consider how users will navigate and interact with your CSS Website and make navigation easy.
10) Review and iterate: Review your plans and designs, seeking feedback from peers or stakeholders if possible. Iterate on the designs as needed to refine your vision.
By carefully planning and designing your CSS Website, you set a clear direction for the development process. Moreover, you can ensure that your end product meets the needs of your audience. Take the time to lay a solid foundation, and you'll find the rest of the website-building process more efficient and effective.

Domain and hosting
When building a website, obtaining a domain and hosting are essential steps that allow your website to be accessible to users worldwide. Here's a breakdown of the domain and hosting process in a CSS Website:
1) Choose a domain name: Choose a striking and relevant domain name that represents your website's identity. Keep it concise, memorable, and easy to spell.
2) Domain registration: Register your chosen domain with a reputable domain registrar. Many domain registrars offer domain search tools to check if your desired domain is available.
3) Domain privacy protection: Consider opting for domain privacy protection to keep your personal information private. This service prevents your contact details from being publicly available in the WHOIS database.
4) Select a hosting provider: Research and choose a trustworthy hosting provider that completes your website's needs. Consider factors such as server performance, storage capacity, bandwidth, security features, and customer support.
5) Choose a hosting plan: Hosting providers offer various plans catering to different website requirements. Select a plan that aligns with the size and traffic expectations of your website.
6) Set up a hosting account: Sign up for the chosen hosting plan and create an account with the hosting provider.
7) Link domain to hosting: After setting up your hosting account, link your registered domain to the hosting service. This process involves updating the domain's DNS settings to point to the hosting server.
8) Install website platform: Depending on your website's technology stack, you may need to install a website platform like WordPress, Joomla, or others. Many hosting providers offer one-click installations for popular platforms.
9) Upload website files: If you have a custom-built website, upload your website files to the hosting server using an FTP (File Transfer Protocol) client or through the hosting provider's control panel.
10) Configure email accounts: If your hosting plan includes email services, set up email accounts with your domain name.
11) Test website functionality: Before making your website live, thoroughly test its functionality and performance. Check all links, forms, and interactive elements to ensure they work correctly.
12) Launch your website: Once you are satisfied with the testing, it's time to make your website live. Visitors can now access your website using the domain name you registered.
Remember to keep your domain and hosting services active and up-to-date to ensure your website remains accessible and functional. Regularly review your hosting plan to accommodate your website's growth and performance requirements.
Styling the website
After setting up the HTML structure, the next step in building a CSS Website is to add CSS to style the web page's appearance. Here's how you can style your website:
1) Create a separate CSS file: Start by creating a separate CSS file. You can name it "styles.css" or something similar. Keeping CSS separate from HTML ensures a clean and organised codebase.
2) Link CSS to HTML: In the ‘
’ section of your HTML document, link the CSS file using the ‘
’ element. For example,
3) CSS selectors: Use CSS selectors to target HTML elements for styling. You can select elements by their tag names (e.g., h1, p, a), classes (e.g., .classname), or IDs (e.g., #elementID).
4) Typography: Set the font family, size, colour, and other typography properties using CSS. For example, body { font-family: Arial, sans-serif; font-size: 16px; color: #333; }.
5) Colours and backgrounds: Apply colours and backgrounds to elements using CSS. Use properties like colour, background colour, background image, and background size.
6) Layout and positioning: Use CSS to control the layout and positioning of elements on the web page. Utilise properties like display, float, position, and margin to achieve the desired layout.
7) Box model: Understand the CSS box model, which includes properties like padding, border, and margin. Adjust these properties to control the spacing and size of elements.
8) Responsive design: Implement responsive design using media queries. Media queries let you adjust the layout and styles based on different screen sizes and devices.
9) Flexbox and grid layout: Consider using Flexbox or CSS Grid for more advanced and flexible layouts. These CSS features make it easier to create responsive and complex designs.
10) Pseudo-classes and pseudo-elements: Apply styles to specific states or parts of elements using pseudo-classes (e.g., :hover, :active, :focus) and pseudo-elements (e.g., ::before, ::after).
11) Animations and transitions: Add animations to elements to create more engaging User Experiences. Use CSS @keyframes for animations and transitions for smooth transitions.
12) Cross-browser compatibility: Test your website on different web browsers to ensure cross-browser compatibility. Some CSS properties may render differently in various browsers.
13) Consistent styling: Maintain consistent styling throughout your website to create a cohesive and professional look.
14) CSS comments: Add comments within your CSS code using /* Comment goes here */. Comments help document your styles and provide clarity for other developers.
Remember to regularly test your website's design on other devices and screen sizes to ensure it looks good and functions well across different platforms. Styling is an important aspect of creating an attractive and user-friendly website, so take the time to fine-tune your CSS to achieve the desired visual impact.
Navigation
Navigation is a crucial website component, allowing users to move around and access different sections or pages. Creating straightforward and user-friendly navigation enhances the overall User Experience. Here are some guidelines for implementing navigation on your CSS Website:
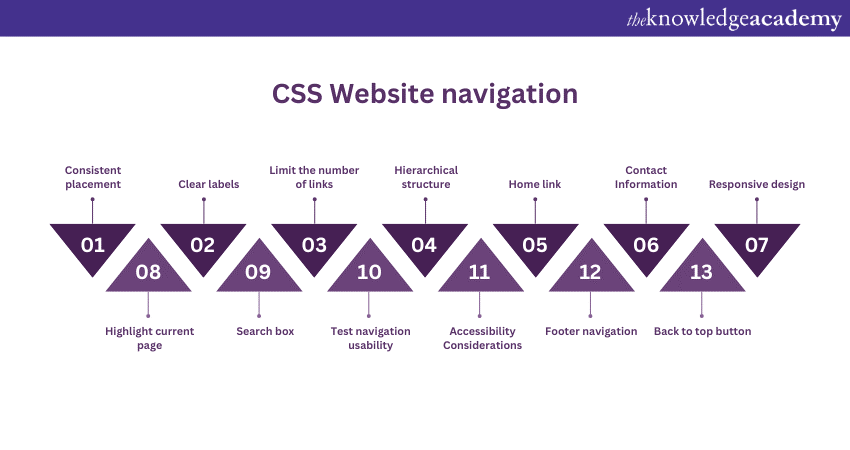
1) Consistent placement: Place the navigation menu in a consistent location on every page, usually at the top or side of the website. Consistency helps users quickly find their way around.
2) Clear labels: Use clear and descriptive labels for navigation links. Avoid ambiguous terms and ensure the labels accurately represent the content of the linked pages.
3) Limit the number of links: Keep the number of navigation links to a manageable amount. Too many options can overwhelm users. Include only the most important links that lead to essential pages.
4) Hierarchical structure: Organise navigation links hierarchically if your website has multiple levels of content. Use drop-down menus or sub-menus to group related links together.
5) Home link: Include a prominent "Home" link that takes users back to the homepage. This link is standard practice and provides an easy way to start over.
6) Contact Information: Consider including a "Contact" link in the navigation, allowing users to get in touch with you easily.
7) Responsive design: Ensure that your navigation is mobile-friendly and adapts well to different screen sizes. Use responsive techniques like hamburger menus for smaller screens.
8) Highlight current page: Use CSS or JavaScript to visually highlight the current page or section in the navigation menu. This helps users know where they are on the website.
9) Search box: Depending on the size and complexity of your website, you might include a search box in the navigation to help users find specific content quickly.
10) Test navigation usability: Test your navigation with real users to make sure it is intuitive and easy to use. Conduct usability tests and gather feedback to make improvements if necessary.
11) Accessibility Considerations: Ensure your navigation is accessible to all users, including those with disabilities. Use semantic HTML and provide alternative text for images.
12) Footer navigation: In addition to the main navigation, consider adding secondary navigation in the footer. This can include links to important pages or site sections.
13) Back to top button: For long-scrolling pages, include a "Back to Top" button that permits users to fast recovery to the top of the page.
Remember that navigation plays a crucial role in the success of your website. Well-designed and user-friendly navigation helps visitors find what they need efficiently, leading to a positive User Experience and increased engagement.
Elevate your design prowess and craft captivating websites with our Website Design Course – Sign up now!
Testing
Testing is a crucial phase in Website Development that ensures its functionality, usability, and performance meet the desired standards. Here are the key testing processes:
1) Functionality testing: Checking if all website features and functionalities work as expected.
2) Cross-browser testing: Verifying website compatibility across different web browsers.
3) Responsive testing: Ensuring the website adapts to various screen sizes and devices.
4) Load testing: Assessing website performance under heavy traffic to avoid crashes.
5) Performance testing: Evaluating page load times and server response for optimisation.
6) Accessibility testing: Ensuring the website is usable for people with disabilities.
7) Usability testing: Gathering user feedback to evaluate the overall User Experience.
8) Security testing: Identifying vulnerabilities and implementing protective measures.
9) Broken link checking: Verifying all links are working correctly.
10) Form validation testing: Ensuring form fields prompt valid information.
11) Compatibility testing: Checking website performance on various devices and platforms.
12) Browser console checks: Reviewing for error messages and warnings.
13) CSS and code cleanup: Ensuring well-organised and efficient stylesheets.
14) Backup and secure files: Ensuring data safety and security measures.
Testing safeguards against errors and ensures your website delivers a seamless and enjoyable User Experience. By following a comprehensive testing approach, you can confidently launch a fully functional and optimised website.
Finalising and polishing
The finalising and polishing stage is essential in Website Development to ensure a seamless and engaging User Experience. Here are the key steps to finalise and polish your website:
1) Quality Assurance review: Conduct a comprehensive QA review to identify and fix any functional, design, or content issues.
2) Cross-browser testing: Verify website compatibility across various web browsers to ensure consistent performance.
3) Performance optimisation: Fine-tune page load times and server response for optimal speed.
4) Security review: Identify and address any security vulnerabilities to protect user data.
5) Content review: Proofread all content for accuracy and consistency.
6) Image optimisation: Optimise image files for faster loading times.
7) SEO optimisation: Optimise meta tags and descriptions for improved search engine visibility.
8) Favicon and touch icon: Add branded icons for better recognition.
9) Custom 404 page: Create a custom error page for broken links.
10) Final cross-device check: Verify consistent performance across various devices.
11) Launch plan: Create a strategy for a smooth website launch.
By following these steps, you can ensure your website is fully functional, visually appealing, and user-friendly. Regular testing and optimisation will help you provide an exceptional online experience for your visitors.
Going live
Going live is the exciting culmination of Website Development. After thorough testing and polishing, your website is ready to be launched and shared with the world. Ensure all components are functioning optimally and check for cross-browser and device compatibility. Back up your files for added security.
Coordinate with stakeholders to set a launch date and communicate the exciting news. Monitor website performance closely during the initial launch phase to address any potential issues promptly.
Celebrate the achievement with your team, and be proud of the user-friendly and visually appealing website you've created. Embrace feedback and continuously improve your website to provide a seamless and enjoyable User Experience.
Unleash the magic of CSS and elevate your Web Design skills with our CSS Introduction & Intermediate Training – Sign up now!
Conclusion
We hope you read and understood how to build a CSS Website. Building a website with CSS is a powerful skill that empowers developers to create visually stunning, user-friendly, and responsive web experiences. Mastering CSS opens doors to limitless possibilities in crafting impactful online platforms.
Unlock your digital creativity and build the future with our cutting-edge App & Web Development Training – Sign up today!
Frequently Asked Questions
Upcoming Programming & DevOps Resources Batches & Dates
Date
 CSS Course
CSS Course
Thu 16th Jan 2025
CSS Course
Thu 6th Mar 2025
CSS Course
Thu 22nd May 2025
CSS Course
Thu 24th Jul 2025
CSS Course
Thu 25th Sep 2025
CSS Course
Thu 20th Nov 2025
CSS Course
Thu 11th Dec 2025
 If you wish to make any changes to your course, please


