


 Top Rated Course

We may not have the course you’re looking for. If you enquire or give us a call on +44 1344 203 999 and speak to our training experts, we may still be able to help with your training requirements.
Kubernetes Namespace: Organising Workloads in Container Orchestration
Sienna Roberts 19 September 2023Kubernetes Namespaces provide a powerful tool for organising and isolating workloads within a Kubernetes cluster. This blog explores the concept of Kubernetes Namespaces, highlighting their role in resource management and enhancing cluster security. Learn how to effectively leverage Kubernetes Namespaces to streamline application deployment and orchestration.
Home
 Resources
Programming & DevOps
Kubernetes Namespace: Organising Workloads in Container Orchestration
Resources
Programming & DevOps
Kubernetes Namespace: Organising Workloads in Container Orchestration

Training Outcomes Within Your Budget!
We ensure quality, budget-alignment, and timely delivery by our expert instructors.
Table of Contents
Kubernetes Namespaces provide a way to create virtual clusters within a single Kubernetes cluster. They act like isolated sections that help organise and manage resources, such as services, pods, and storage, in a structured manner. It offers a powerful tool to simplify resource management, enhance collaboration, and ensure efficient coexistence within a shared Kubernetes environment.
According to a survey published by Statista, over 60 percent of organisations adopted Kubernetes in 2022. These Namespaces are particularly useful when multiple teams or projects share the same cluster, as they allow each group to work independently without interfering with each other's resources. Dive into the world of Kubernetes Namespaces and discover how they enable seamless multi-tenancy in containerised environments. Explore best practices!
Table of Contents
1) What are Kubernetes Namespaces?
2) Default Namespace in Kubernetes
3) Why are Kubernetes Namespaces important?
4) When are Kubernetes Namespaces Used?
5) What are the basic kubectl commands relating to namespace?
6) Steps to Create a Namespace
7) Best practices for naming conventions.
8) Cleaning up and deleting Kubernetes Namespaces
9) Namespaces and DNS
10) Conclusion
What are Kubernetes Namespaces?
Kubernetes Namespaces are a way to create isolated environments within a single Kubernetes cluster. They allow you to group and manage your applications and their resources separately from each other. This helps in avoiding conflicts and provides better organisation when you're running multiple applications on the same cluster.

Default Namespace in Kubernetes
Kubernetes starts with four default Namespaces:
1) default: This namespace is for objects that aren't assigned to any other namespace.
2) kube-system: It's the namespace for objects created by Kubernetes itself, essential for its operation.
3) kube-public: This automatically generated namespace is accessible to all users, even those not authenticated. It's mainly for cluster-wide visibility and readability, though it's not mandatory.
4) kube-node-lease: This namespace contains Lease objects for each node, enabling the kubelet to send heartbeats to the control plane, helping detect node failures.
Why are Kubernetes Namespaces important?
Kubernetes Namespaces are important for handling applications in containers and managing resources in a group of computers. Site reliability engineers use Kubernetes namespace to organise and manage resources reliably. They serve as a critical organisational tool that offers several key benefits:
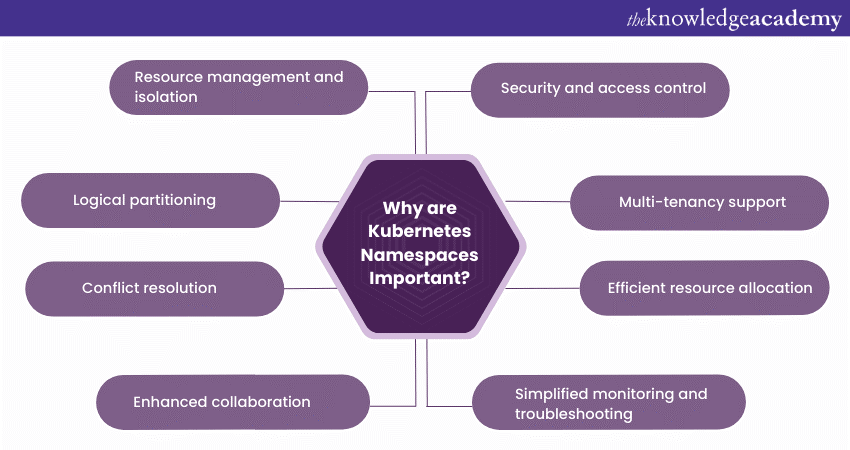
Resource management and isolation
As applications grow in complexity, managing resources can become overwhelming. Namespaces allow you to segregate resources, such as pods, services, and storage, into distinct units. This isolation prevents conflicts and unintended interactions between resources, leading to better resource management.
Logical partitioning
Namespaces provide a way to logically partition your Kubernetes cluster. This is particularly useful when different teams or projects share the same cluster. Each team can have its own namespace, creating a separation that streamlines management and minimises confusion.
Conflict resolution
With namespaces, you can avoid naming clashes. Resources in one namespace can share the same name as resources in another, since the namespace context makes them distinct. This simplifies resource naming and reduces the need for complex naming conventions.
Enhanced collaboration
In multi-team environments, namespaces promote collaboration without interference. Teams can work independently within their designated namespaces, making it easier to test, develop, and deploy applications without impacting others.
Security and access control
Namespaces play a role in access control by allowing administrators to assign different permissions to different namespaces. This enables fine-grained control over who can access and modify resources, enhancing security and preventing unauthorised access.
Multi-tenancy support
For scenarios where a Kubernetes cluster serves multiple users or tenants, namespaces facilitate multi-tenancy. Tenants can have their own isolated namespaces, ensuring that their applications run securely without affecting others.
Efficient resource allocation
By allocating resources within Namespaces, you can set limits and quotas specific to each Namespace. This prevents a single application or team from consuming excessive resources and negatively impacting the entire cluster's performance.
Simplified monitoring and troubleshooting
Isolating resources in Namespaces makes monitoring and troubleshooting more straightforward. You can focus on the health and performance of each namespace individually, identifying and resolving issues more efficiently.
Improve your Kubernetes DevOps skills with Kubernetes Training For DevOps from The Knowledge Academy.
When are Kubernetes Namespaces used?
Kubernetes namespaces serve various purposes in different scenarios:
a) Project compartmentalisation: In organisations where multiple projects and departments operate concurrently, having distinct namespaces for each project and team is vital. This segregation safeguards project resources and restricts access to authorised team members, enhancing security.
b) Sandbox development: An extension of project compartmentalisation, sandbox development involves creating isolated environments for testing new services or features. It allows for experimentation without disrupting live processes, enabling iterative improvements and efficient testing.
c) Access and permissions: Role-based Access Controls (RBAC) play a crucial role in application development. Namespace-specific restrictions can further enhance security by limiting user access and permissions, reducing the risk of unauthorised changes that could disrupt operations or introduce security vulnerabilities.
d) Resource control: Efficient resource management is essential to prevent resource contention and performance degradation. By using Namespaces, cluster or Namespace operators can allocate resources to different teams, projects, or modules, minimising the impact of resource leaks and ensuring overall performance remains stable.
What are the basic kubectl commands relating to Namespace?
Here are the basic kubectl commands related to Kubernetes Namespaces:
Find current Kubernetes Namespace
To find the current Kubernetes Namespace, you can use the following command:
|
kubectl config view --minify --output 'jsonpath={..namespace}' |
List all Kubernetes Namespaces
To list all Namespaces in the cluster, including their status and age, you can use the command:
|
kubectl get namespaces |
Create a new Kubernetes Namespace:
You can create a new Kubernetes Namespace with the command:
|
kubectl create namespace |
Alternatively, you can create a Namespace using a YAML file. For example, if you have a file named "newspace.yaml," you can create the namespace with:
|
kubectl apply -f newspace.yaml |
Switch between Kubernetes Namespaces:
To interact with a specific Namespace, include the --namespace= option in your kubectl command. However, to set the default namespace for future kubectl commands, you can use the following command to change the context:
|
kubectl config set-context --current --namespace= |
Rename a Kubernetes Namespace:
It's not common to rename a Kubernetes Namespace. It's generally recommended to create a new Namespace with the desired name and migrate resources.
Delete a Kubernetes Namespace:
To delete a Kubernetes Namespace, you can use the command:
|
kubectl config set-context --current --namespace= |
The deletion is asynchronous, and the Namespace will appear as 'terminating' until it's fully deleted.
Steps to create a Namespace
Creating a Kubernetes Namespace involves a straightforward process that can be accomplished through a series of steps. Here's a more detailed explanation of how to create a Namespace:
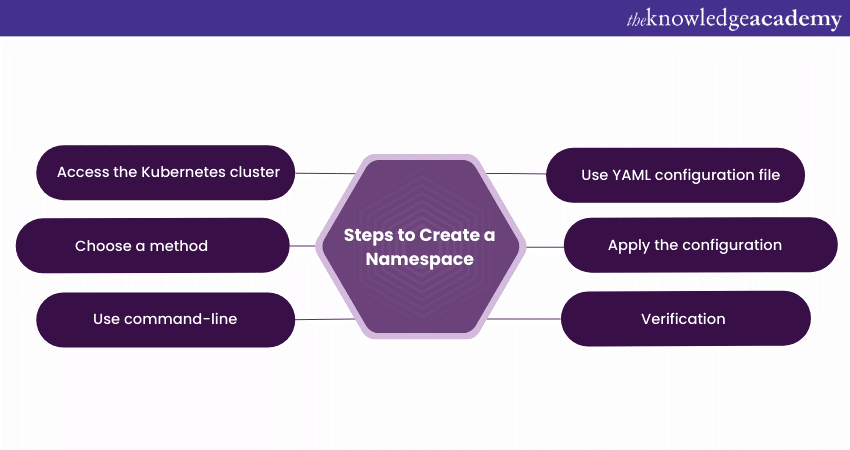
Access the Kubernetes cluster
To begin, you need to have access to your Kubernetes cluster. This could be through a command-line interface (CLI) like kubectl or through a graphical user interface (GUI) provided by your Kubernetes management tool.
Unlock the power of Kubeflow with our course on Kubeflow Training and advance your DevOps capabilities.
Choose a method
Decide whether you want to create the Namespace using command-line commands or by defining a configuration file in YAML format. Both methods achieve the same goal, so choose the one that you're more comfortable with.
Use command-line
a) Open your terminal and make sure you're authenticated with the Kubernetes cluster using kubectl.
b) Run the command: kubectl create namespace
c) Replace with the desired name for your Namespace.
d) Press Enter to execute the command.
Use YAML configuration file
a) Create a new YAML file using a text editor. You can name it something like namespace.yaml.
b) Inside the file, define the Namespace using the following structure:
apiVersion: v1
kind: Namespace
metadata:
name:
c) Replace with your chosen namespace name.
d) Save the file.
Apply the configuration
a) Return to your terminal.
b) Go to the directory where you saved the YAML file if necessary.
c) Run the command: kubectl apply -f namespace.yaml.
d) This command applies the configuration defined in the YAML file to the Kubernetes cluster, creating the Namespace.
Verification
To ensure that the Namespace was created successfully, you can run kubectl get namespaces. This command will show a list of all existing namespaces in your cluster, including the one you just created.
Best practices for naming conventions
Establishing consistent and well-thought-out naming conventions for Kubernetes Namespaces is crucial to maintain order, clarity, and manageability within your cluster. Here's a detailed exploration of the best practices for naming conventions:
a) Descriptive and meaningful names: Choose names that accurately reflect the purpose or function of the Namespace. A Namespace's name should provide a clear understanding of its contents, making it easier for you and your team to identify its role.
b) Short and precise: While being descriptive, keep Namespace names concise. Long names can become unwieldy and may lead to errors during command-line operations.
c) Lowercase and hyphens: Stick to lowercase letters and use hyphens to separate words within the Namespace name. This convention is not only a standard in Kubernetes but also ensures consistency and readability.
d) Avoid special characters: Refrain from using special characters, symbols, or spaces in Namespace names. Stick to alphanumeric characters and hyphens to prevent compatibility issues and ensure easy integration with various tools.
e) Resist abbreviations: While concise, avoid excessive abbreviations that might confuse others or lead to ambiguity. Try to find a middle ground between being clear and keeping things short.
f) Include environment indicators: If your cluster supports multiple environments (e.g., development, staging, production), include environment indicators as a prefix or suffix in the Namespace name. For example, "dev-namespace" for development.
g) Separate projects or teams: If different projects or teams share the same cluster, consider adding a project or team identifier to the Namespace name. This helps distinguish resources and prevents overlap.
h) Consistent format: Establish a consistent format for Namespace names across your organisation. This makes it easier for everyone to understand and follow the conventions.
Cleaning up and deleting Kubernetes Namespaces
When it comes to maintaining a tidy and efficient Kubernetes environment, it's essential to know how to clean up and delete Kubernetes Namespaces and their associated resources properly. Here's a detailed breakdown of the process:
a) Identify unused or unneeded namespaces: Before you start deleting Namespaces, review your cluster to identify which Namespaces are no longer in use or are no longer needed. This prevents accidental deletion of important resources.
b) Check resources in the namespace: Inside each Namespace, there are various resources like pods, services, config maps, and more. Make sure you understand what resources are present within the Namespace you're planning to delete. You can use commands like kubectl get all -n
c) Backup configuration: If the Namespace contains critical resources, consider backing up their configuration before deletion. This could involve saving YAML files or taking screenshots of settings.
d) Drain and delete resources: If you're certain that a Namespace can be deleted, start by deleting its resources. Use the kubectl delete command with the appropriate flags, like kubectl delete deployment
e) Delete the Namespace: After emptying the Namespace of its resources, you can proceed to delete the Namespace itself. Use the command: kubectl delete namespace
f) Verification: To confirm that the Namespace has been deleted, you can run kubectl get namespaces and ensure that the targeted Namespace is no longer listed.
g) Cleanup remaining resources: While deleting a Namespace typically removes most of its resources, certain resources might still remain, like Persistent Volume Claims (PVCs) that are bound to storage. You might need to clean up these remaining resources manually.
h) Reclaim resources: If the resources used within the deleted Namespace were tied to limited resources (like CPU or memory), those resources are now freed up for use by other parts of the cluster.
i) Monitoring impact: It's a good practice to monitor your cluster after deleting a Namespace to ensure that the deletion did not have any unintended consequences on other parts of your applications.
j) Regular maintenance: Implement a regular maintenance routine to periodically review and delete unused Namespaces and resources. This prevents clutter and optimises resource allocation.
Namespaces and DNS
When you create a Kubernetes Service, it automatically generates a corresponding DNS entry in the format of
It's important to note that all Namespace names in Kubernetes must adhere to the rules of valid RFC 1123 DNS labels.
A potential concern is that when creating namespaces with names matching public Top-level Domains (TLDs), Services within these Namespaces can have short DNS names that conflict with public DNS records. This could lead to workloads from any Namespace unintentionally being redirected to these services, taking precedence over public DNS.
To address this issue, it's advisable to limit the privileges for creating Namespaces for trusted users. Additionally, you can configure third-party security controls, like admission webhooks, to prevent the creation of Namespaces with names matching public TLDs. This helps maintain DNS integrity and prevent unintentional redirection of traffic.
Conclusion
Choosing the right names for your Kubernetes Namespaces is like giving each part of your digital playground a clear label. Simple, meaningful, and consistent names help keep things organised and prevent confusion. Following these naming guidelines ensures your cluster runs smoothly, your teams collaborate effectively, and your applications stay well-managed within their designated spaces.
Unlock the power of Kubeflow with our course on Certified DevOps professional and advance your DevOps capabilities.
Frequently Asked Questions
Upcoming Programming & DevOps Resources Batches & Dates
Date
 Terraform Training
Terraform Training
Fri 6th Dec 2024
Terraform Training
Fri 7th Feb 2025
Terraform Training
Fri 4th Apr 2025
Terraform Training
Fri 6th Jun 2025
Terraform Training
Fri 8th Aug 2025
Terraform Training
Fri 3rd Oct 2025
Terraform Training
Fri 5th Dec 2025
 If you wish to make any changes to your course, please


