


 Top Rated Course

We may not have the course you’re looking for. If you enquire or give us a call on +44 1344 203 999 and speak to our training experts, we may still be able to help with your training requirements.
Color Correcting Vs Color Grading: Key Differences
Sophia Ellis 12 December 2023Dive into the nuances of video editing with a focus on the distinct roles and techniques of Colour Correction and Colour Grading. Learn how each process uniquely enhances visuals, from naturalness in Colour Correction to mood and style in Colour Grading. Essential for filmmakers, Editors, and artists in mastering these vital aspects of post-production.

Training Outcomes Within Your Budget!
We ensure quality, budget-alignment, and timely delivery by our expert instructors.
Table of Contents
Colours have a huge impact when it comes to visual storytelling. In visual storytelling, the visual aesthetics is often determined by choosing between Colour Correction vs Colour Grading. Each holds a distinct role in determining the output of the video.
Filmmakers have used Colour Correction and Colour Grading to create strong feelings in audiences. From the intense and dark greens and blacks in The Matrix, to the deep, dark orange and blue-green tones in Mad Max: Fury Road. Discover Colour Correction vs Colour Grading in video and photography. Learn how each technique enhances visuals and brings your creative vision to life.
Table of Contents
1) Basics of Colour in video production
2) What is Colour Correction?
3) What is Colour Grading?
4) Key differences between Colour Correction and Colour Grading
5) Collaborative relationship between Colourist and Editor
6) Real-world examples of Colour Correction and Colour Grading
7) Famous examples of Colour Correction and Colour Grading
8) Conclusion
Basics of Colour in video production
Video production is about more than just capturing moving images. It's an art form that uses visuals to tell a compelling story. Colour is one of the primary tools at a filmmaker's disposal to enhance this storytelling. Let's break down the fundamental aspects of colour in video production, keeping it simple and clear

Importance of Colour
Colour plays a huge role in setting the mood and tone of a video. It can make scenes feel happy, sad, mysterious, or tense. Imagine watching a horror movie with bright and cheerful colours; it wouldn't be very scary, would it? By adjusting colours, filmmakers can guide our emotions and make the story more impactful.
Imagine watching a film where everything was just in black and white. While it might be artistic for some stories, it would be limiting for others. Colour breathes life into scenes, making them feel real and vibrant. But that's just scratching the surface. Let's dive a bit deeper into the significance of colour in videos.
a) Setting the mood: Think about a sunset scene with hues of orange, red, and purple. It instantly evokes feelings of calmness, reflection, and tranquillity. On the other hand, a scene dominated by blues and greys might make you feel sad or uneasy. That's the magic of colour – it sets the emotional tone.
b) Highlighting importance: Filmmakers often use colour to draw attention to crucial elements in a scene. If there's a bright red apple among a bunch of green ones, your eyes will be drawn to it. The same principle applies to videos. Through colour, filmmakers can guide our eyes and make us focus on what's essential.
c) Enhancing realism: Have you noticed how nature documentaries have such vibrant greens, blues, and yellows? By enriching the colours, filmmakers can make a scene feel even more lifelike, pulling viewers into the world they're presenting.
d) Conveying time and place: Colours can tell us about when and where a scene is set. Warm, sepia tones might suggest a scene from the past, while cold, neon-lit scenes could represent a futuristic city.
e) Communicating character traits: Think of a villain dressed in dark, cold colours or a hero shining in bright, warm hues. Colour plays a vital role in shaping our perceptions about a character's personality and intentions.
Elevate your creative skills with our Photo Retouching Training – transform ordinary images into extraordinary works of art!
Terminology brief
There are three main aspects that together form what we perceive as 'colour':
a) Hue: Hue refers to the basic identity of a colour. When you identify something as blue, green, or yellow, you're naming its hue. It's the initial and immediate colour perception that we recognise.
b) Saturation: Saturation describes how intense or pure a colour is. A highly saturated colour appears vibrant and clear. On the other hand, low saturation means the colour has a faded appearance, becoming closer to grey the less saturated it is.
c) Luminance: Luminance measures the brightness of a colour. If a colour has high luminance, it appears brighter and more vivid. Conversely, with low luminance, the colour appears darker and subdued. Adjusting the luminance in videos can influence the overall brightness of the scene.
d) Colour balance: Have you ever seen a video where everything looks a bit too blue or orange? That's an issue with colour balance. Filmmakers aim for a natural representation of colours, especially skin tones. Colour balance ensures that whites appear white, not tinted with some other colour.
e) Colour temperature: This concept is about the 'warmth' or 'coolness' of an image. Warm temperatures (with yellows and reds) can make a scene feel cosy or nostalgic. Cool temperatures (with blues and greens) might make a scene feel eerie or sad.
What is Colour Correction?
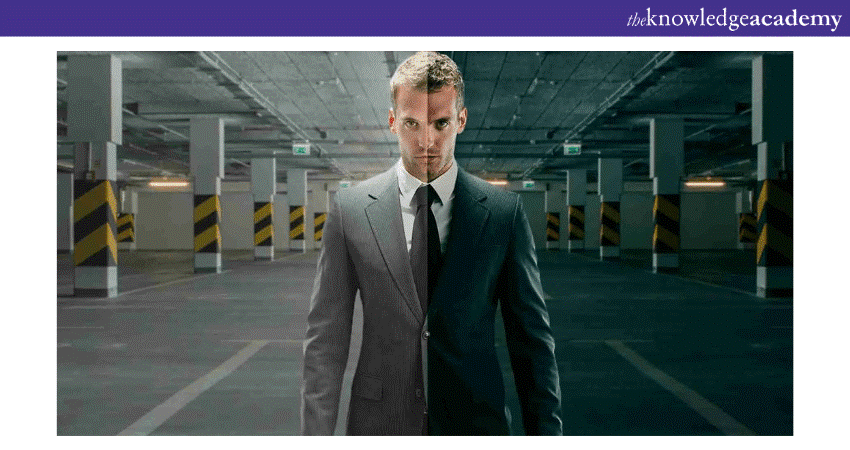
Colour Correction is a fundamental process in video and film post-production. It involves adjusting the colours captured in the footage to ensure they are represented accurately and consistently. The primary aim of Colour Correction is to achieve a neutral balance across the footage, ensuring that all the colours appear as they should in various lighting conditions.
During filming, various external factors such as lighting conditions, camera settings, or even the environment can affect how colours are captured on camera. For instance, footage shot in the shade might appear bluer (cooler) than footage shot in direct sunlight. These inconsistencies can be distracting and can take away from the storyline or the message of the video.
Colour Correction addresses these issues. By adjusting the shadows, mid tones, and highlights, videographers can neutralise any colour casts or biases. It ensures whites look white and blacks look black. This process also ensures skin tones appear natural and consistent throughout the video.
Purpose of Colour Correction
Colour Correction plays a pivotal role in the realm of video and film production. Its significance goes beyond just making visuals 'look good'; it's about ensuring integrity, consistency, and the accurate portrayal of a scene or narrative. Let's understand deeper the primary purposes of Colour Correction:
a) Achieving neutral balance: At its core, Colour Correction ensures that the footage reflects true-to-life colours. By neutralising any unwanted colour tints or casts, it ensures that whites are genuinely white, blacks are deep and true, and all colours in between are accurate. This foundational step provides a clean canvas for further editing and grading.
b) Ensuring consistency: Films and videos often consist of shots taken under various lighting conditions, at different times, or even using different cameras. Colour Correction is instrumental in ensuring that all these disparate shots look consistent when edited together, offering a seamless viewing experience.
c) Enhancing clarity and focus: By adjusting colour and brightness levels, Colour Correction can help draw the viewer's attention to subjects or areas within a shot. This subtle guiding of the viewer's focus can amplify storytelling elements and enhance narrative engagement.
d) Maintaining skin tones: People are often the focal point of videos, and it's crucial for skin tones to appear natural. Colour Correction ensures that regardless of the lighting or environment during the shoot, skin tones remain consistent and authentic throughout the footage.
e) Setting the stage for creative grading: Before delving into the creative aspects of Colour Grading, where moods and themes are amplified through colour, it's essential to have a neutral and balanced starting point. Colour Correction provides this baseline, ensuring that any creative grading applied later aligns with the filmmaker's vision without distorting the original footage.
f) Upholding production value: A well-corrected video or film not only looks professional but also communicates a higher production value. Viewers, even if subconsciously, appreciate the clarity and consistency of well-corrected footage, resulting in a more positive reception of the content.
Tools used in Colour Correction
Colour Correction is like giving your video a makeover, and just like makeup artists have their set of tools, video Editors have theirs for Colour Correction. Here's a simple breakdown of some common tools used in the process:
a) Waveform monitor: Think of this as a health check for your video's brightness. It shows the brightness levels of your footage, from the darkest to the brightest parts. If something's too dark or too bright, this tool will let you know.
b) Vectorscope: This tool helps see how vibrant and which direction the colours in your video are leaning towards. For instance, if your video looks a bit too green, the vectorscope will show you that.
c) Colour wheels: These are like the colour palettes artists use. With three wheels representing shadows (dark parts), midtones (middle brightness), and highlights (bright parts), Editors can adjust the colours of different parts of their footage.
d) RGB parade: This breaks down the colours in your video into three main ones: red, green, and blue. It helps Editors see if there's too much or too little of a particular colour in the footage.
e) LUTs (Look-Up Tables): These are like filters on your photos but for videos. They quickly change the look of your footage, but they're usually used as a starting point which Editors then refine further.
f) Temperature and tint controls: If your video feels too 'warm' (reddish or orange) or too 'cool' (blue), these controls help balance that out. They can make your video feel more natural.
g) Exposure and contrast sliders: These are straightforward. Exposure controls how light or dark your video is, and contrast deals with the difference between the light and dark parts.
What is Colour Grading?
Colour Grading is the step that comes after Colour Correction in the world of video and film. While Colour Correction is about making sure everything looks natural and consistent, Colour Grading is more about adding a creative touch. It's like painting a mood or a feeling onto a video, giving it a specific look or style.
For example, a movie set in the 1980s might have a certain colour tone to make it feel nostalgic. Or a music video might use bright and vibrant colours to make it pop and feel energetic. These artistic choices are made during the Colour Grading process. It's not just about what's real and accurate; it's about what the filmmaker wants you to feel when you watch it.
Colour Grading is where the magic happens in post-production. It transforms the video from just showing a scene to telling a story, making viewers feel a certain way, and enhancing the overall viewing experience.
Components of Colour Grading
a) Mood and Atmosphere: Colour Grading can set the emotional tone of a scene. For instance, cool blue tones might evoke a sense of melancholy or mystery, while warm orange and yellow hues can convey happiness or nostalgia.
b) Visual continuity: While Colour Correction ensures consistency in the portrayal of real-life colours, Colour Grading ensures that the visual style remains consistent throughout a film or video. This consistency enhances the viewing experience, making the narrative more cohesive.
c) Stylising the footage: Many filmmakers use Colour Grading to give their films a distinct visual style. Think of the unique greenish hue in the "Matrix" films or the desaturated, almost sepia tones in some period dramas.
d) Enhancing narratives: Colour can be a powerful storytelling tool. Grading can highlight specific elements of a scene, shift focus, or even foreshadow events.
e) Creating visual separation: Colour Grading can be used to differentiate between different timelines, realities, or perspectives in a story. For example, flashbacks might be given a distinct colour treatment to differentiate them from the present-day scenes.
f) Improving aesthetics: At its heart, Colour Grading is also about making the footage look visually appealing. Proper grading can enhance the beauty of a scene, making landscapes more breathtaking, or cityscapes more dynamic.
Tools used in Colour Grading
The tools used in Colour Grading help Editors add their artistic touch to videos, transforming them from raw footage into visually stunning stories. Each tool plays a specific role in enhancing the mood, style, and overall feel of the final product.
a) Colour wheels: Colour wheels allow Editors to tweak the colours in a video. There are usually three wheels, representing shadows, midtones, and highlights. By adjusting these, Editors can change the mood of a scene, like making it look sunny or moody.
b) LUTs (Look-Up Tables): LUTs are presets that change the look of a video instantly. They're like quick style changes. For instance, a LUT might turn a day scene into a night one or give footage a vintage look.
c) Curves: Curves help adjust the brightness and contrast in precise ways. By pulling or pushing parts of the curve, Editors can brighten the highlights, darken the shadows, or change the midtones of a video.
d) Secondary correction tools: These tools let Editors change specific parts of a video without affecting the rest. For example, they might want to brighten just a person's face or change the colour of a car without altering the whole scene.
e) Masks and power windows: These are tools that allow Editors to focus on specific parts of a frame. Imagine drawing a circle around a subject and then only changing the colours inside that circle. That's what masks and power windows can do.
f) Tracking tools: These are smart tools. If an Editor wants to change the colour of a moving car across several frames, tracking tools will 'follow' that car, making sure the colour change remains consistent.
g) Noise reduction tools: Sometimes, videos can have 'noise' or grain, especially in low light. Noise reduction tools smooth this out, ensuring the footage looks clean and clear.
h) Film emulation tools: These tools give videos the look of classic film stocks. If an Editor wants their video to have the feel of old cinema or a specific film type, these tools come in handy.
Key Differences between Colour Correction and Colour Grading
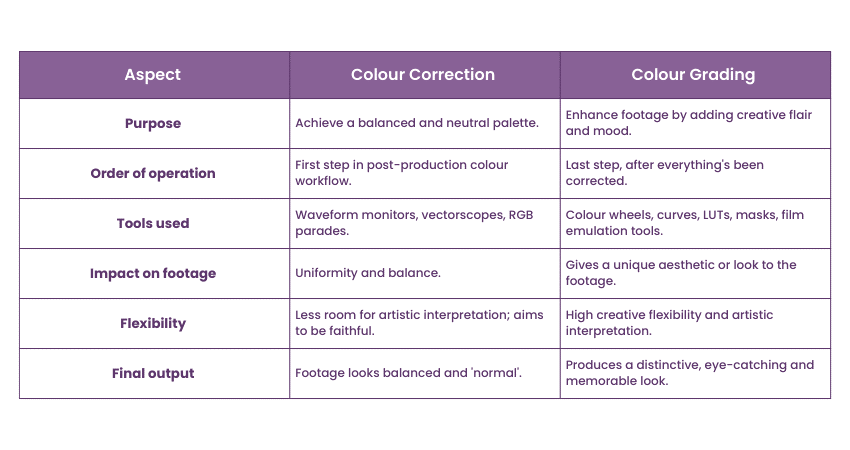
Both Colour Correction and Colour Grading are critical steps in the post-production. They serve distinct purposes and achieve different outcomes. Understanding the differences between the two can help anyone involved in video production to know how colour impacts the quality, mood, and storytelling capabilities of the final product. Discussed below is the breakdown of the key differences:
Purpose
a) Colour Correction: The primary goal is to get a balanced and neutral colour palette. It aims to make sure all the colours in your footage look natural and the same as they did when you shot the video. It's about fixing issues and making everything consistent.
b) Colour Grading: Once everything looks natural, Colour Grading steps in to add creative flair. It aims to enhance the footage, providing a particular mood or style. It's more about art and less about fixes.
Order of operation
a) Colour Correction: This is typically the first step in the post-production colour workflow. It prepares the footage, making sure there are no glaring errors or inconsistencies, providing a clean canvas for any further steps.
b) Colour Grading: This is usually the last step, after everything's been corrected. It's like the final layer of paint, the finishing touch that brings everything together.
Tools used
a) Colour Correction: The tools used are often quite technical, aiming for precision. Waveform monitors, vectorscopes, and RGB parades are standard tools that help to balance and neutralise the colour in the footage.
b) Colour Grading: Here, the tools can be more varied and artistic. While colour wheels and curves are commonly used in both, grading often employs additional elements like LUTs, masks, and film emulation tools for creative effects.
Impact on footage
a) Colour Correction: It’s more about uniformity and balance. For instance, if you've filmed at different times of the day, Colour Correction will make the lighting look consistent across all shots. Skin tones, skies, and other elements will appear as they should.
b) Colour Grading: This gives a unique look or aesthetic to the footage. Think of the cool, blue overtones in a thriller movie, or the warm, golden hues in a romantic film. Grading amplifies the emotional impact of scenes.
Flexibility
a) Colour Correction: There’s less room for artistic interpretation here. The aim is to be as faithful as possible to the original scenes and lighting conditions, so it’s usually less flexible in terms of creative choices.
b) Colour Grading: This is where creative flexibility shines. The Colourist has the artistic licence to manipulate hues, contrast, and saturation to align with the director's vision or storytelling needs.
Final output
a) Colour Correction: The end result is footage that looks balanced, realistic, and ready for the next steps of editing. It's a necessary but somewhat invisible step, as its primary aim is to make things look 'normal'.
b) Colour Grading: The final output is more eye-catching and contributes to the film or video's signature look. Good Colour Grading can make scenes more memorable and emotionally engaging.
Collaborative relationship between Colourist and Editor
The Colourist and the Editor work closely to make everything in a film look great. They help create the wonderful visuals we see on screen. Let's understand how they work together to make stories even more interesting.
What the Colourist does?
The Colourist is an expert who makes sure that the colours in the videos look just right. They adjust things like brightness, contrast, and overall look of the images. They watch the raw footage carefully and fix any colour problems. This could be things like making sure the colours match well between different shots.
What the Editor does?
Then there's the Editor. They put all the different shots together to tell a good story. They choose the best parts of each shot, arrange them in the right order, and make sure things look smooth. While they focus on the story, they also do basic colour changes if needed.
Working together
The Colourist and the Editor work like a team. The Editor starts by putting the video pieces together in a rough way. Sometimes, they do a little bit of colour work to show the mood they want. Then they pass the work to the Colourist.
Talking and listening
To work well together, they need to talk a lot. The Editor tells the Colourist what they want the video to feel like and if there are any special colour ideas. This helps them both understand what they're aiming for. Then the Colourist uses their skills to make the video look even better.
Making visuals look nice
The Colourist takes what the Editor started and improves it. They change the colours and tones to match the story's emotions. For example, they can make scenes warmer to feel cozy or colder to make them look serious. This makes the story have a bigger impact on the people watching.
Keeping things same
Sometimes, different parts of a video are shot at different times and under different lights. The Colourist makes sure that these differences don't show too much. They make everything look consistent, so the viewers don't get distracted.
Finishing touches
When the Colourist finishes their work, they give it back to the Editor. The Editor then puts the nice-looking videos back into the story. This way, the video looks good and tells a great story at the same time.
Ready to master Video Editing? Explore our comprehensive Video Editing Training now!
Real-world examples of Colour Correction and Colour Grading
Let's look at some real examples of how Colour Correction and Colour Grading have been used in movies and videos to make a difference:
Colour Correction examples
a) Outdoor scenes: Imagine a film that has scenes shot outside on a sunny day. Sometimes, the camera might not capture the colours perfectly due to the bright sunlight. Colour Correction can help fix this by adjusting the colours to look more natural and pleasing.
b) Flashbacks: In movies, flashbacks are used to show something that happened in the past. Colour Correction can be used here to make the flashbacks look different from the present scenes. They might use softer colours to give a nostalgic feeling.
c) Consistency: In a TV series, different episodes might be shot on different days. Colour Correction helps maintain the same look throughout all episodes, even if they were filmed at different times.
Colour Grading examples
a) Creating mood: Think of a horror movie. The Colour Grading might make the scenes darker and add a bluish tint. This helps to create a spooky atmosphere that matches the genre.
b) Different worlds: In a science fiction film, Colour Grading can be used to make a futuristic world look distinct from the real world. They might use strong colours to give a sense of an otherworldly place.
c) Time of day: Colour Grading can also change the time of day in a scene. For example, they might make a shot taken in the afternoon look like it was shot during sunset, all through Colour Grading.
Unlock your creativity with our Maxon Cinema 4D Masterclass – take your 3D design skills to the next level!
Combined effect
Sometimes, Colour Correction and Colour Grading work together. For instance, imagine a scene in a movie where the characters are in a dark forest. Colour Correction could be used to make sure the forest colours look natural, and then Colour Grading might add a bit of darkness to create the right mood.
Famous examples of Colour Correction and Colour Grading
Let's explore more well-known examples where Colour Correction and Colour Grading have left a lasting impact on the visual storytelling of movies and videos:
Mad Max: Fury Road (2015)

The post-apocalyptic setting of "Mad Max: Fury Road" was brought to life through intricate Colour Grading. The desert landscapes were enhanced with warm and dusty tones, contributing to the harsh and barren atmosphere. This creative decision made the world of the movie feel even more desolate and intense.
The Grand Budapest Hotel (2014)

Wes Anderson's “symmetrical” visual style is elevated using Colour Grading in "The Grand Budapest Hotel." Different time periods are given distinct colour palettes – the past scenes have a vibrant and nostalgic look, while the present scenes have a more muted and melancholic tone. This enhances the storytelling by visually representing different eras.
The Revenant (2015)

The naturalistic and immersive visual experience of "The Revenant" was achieved through both Colour Correction and Grading. The film's cold and raw landscapes were enhanced with cool blue tones, intensifying the sense of isolation and survival. This approach immersed the audience in the challenging environment the characters faced.
Skyfall (2012)
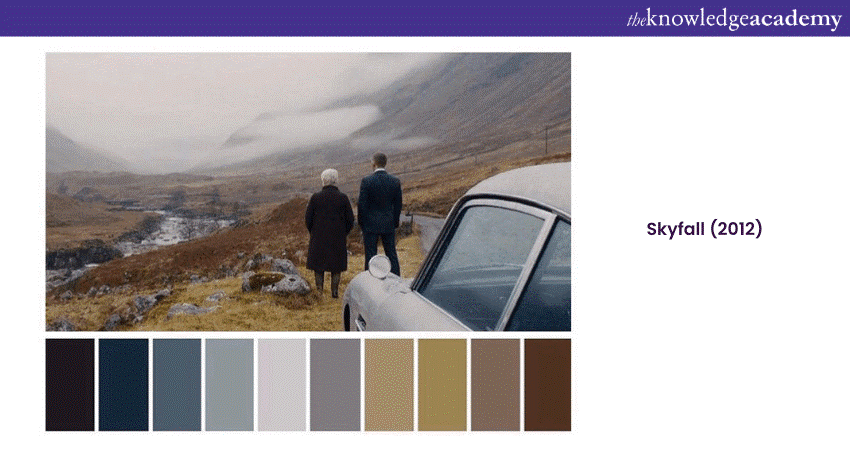
In the James Bond film "Skyfall," Colour Grading was used to create visual contrast between the different locations. The Shanghai scenes are particularly notable, with their striking and saturated colours that contribute to the film's stylish and sophisticated aesthetic.
The Matrix Trilogy (1999-2003)

"The Matrix" trilogy is renowned for its distinctive green tint during scenes that take place within the computer simulation. This green hue, achieved through Colour Grading, enhances the futuristic and artificial nature of the Matrix world, setting it apart from the real world scenes.
O Brother, Where Art Thou? (2000)

The Coen Brothers' film "O Brother, Where Art Thou?" employed heavy Colour Correction to achieve a sepia-toned, vintage look reminiscent of old photographs. This unique colour treatment contributed to the film's period setting and added a whimsical touch to its storytelling.
Amélie (2001)
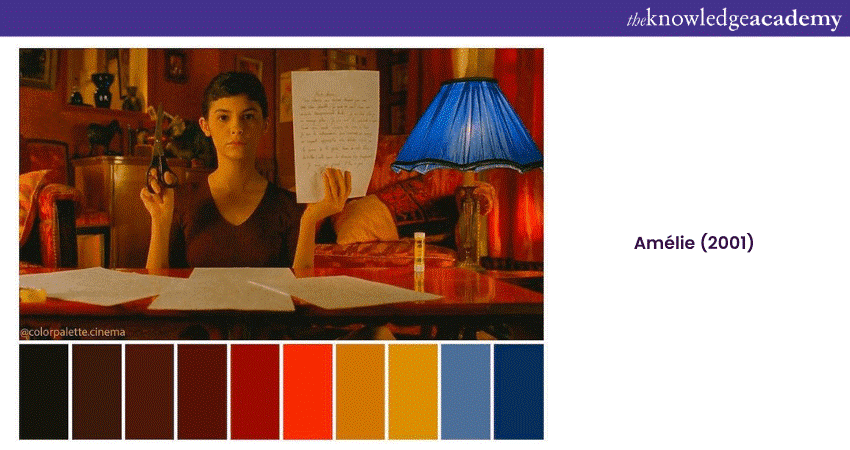
The whimsical and dreamlike atmosphere of "Amélie" was achieved through intricate Colour Grading. The film's colour palette, characterised by warm and rich tones, contributed to the romantic and imaginative tone of the story.
The Lord of the Rings Trilogy (2001-2003)

The "Lord of the Rings" trilogy used Colour Grading to distinguish different locations and atmospheres. The Shire scenes are known for their lush and vibrant colours, while scenes in Mordor are characterised by desaturated and ominous tones, reflecting the varying moods of the story.
Avatar (2009)
![]()
James Cameron's "Avatar" made innovative use of both Colour Correction and grading to create the otherworldly environment of Pandora. The film's rich and vibrant colours contributed to the alien landscapes, enhancing the sense of immersion in a fantastical world.
Blade Runner 2049 (2017)

"Blade Runner 2049" used Colour Grading to evoke a futuristic and dystopian atmosphere. The film's cold and desaturated tones added to the visual aesthetic, creating a visual continuity with the original "Blade Runner" film.
Conclusion
Using Colour Grading is a strong way to make your audience feel emotions. Smartly using colours can change how your movie feels, make scenes have a certain atmosphere, and help you tell your story better. Hope you have a clear idea about Colour Correction vs Colour Grading.
Take the first step towards a creative career with our Animation and Design Training. Sign up today!
Frequently Asked Questions
Upcoming Office Applications Resources Batches & Dates
Date
 Video Editing Course
Video Editing Course
Fri 7th Feb 2025
Video Editing Course
Fri 4th Apr 2025
Video Editing Course
Fri 6th Jun 2025
Video Editing Course
Fri 8th Aug 2025
Video Editing Course
Fri 3rd Oct 2025
Video Editing Course
Fri 5th Dec 2025
 If you wish to make any changes to your course, please


