


 Top Rated Course

We may not have the course you’re looking for. If you enquire or give us a call on + 1-866 272 8822 and speak to our training experts, we may still be able to help with your training requirements.
How to Create a New Layout in AutoCAD: Step-By-Step Guide
Sienna Roberts 10 February 2025Creating a New Layout in AutoCAD is a process of designing a workspace tailored to your project needs. It involves setting up a custom paper size, viewport, and scale to ensure precision in your drawings. This blog will take you through How to Create a New Layout in AutoCAD, customising layouts and improving your workflow efficiency.
Training Outcomes Within Your Budget!
We ensure quality, budget-alignment, and timely delivery by our expert instructors.
Table of Contents

AutoCAD is a powerful Computer-Aided Design (CAD) application that allows anyone to create precise 2D and 3D drawings. One of its essential features is the ability to create layouts, which enable users to organise their drawings effectively for printing or presentation purposes. However, you must learn How to Create a New Layout in AutoCAD to add layouts to your drawings in the application.
According to Polaris Market Research, the computer-aided design market is projected to grow at a CAGR of 6.9 per cent between 2022-2030. This blog will guide you through a step-by-step process on How to Create a New Layout in AutoCAD, ensuring you can harness this versatile software's full potential.
Table of Contents
1) What is Layout in AutoCAD?
2) How to Create a New Layout in AutoCAD?
a) Step 1: Launch AutoCAD
b) Step 2: Create and Setup a New Layout
c) Step 3: Customise the Appearance of the Layout
d) Step 4: Insert a Title Block
e) Step 5: Arrange Drawing Views and Other Graphical Elements
f) Step 6: Customise the Layout With Additional Elements
g) Step 7: Save and Switch Back to the Model Space
3) Conclusion
What is a Layout in AutoCAD?
An AutoCAD Layout is a virtual sheet where you can organize and present your drawings, serving as a container for both graphical and non-graphical elements of your design. While settings like how to Change Units in AutoCAD are typically handled at the drawing level, layouts offer control over scale, viewport arrangement, plot styles, and other sheet-specific settings, simplifying the management of multiple drawings within a project.
When creating a Layout in AutoCAD, you can customise its size, orientation, and title block to fit your output format, such as A4 or ANSI D. You can also add graphical elements like dimensions, text annotations, and labels to improve the clarity and readability of your design.

How to Create a New Layout in AutoCAD?
Now that you understand what Layouts are in AutoCAD, let's explore How to Create a New Layout in AutoCAD:
Step 1: Launch AutoCAD
Open AutoCAD and either start a new drawing or open an existing one. This drawing will be the basis for your Layout. At the bottom of the window, locate the series of tabs and click on the "Layout" tab to enter the Layout environment.
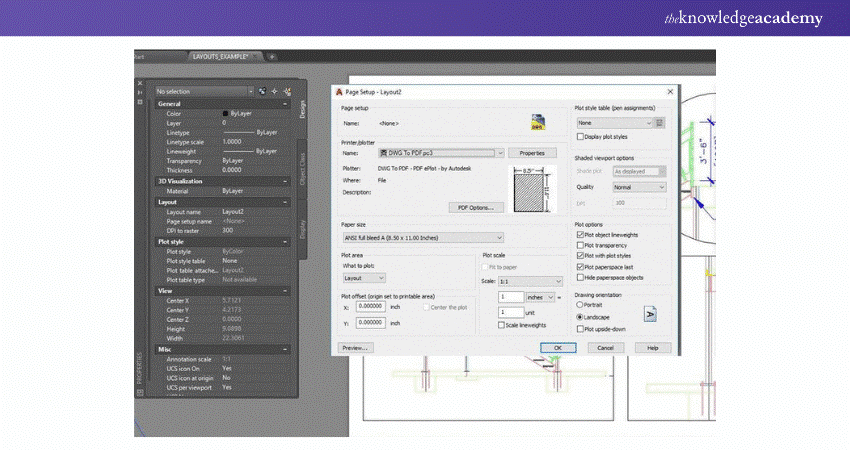
Step 2: Create and Setup a New Layout
In the "Layout" tab, find and click the "Create Layout" button. This opens the "Page Setup Manager" dialogue box, where you can control various Layout settings. Click the "New" button to create a new Layout. Name your Layout, such as "Sheet 1" or "Floor Plan," and choose the desired paper size and orientation. AutoCAD offers standard sizes like A4, A3, ANSI A, and ANSI D. After making your selections, click "OK."
Step 3: Customise the Appearance of the Layout
You will now be in the Layout space, representing your virtual sheet of paper. Here, you can customise the Layout to fit your needs by adjusting the scale, adding a title block, and arranging the elements.
Step 4: Insert a Title Block
To insert a title block, which provides essential drawing information like the project name, sheet number, author, and date, navigate to the "Layout" tab and click the "Insert" button. Choose "Title Block" from the drop-down menu, and select a suitable template or create a new one. Edit the title block to include the relevant information.
Step 5: Arrange Drawing Views and Other Graphical Elements
Within the Layout space, use the "Viewport" tool in the "Layout" tab to create and manipulate viewports. Viewports allow you to display different sections of your drawing at various scales for detailed examination or an overview of the project. Arrange these views and other graphical elements to present your design effectively.
Learn how to work with the AutoCAD interface and understand how grids and snaps work with AutoCAD LT Training.
Step 6: Customise the Layout With Additional Elements
Enhance your design's clarity by adding text annotations, dimensions, labels, and other details within the Layout space. These elements communicate important information and improve the drawing's readability.
Step 7: Save and Switch Back to the Model Space
Once satisfied with your Layout, save it by clicking the "Save" button or using the Ctrl + S shortcut. To return to the model space and continue working on your drawing, click the "Model" tab at the bottom of the AutoCAD window.
Take hands-on AutoCAD Training Courses to master design and drafting skills. Learn how to create precise 2D and 3D drawings, models, and plans to advance your career.
Conclusion
In this blog, we have provided a step-by-step explanation of How to Create a New Layout in AutoCAD. By following these instructions, you can effectively organize your drawings and present your designs professionally. Mastering the creation of layouts in AutoCAD not only enhances your workflow but also improves communication. Still, one must consider the disadvantages of AutoCAD, like the software’s complexity and potential limitations when it comes to collaborating with other design programs or teams who use alternative software. To gain a deeper understanding of the role of an AutoCAD Drafter, check out our AutoCAD Drafter Job Description. With practice and exploration of advanced techniques, you can optimize your layouts even further. Unlock its full potential by creating impressive layouts that showcase your designs with clarity and professionalism.
Master 3D rendering concepts with our AutoDesk Maya Training – sign up now!
Frequently Asked Questions
What are Model and Layout Tabs in AutoCAD?
In AutoCAD, the model tab is where you create and edit your design on a full scale. Layout tabs represent paper space, where you can arrange and scale your models for printing.
What are Layout Viewports in AutoCAD?
Layout viewports are regions on layout tabs that display different views of your model space. These views can be scaled and arranged for detailed examination or printing.
What are the Other Resources and Offers Provided by The Knowledge Academy?
The Knowledge Academy takes global learning to new heights, offering over 3,000 online courses across 490+ locations in 190+ countries. This expansive reach ensures accessibility and convenience for learners worldwide.
Alongside our diverse Online Course Catalogue, encompassing 19 major categories, we go the extra mile by providing a plethora of free educational Online Resources like News updates, Blogs, videos, webinars, and interview questions. Tailoring learning experiences further, professionals can maximise value with customisable Course Bundles of TKA.
What is The Knowledge Pass, and How Does it Work?
The Knowledge Academy’s Knowledge Pass, a prepaid voucher, adds another layer of flexibility, allowing course bookings over a 12-month period. Join us on a journey where education knows no bounds.
What are Related Courses and Blogs Provided by The Knowledge Academy?
The Knowledge Academy offers various AutoCAD Courses, including the AutoCAD Course, AutoDesk Maya Training and AutoCAD Electrical Training. These courses cater to different skill levels, providing comprehensive insights into Logo Design.
Our Office Applications Blogs cover a range of topics related to AutoCAD, offering valuable resources, best practices, and industry insights. Whether you are a beginner or looking to advance your drawing skills, The Knowledge Academy's diverse courses and informative blogs have got you covered.
Upcoming Office Applications Resources Batches & Dates
Date
 AutoCAD Course
AutoCAD Course
Fri 11th Apr 2025
AutoCAD Course
Fri 13th Jun 2025
AutoCAD Course
Fri 8th Aug 2025
AutoCAD Course
Fri 26th Sep 2025
AutoCAD Course
Fri 21st Nov 2025
 If you wish to make any changes to your course, please


