 Halloween sale! Upto 40% off - 95 Vouchers Left


 Top Rated Course

We may not have the course you’re looking for. If you enquire or give us a call on +31 208081674 and speak to our training experts, we may still be able to help with your training requirements.
How to Set Up Google Analytics? A Brief Guide
Sienna Roberts 27 July 2023Wondering How to Set up Google Analytics? This powerful tool helps you monitor website performance by tracking traffic, user behaviour, and conversion rates. In this comprehensive guide, you’ll learn how to create an account, implement tracking codes, and customise reports to gain actionable insights that drive your business forward.

Training Outcomes Within Your Budget!
We ensure quality, budget-alignment, and timely delivery by our expert instructors.
Table of Contents

Feeling lost in a sea of website statistics? You’re not alone! Many website owners find analytics daunting and complex. Yet, understanding your audience is crucial for growth. What if you had a simple tool to help you? Google Analytics could be your best ally in this journey. Learn How to Set up Google Analytics with our step-by-step guide to mastering Google Analytics.
This blog on How to Set up Google Analytics will guide you through the process. This step-by-step tutorial will walk you through creating your account and tracking essential metrics, empowering you to turn data into actionable insights. Get ready to harness the power of Google Analytics and take your online presence to new heights
Table of Contents
1) Google Analytics - An Overview
2) Why do you Need Google Analytics?
3) Five Easy Steps on How to Set up Google Analytics
4) Things you can do After Setting up Google Analytics
5) Ways to Utilise Google Analytics for Analysing Web Traffic
6) Conclusion
Google Analytics - An Overview
Google Analytics is a popular web analytics service from Google, offering a robust set of tools to monitor and analyse website performance and marketing efforts. It’s used by businesses of all sizes to gain insights into user behaviour and improve their online presence.
The platform excels at tracking user engagement, providing detailed data on website traffic sources and specific actions users take. This information helps businesses assess the effectiveness of their marketing campaigns and achieve their goals more efficiently.
Google Analytics also offers valuable insights into customer behaviour, including demographics and device usage. By understanding these patterns, businesses can tailor their content and marketing strategies to better meet the needs of their target audience.
With its user-friendly interface and extensive reporting options, Google Analytics makes it easy to create custom reports and integrate with other Google tools. This consolidation of data enables businesses to analyse customer journeys and improve their overall marketing strategies.

Why do you Need Google Analytics?
Google Analytics is an essential tool for anyone looking to gain valuable insights into their website's performance and visitor behaviour.
As one of the most widely adopted platforms in digital marketing, with more than half of all websites using it, Google Analytics offers a comprehensive view of your online presence. It equips you with detailed data that can help you understand your audience better and make informed decisions to enhance your website's effectiveness.
Key metrics you can track with Google Analytics include:
1) Overall traffic to your website
2) Sources of incoming traffic
3) Performance of individual web pages
4) Lead conversion rates
5) Origins of your leads
6) Visitor demographics, such as their geographical location
7) Device preferences, whether mobile or desktop
Understanding why your website performs the way it does is crucial for growth, and that’s where Google Analytics comes in. It allows you to dive deep into the behaviour of your visitors, revealing which strategies work and where there’s room for improvement.
Five Easy Steps on How to Set up Google Analytics
Here is a step-by-step procedure that explains how you can set up Google Analytics successfully:
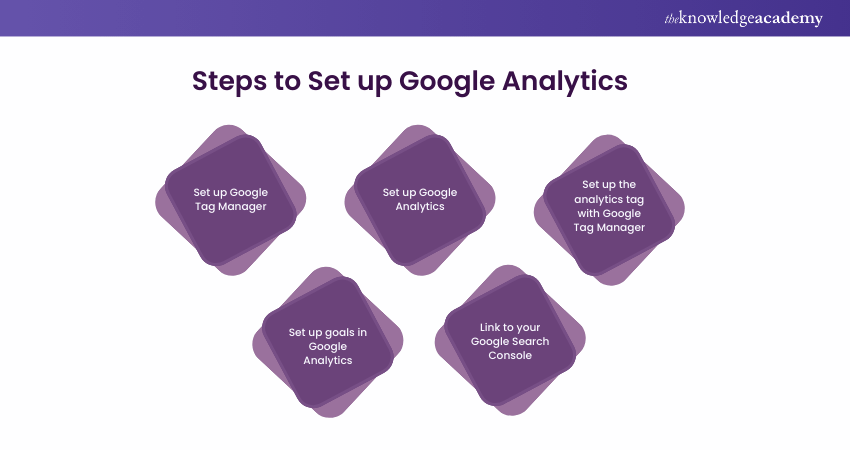
Step 1: Set up Google Tag Manager
Google Tag Manager is a free tool from Google that simplifies tag management for your website. Its function is straightforward: Google Tag Manager gathers data from your website and sends it to other platforms like Facebook Analytics and Google Analytics.
One of the key advantages of Google Tag Manager is that it allows you to update and add tags to your Google Analytics code without needing to manually alter the back-end code. This feature saves you time and reduces the potential for errors.
For example, if you want to track how many users click on a downloadable PDF link, you will typically need to manually modify each download link. However, with Google Tag Manager, you can simply add a new tag to track these downloads.
To get started, first, create an account on the Google Tag Manager dashboard.
a) Create a New Account in Google Tag Manager
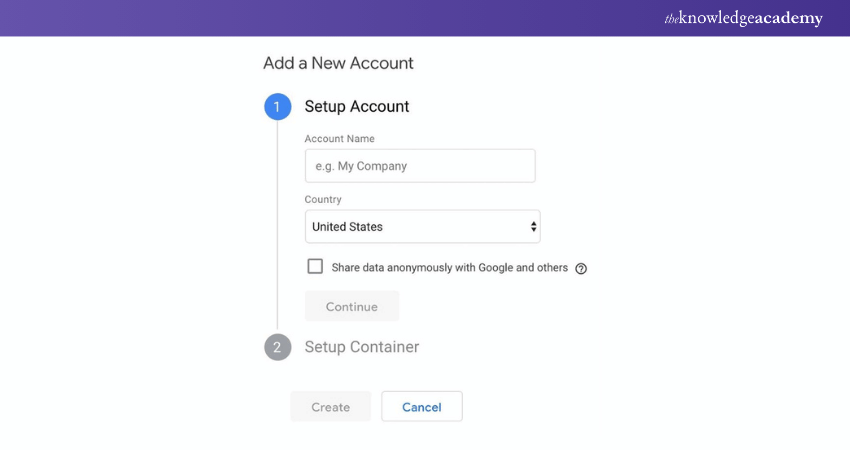
Begin by entering an account name and clicking "Continue."
Next, you’ll need to set up a container, which Google describes as a bucket that holds all the “macros, rules, and tags” for your website.
b) Set up the Container
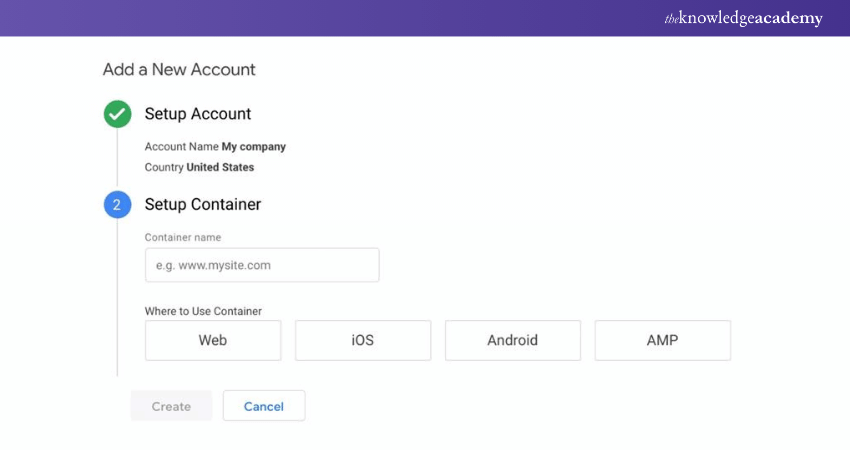
Provide a descriptive name for your container and choose the type of content it will be associated with, such as Web, iOS, Android, or AMP.
After this, click "Create," review the Terms of Service, and agree to them. You will then receive a container installation code snippet.
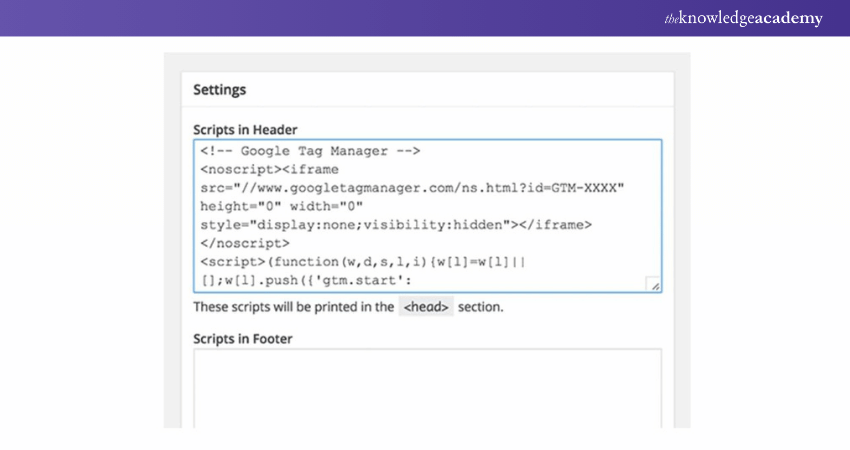
c) Install the Google Tag Manager Code
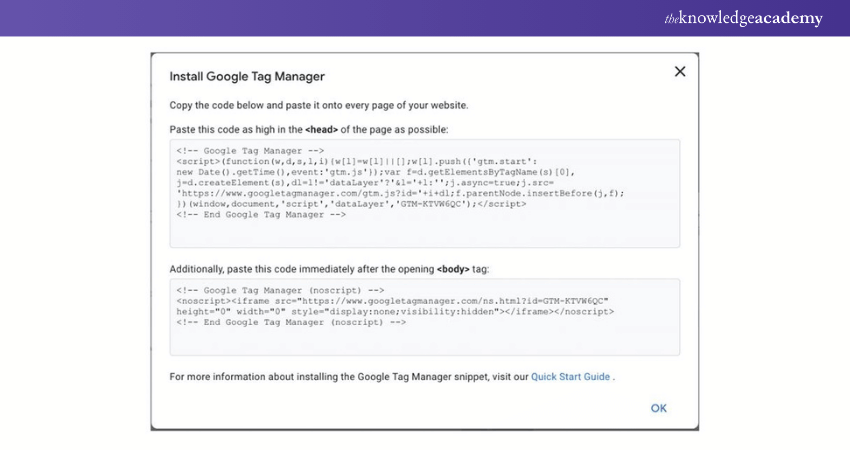
This snippet of code is what you’ll paste into your website’s back end to manage your tags. Copy and paste the two code snippets onto every page of your website—one in the header and the other after the opening body tag.
If you’re using WordPress, this process is straightforward. Simply paste the code into your WordPress theme.
Pro Tip: To make this even easier, consider installing and activating the Insert Headers and Footers plugin for WordPress (or a similar plugin for other platforms). This plugin allows you to add any script to the header and footer across your entire website, requiring you to copy and paste the code only once.
Step 2: Set up Google Analytics Property
One of the key benefits of Google Analytics is its ability to offer detailed reports on various metrics, such as the number of visitors, their geographic location, and how they interact with your site. This information is crucial for improving user experience and driving growth.
To begin using Google Analytics, the first step is to create an account on the Google Analytics sign-up page.
a) Create a New Account in Google Analytics

Start by entering your account name, website name, and the website’s URL. This ensures that the data collected is associated with the correct site.
Next, select your website’s industry category and choose the time zone that will be used for your reports. These settings help Google Analytics provide more relevant and accurate data.
b) Obtain Your Tracking ID
After filling in the necessary details, review and accept the Terms of Service. Once this is done, you’ll receive a unique tracking ID.

This tracking ID is a specific code that looks something like UA-000000-1. The first part (000000) represents your account number, while the second part (1) is the property number linked to your account. The tracking ID is essential for Google Analytics to collect data from your website.
c) Install the Tracking ID on Your Website
To start gathering data, you’ll need to add the tracking ID to your website’s code. This step is crucial, as it allows Google Analytics to monitor your site’s performance and provide valuable insights.
If you’re using a platform like WordPress, adding the tracking ID is straightforward. You can use plugins like Insert Headers and Footers to easily insert the tracking code into your site without needing to manually edit your theme files.
Pro Tip: Keep your tracking ID secure and do not share it publicly, as it’s tied to your personal data and website.
Step 3: Set up the Google Tag
One of the significant benefits of using Google Tag Manager is its ability to streamline the process of adding and updating Google Analytics tracking tags without needing to modify the website's back-end code. This makes managing your tags more efficient and minimises the risk of errors.
For instance, when you want to set up specific Google Analytics tracking tags for your website, Google Tag Manager simplifies the process.
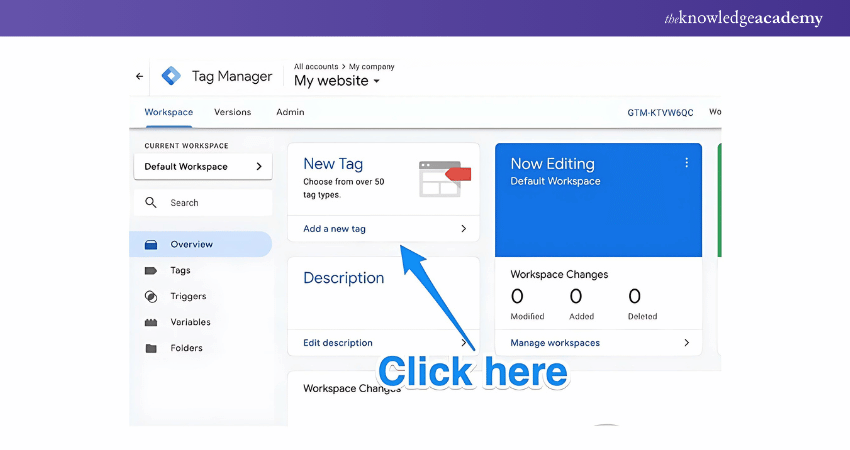
To begin, access your Google Tag Manager dashboard and click on the "Add a new tag" button.
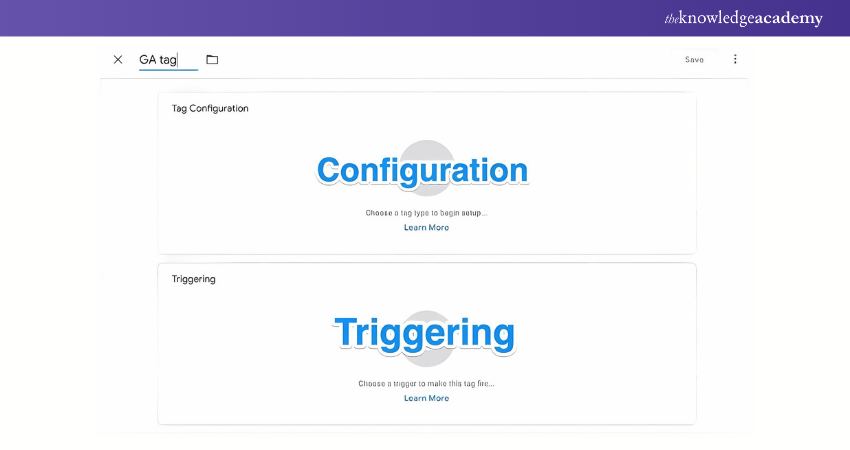
a) Create a New Tag in Google Tag Manager
You'll be taken to a page where you can create your new website tag. Here, you can customise two main areas:
Configuration: Specifies where the collected data will be sent.
Triggering: Defines what type of data you want to collect.
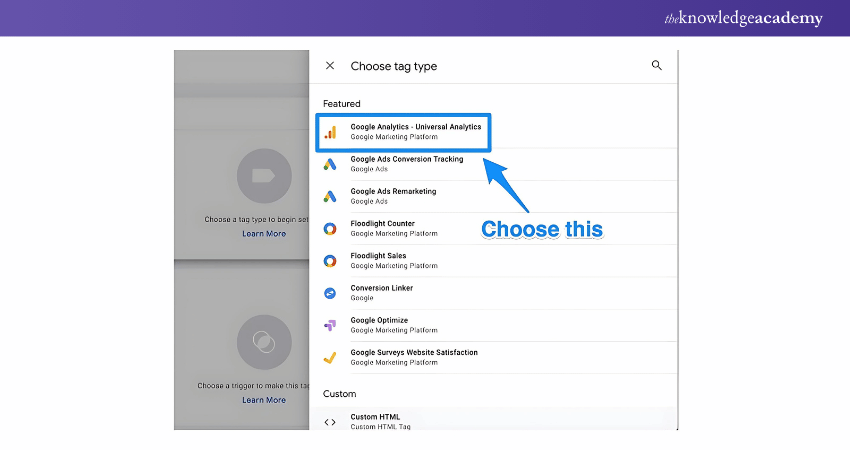
b) Set up the Tag Configuration
Click on the "Tag Configuration" button to select the type of tag you wish to create. Choose the "Universal Analytics" option to create a tag for Google Analytics.
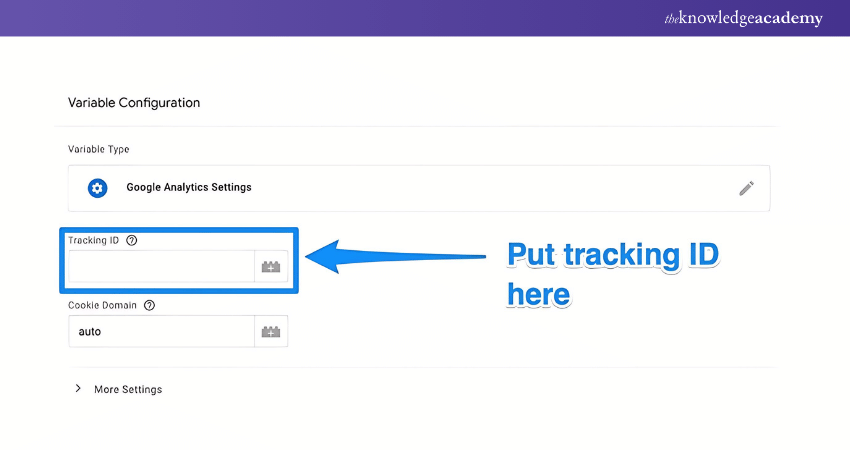
c) Enter Google Analytics Tracking
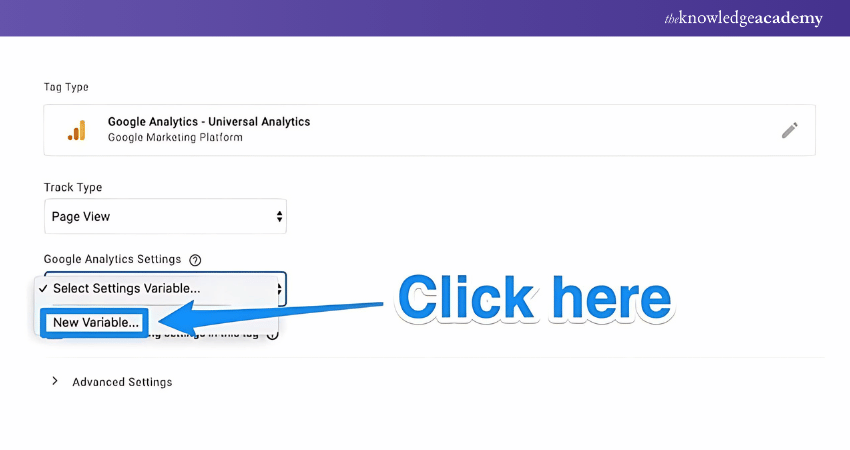
After selecting the tag type, you can define the data you want to track. Navigate to the "Google Analytics Setting" and select "New Variable…" from the dropdown menu. In the new window, enter your Google Analytics tracking ID, which will direct your website's data to Google Analytics.
d) Choose a Trigger
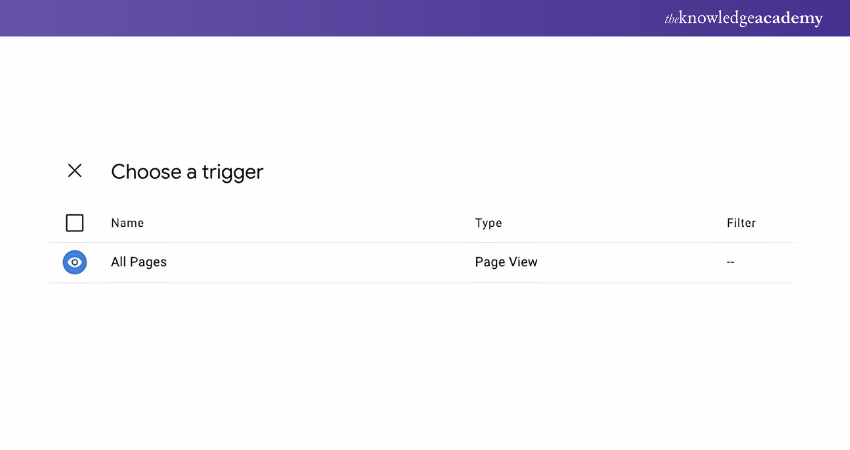
Next, proceed to the "Triggering" section. Click on the "Triggering" button to reach the "Choose a Trigger" page. Select "All Pages" to ensure that data is collected from every page on your website.
e) Finalise and Save your Tag
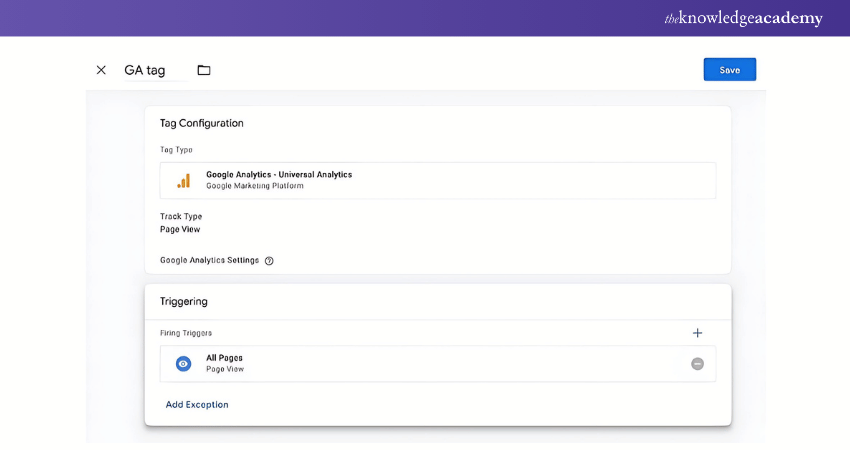
Once you've configured and triggered your tag, your setup should be complete. Simply click "Save," and your Google Tag Manager will begin tracking and sending data to your Google Analytics account.
By following these steps, you’ve successfully created a new tag that will help you monitor and analyse your website's performance through Google Analytics.
Become a Google Analytics Pro! Register for our Google Analytics Course and learn how to optimise your website with expert insights.
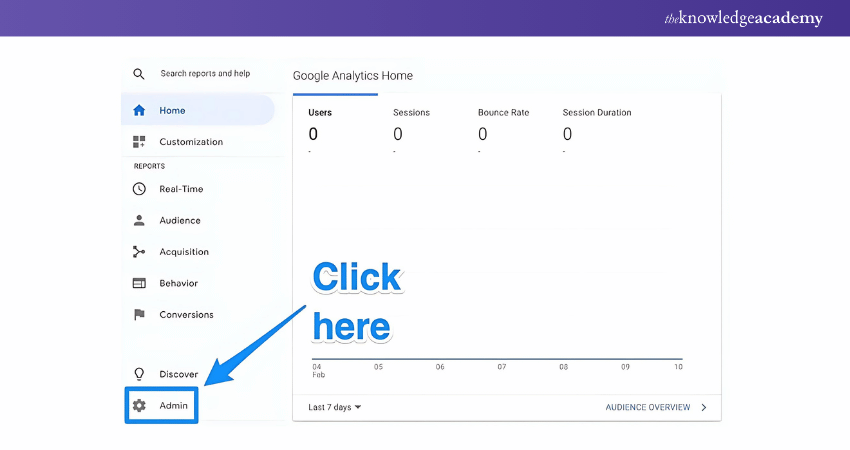
Step 4: Set up Google Analytics Goals
To effectively track your website's success, it’s crucial to define what success looks like in Google Analytics by setting up specific goals. Without these goals, Google Analytics won’t automatically understand your key performance indicators.
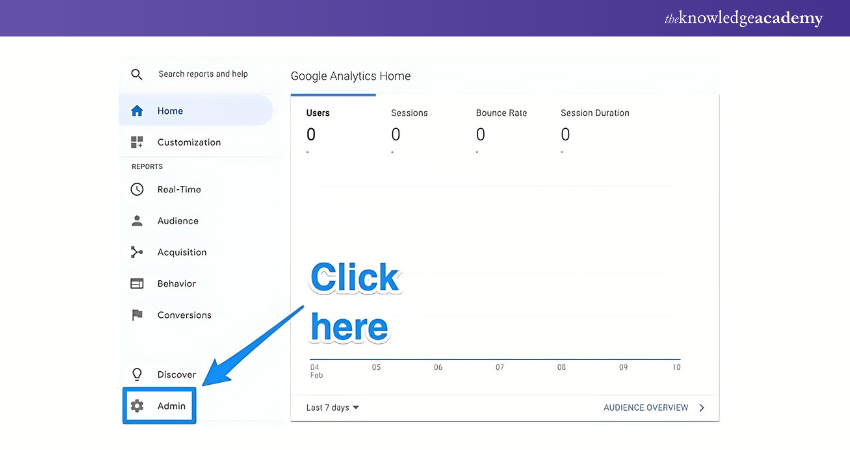
To begin, access the “Admin” section of Google Analytics by clicking the “Admin” button in the bottom left corner.
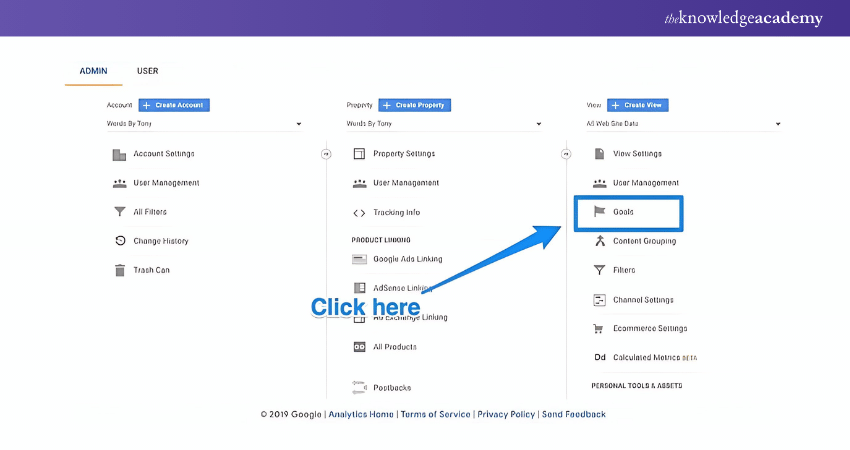
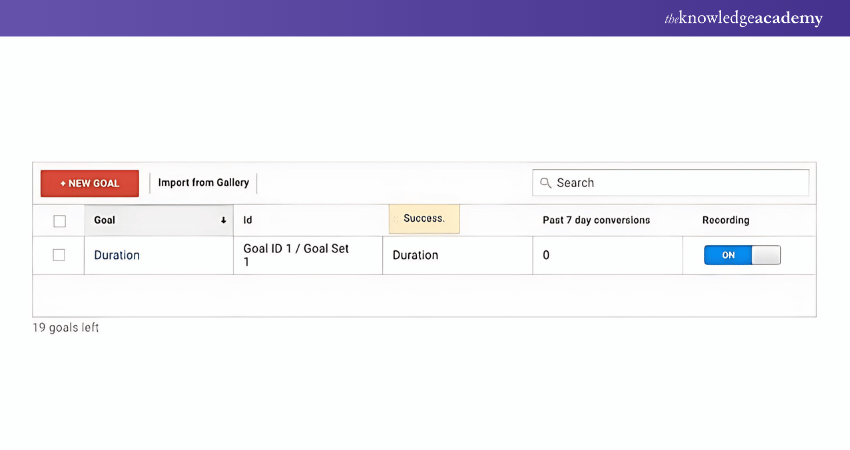
a) Set up Goals in Google Analytics
Once in the Admin section, navigate to the “Goals” button. Clicking this will take you to the “Goals” dashboard, where you can create a new goal.
b) Create a New Goal
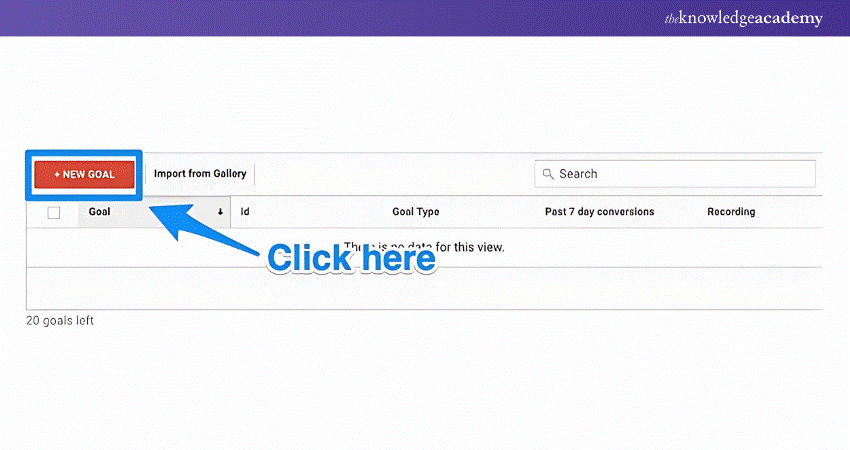
From the dashboard, browse through different goal templates to find one that aligns with your objectives. Next, choose the type of goal you want to set, such as:
Destination: For instance, if your goal is to have users reach a specific page on your site.
Duration: For example, if you want users to spend a certain amount of time on your site.
Pages/Screens per session: Such as setting a goal for users to visit a particular number of pages.
Event: For example, if your goal is to have users engage with an element, like playing a video or clicking on a link.
c) Customise your Goal Settings
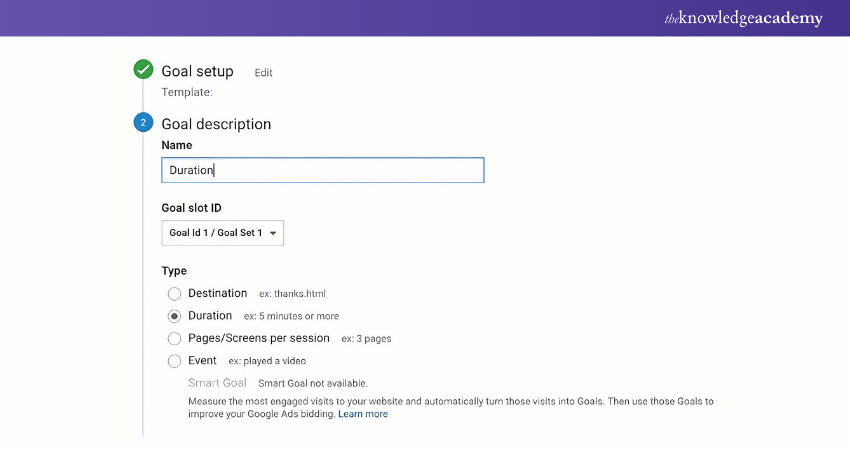
After selecting a template, you can further refine your goal by specifying details, like how long users need to stay on your site to consider it a success. Once your goal is set up, save it, and Google Analytics will begin tracking it.
d) Start Tracking and Analysing Data
Remember, Google Analytics and Google Tag Manager offer a vast array of metrics to track. However, it’s easy to become overwhelmed by the data available. It’s advisable to start with the metrics that are most important to your business goals and gradually expand your tracking efforts as needed.
Step 5: Link to Google Search Console
One of the key steps in optimising your website’s search presence is linking it to Google Search Console. This tool provides marketers and webmasters with crucial search metrics and data that can enhance your online strategy.
For instance, Google Search Console allows you to:
1) Monitor your site’s crawl rate by search engines
2) View when Google indexes your website
3) Identify which internal and external pages link to your site
4) Analyse the keyword queries that drive traffic to your pages
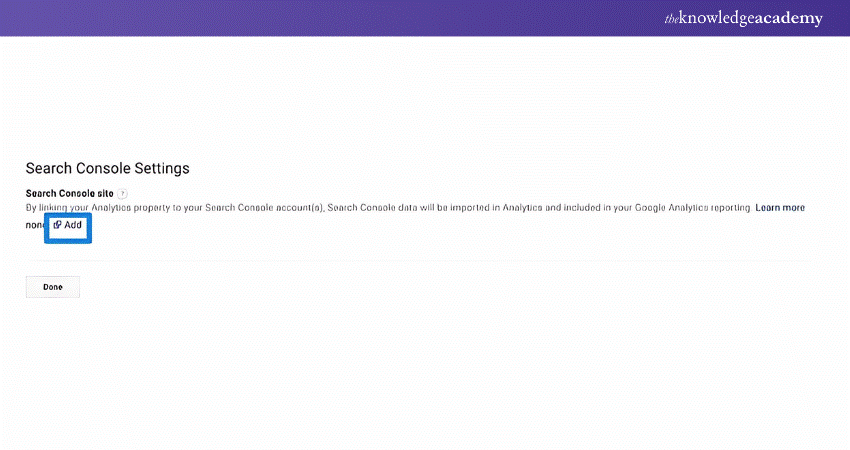
To begin, navigate to the main dashboard and locate the gear icon in the lower-left corner.
a) Access Property Settings in Google Analytics
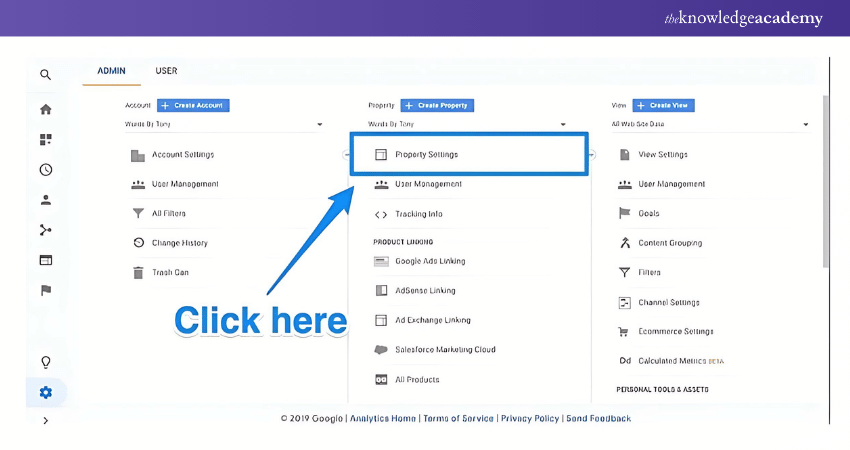
Click on the gear icon, and then select "Property Settings" from the middle column.
Next, scroll down and look for the option to adjust your Search Console settings.
b) Link Your Website to Google Search Console
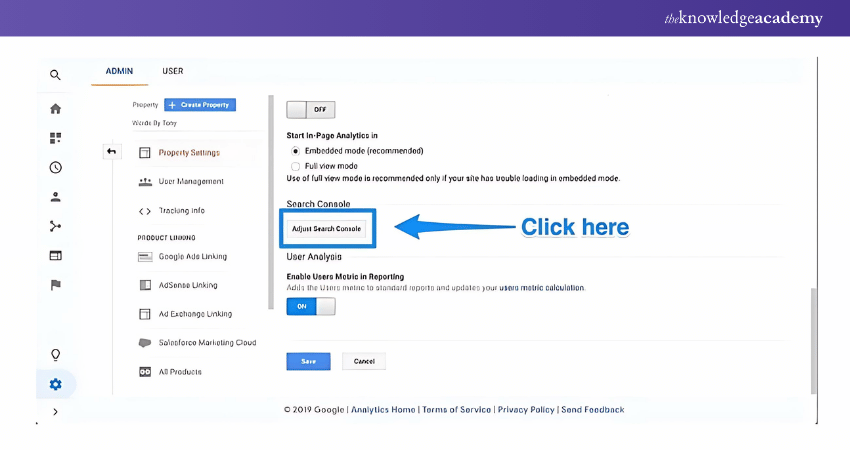
This will guide you through the process of adding your site to Google Search Console. Click the "Add" button, which will redirect you to a page where you can link your site.
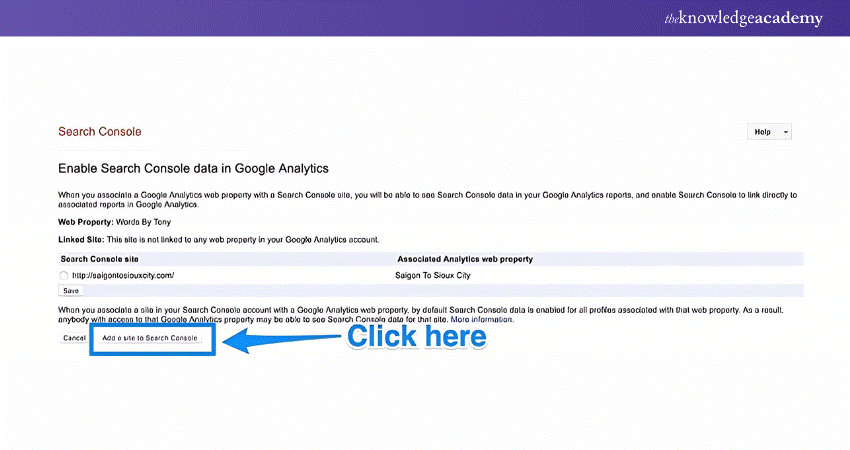
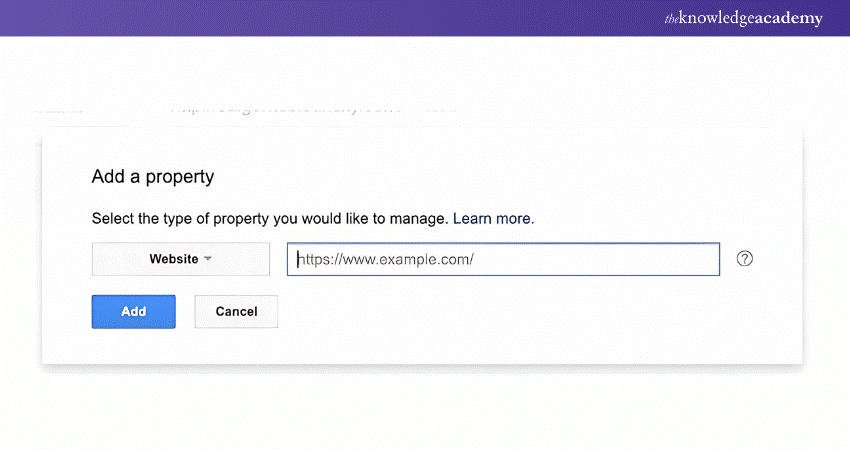
c) Add a New Site in Google Search Console
At the bottom of the page, click on "Add a site to Search Console." Enter your website’s name and click "Add" to link it to Google Search Console.
d) Complete the Verification Process
Follow the instructions provided to add the necessary HTML code to your website. After completing this step, click “Save” to finalise the connection. You will then return to Google Analytics.
Note: Your data won’t appear immediately, so check back later to view the newly integrated Google Search Console data.
Things you can do After Setting up Google Analytics
Once you've set up Google Analytics, there are numerous ways to leverage its powerful features for data analysis and web marketing.
Here are some key steps to get started:
Grant Access to Your Team
To grant your team access to Google Analytics, open the “Admin” dashboard by clicking the gear icon. Select "User Management," then click "Add new users." Enter the user’s Google account email, choose their permissions, and click "Add." This ensures they can access the data they need.
Link Google Ads with Google Analytics
If your business uses Google Ads, linking it with Google Analytics is essential for a complete view of the customer journey, from ad interactions to goal completions on your site.
To link the accounts, access the “Admin” dashboard by clicking the gear icon, then select “Google Ads Linking” in the “Property” column. Click "New Link Group," choose the Google Ads accounts you want to connect, and click "Continue." Ensure linking is enabled for each property, then click "Link accounts." This integration will provide deeper insights into your ad campaign performance.
Set up Views
Google Analytics lets you tailor your reports by creating "views" that focus on specific data, like organic search or social media traffic. To set up a new view, go to the “Admin” dashboard by clicking the gear icon, select "Create new view" in the "View" column, choose either "Web Site" or "App," name the view to match its focus, set the "Reporting Time Zone," and click "Create View." You can then adjust the view settings to filter the exact data you want to analyse.
Ways to Utilise Google Analytics for Analysing
Google Analytics offers sufficient data to help improve your understanding of how to optimise your website's performance. Here are five essential ways to utilise Google Analytics for analysing web traffic:
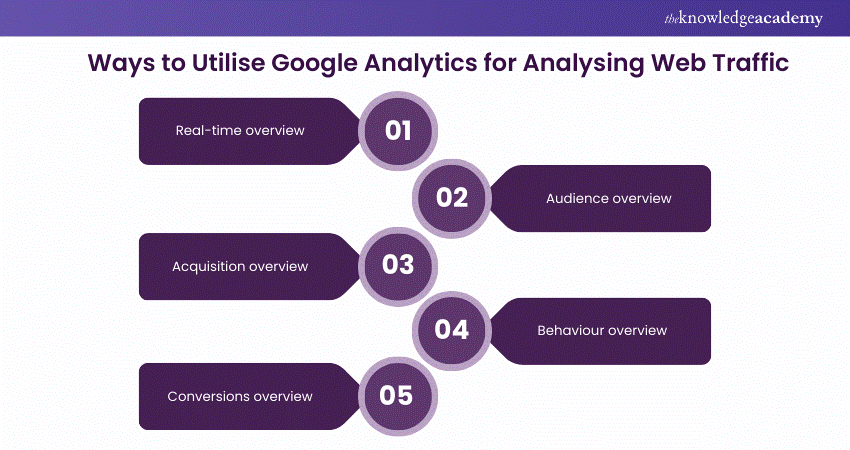
1) Real-time overview
Google Analytics provides a real-time overview what's happening on your website at any given moment. You can see how many people are visiting your site, which pages they are currently viewing, their geographical locations, and even the traffic sources that brought them there.
Furthermore, this feature is especially valuable for assessing the immediate impact of marketing campaigns, promotions, or website updates. By monitoring real-time data, you can respond quickly to emerging trends or issues and make timely adjustments to enhance user experience and engagement. This report is especially useful if you have a large site, and you are generating traffic in over hundreds and thousands each day. However, this report might not be suitable to you if you have a relatively new or small website. In that case, you can look at other reports which might be more suited for your website.
2) Audience overview
The audience overview report provides valuable insights into your website's visitors. It gives you an understanding of your audience's demographics, such as age, gender, and location. You can also analyse their interests; the devices used to access your site, and even the time they spend on specific pages.
You can also trace your audience’s journey with your brand. This includes the social media pages they visited, or the page or link they used to reach your brand to purchase the product or service. This helps you determine the effective strategies and help you to improve on the marketing strategies, so that you can drive more traffic to your website. You can tailor your content and marketing strategies to cater to their preferences and needs, ultimately improving user satisfaction and increasing website traffic.
3) Acquisition overview
The acquisition overview report reveals how users arrive at your website. It categorises traffic sources into channels, such as organic search, direct, social media, referral, and paid search. By identifying which channels are driving the most traffic, you can allocate your marketing resources more effectively.
Additionally, you can dig deeper into each channel to assess the performance of individual campaigns or referral sources. This information empowers you to focus on the most fruitful channels and make informed decisions to boost website visibility and attract more visitors.
4) Behaviour overview
The behaviour overview report offers valuable insights into how users interact with your website. You can view metrics such as page views, bounce rate, average time on page, and the most visited pages.
Moreover, a fundamental understanding of user behaviour helps you identify which pages are performing well and which might need improvement. By analysing the data, you can optimise your website's navigation, content, and user flow. This ensures a positive user experience that encourages visitors to stay longer and explore further.
5) Conversions overview
The conversions overview report is vital for tracking and measuring your website's goals and conversions. With the help of this conversion overview report, you can see how many visitors are getting converted into customers and the amount of revenue they are generating for your business. There are three major insights you can get from this report. They are:
a) Goals: This will show you how your goals are getting converted into potential sales and generating revenue for your brand. It will also help you to understand the time and the number of goals that are getting converted into major revenue generating aspects.
b) E-commerce: If you have an e-commerce website, or an online store, this report will show you how many visitors are visiting your website for your products, the number of days the products are staying in the cart, and which are checked out and which are not.
c) Multi-channel funnels: Giving small breadcrumbs, in the form of blogs and social media pages to your customers helps you to understand the path that is most used by visitors and the result which are being generated through these multi-channel funnels.
Transform Your Career with Expert-Led Web Analytics Training - Start Learning Today and Advance Your Opportunities.
Conclusion
We hope that after reading this blog, you have now understood How to Set up Google Analytics for your team and how leveraging its powerful features can significantly enhance your understanding of website performance. We hope that you gained valuable information to make informed decisions by analysing real-time data, audience insights, acquisition sources, user behaviour, and conversion metrics.
Get Ahead in Digital Marketing! Join Digital Marketing Course Today and Empower Your Career with Essential Skills.
Frequently Asked Questions
What is a Tracking ID in Google Analytics and How do I Find it?

A tracking ID is a unique identifier in Google Analytics used to track data from your website. To find it, go to the “Admin” dashboard, select the "Property" column, click on "Tracking Info," and then "Tracking Code." The ID starts with "UA-".
Can I Track Multiple Websites with one Google Analytics Account?
Yes, you can track multiple websites with one Google Analytics account. Each website can have its own property within the account, allowing you to monitor and analyse data separately for each site under the same account.
What are the Other Resources and Offers Provided by The Knowledge Academy?
The Knowledge Academy takes global learning to new heights, offering over 30,000 online courses across 490+ locations in 220 countries. This expansive reach ensures accessibility and convenience for learners worldwide.
Alongside our diverse Online Course Catalogue, encompassing 19 major categories, we go the extra mile by providing a plethora of free educational Online Resources like News updates, Blogs, videos, webinars, and interview questions. Tailoring learning experiences further, professionals can maximise value with customisable Course Bundles of TKA.
What is The Knowledge Pass, and How Does it Work?
The Knowledge Academy’s Knowledge Pass, a prepaid voucher, adds another layer of flexibility, allowing course bookings over a 12-month period. Join us on a journey where education knows no bounds.
What are the Related Courses and Blogs Provided by The Knowledge Academy?
The Knowledge Academy offers various Digital Marketing Courses, including the Google Analytics Certification Course, and the Google Tag Manager Certification Course. These courses cater to different skill levels, providing comprehensive insights into Google Ads Campaign Types.
Our Digital Marketing Blogs cover a range of topics related to Google Analytics, offering valuable resources, best practices, and industry insights. Whether you are a beginner or looking to advance your Digital Marketing skills, The Knowledge Academy's diverse courses and informative blogs have got you covered.
Upcoming Digital Marketing Resources Batches & Dates
Date
 Digital Marketing Course
Digital Marketing Course
Fri 15th Nov 2024
Digital Marketing Course
Fri 24th Jan 2025
Digital Marketing Course
Fri 28th Mar 2025
Digital Marketing Course
Fri 23rd May 2025
Digital Marketing Course
Fri 25th Jul 2025
Digital Marketing Course
Fri 26th Sep 2025
Digital Marketing Course
Fri 28th Nov 2025
 If you wish to make any changes to your course, please


