We may not have the course you’re looking for. If you enquire or give us a call on 44 1344 203 999 and speak to our training experts, we may still be able to help with your training requirements.
We ensure quality, budget-alignment, and timely delivery by our expert instructors.

Adobe Premiere Pro stands out as one of the top Video Editing tools for professionals and hobbyists alike. One feature that makes it so powerful is its vast array of filters. These filters can transform any regular footage into a cinematic masterpiece. But with so many options, where do you begin? In this blog, we'll delve into the world of Adobe Premiere Pro Filters and provide step-by-step instructions and tips on how to use them.
Table of Contents
1) What are Adobe Premiere Pro Filters?
2) Applying filters to your footage
3) Popular Adobe Premiere Pro Filters and how to use them?
4) Tips for using filters effectively
5) Conclusion
What are Adobe Premiere Pro Filters?
Adobe Premiere Pro Filters are tools that allow Video Editors to modify or enhance their footage in various ways. They encompass a broad range of effects, from colour correction and grading to special visual effects and transitions.
These filters can transform raw footage, providing depth, emotion, or clarity to visual narratives. While used subtly to correct imperfections or, more prominently, to set a mood, filters in Premiere Pro are essential assets in an editor's toolkit, as they help them bring their creative visions to life.
Applying filters to your footage
While venturing into the realm of Video Editing for the first time, applying filters can revolutionise your content. In Adobe Premiere Pro, this process is both intuitive and deeply customisable. Here's a detailed breakdown of how to apply filters to your footage:

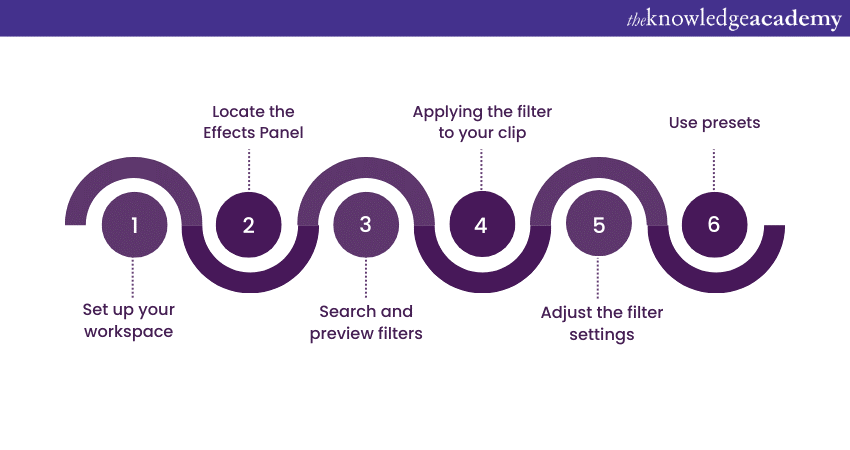
Set up your workspace
Before you begin, it's essential to have an organised workspace. Adobe Premiere Pro offers several default workspaces, but for working with filters, the 'Effects' workspace is recommended.
So, go to the top menu, click on 'Window', hover over 'Workspaces', and select 'Effects'. This layout provides a more prominent 'Effects' panel, making it easier to browse and apply Filters.
Locate the Effects Panel
On the right side of the Adobe Premiere Pro interface, you'll find the 'Effects' panel. This panel is your gateway to the extensive library of filters that the software offers. It's categorised into video effects, audio effects, video transitions, and audio transitions for ease of use.
Search and preview filters
With hundreds of filters to choose from, the search bar at the bottom of the 'Effects' panel is invaluable. Just type in a keyword related to the effect you're looking for and the results will be filtered accordingly. To preview what an effect will look like on your footage, drag and hover it over your clip in the 'Program Monitor'. This will give you a temporary view of the effect.
Elevate your creative game with our Adobe Training! Get ready to unlock endless possibilities in your projects.
Applying the filter to your clip
Once you've decided on a filter follow these steps:
1) Drag and drop method: Click on the desired filter, drag it over to your timeline, and drop it onto the specific clip you want to apply it to.
2) Double-click method: Select the clip in your timeline to which you wish to add a filter, then double-click the filter in the 'Effects' panel.
Adjust the filter settings
After applying a Filter, follow the below-mentioned steps:
1) Open the 'Effect Controls' panel, usually located to the left of the 'Effects' panel.
2) Here, you'll find adjustable parameters for the filter you've applied. This can include intensity, duration, blend modes, and more.
3) Use the settings to customise the filter to your liking. Remember, the key is to make enhancements without making the footage look overly processed.
Use presets
If you find a particular combination of filter settings you like, you can save it as a preset. Right-click on the effect name in 'Effect Controls', then choose 'Save Preset'. This allows you to use the same settings in future projects without having to adjust everything from scratch.
Popular filters and how to use them
Adobe Premiere Pro's vast library of filters offers an expansive palette for Video Editors, ranging from subtle enhancements to transformative effects. While the options can initially seem overwhelming, familiarising oneself with a few popular filters can greatly enhance your editing prowess. Let's delve into some of the best Adobe Premiere Pro Filters and learn how to deploy them effectively:
Lumetri Colour
This comprehensive tool provides everything from basic colour correction to advanced grading. It's essential for setting the mood of your footage or correcting improperly balanced shots.
How to use: Apply Lumetri Colour from the 'Effects' panel. Within the 'Effect Controls', you'll find options like Basic Correction (for exposure, contrast, highlights, and shadows) and Creative (for applying looks and adjusting intensity).
Cross Dissolve
This is the most common transition, used to seamlessly blend two clips together.
How to use: Drag and drop the Cross Dissolve effect between two adjacent clips in your timeline. Adjust the duration by dragging its edges to your desired length.
Dip to Black/white
A transitional effect that momentarily fades a clip to black or white before transitioning to the next.
How to use: Place it at the beginning or end of a clip for a fade-in/out effect or between two clips to use it as a transitional element.
Lens Flare
Adds a cinematic touch to your footage by simulating the effect of a bright light source striking the camera lens.
How to use: Drag and drop onto your clip. Adjust the flare's brightness and blend mode within 'Effect Controls'. You can also keyframe its position to animate the flare's movement.
Fast Blur
Useful for creating depth or drawing attention to a specific part of your frame.
How to use: After applying, adjust the blurriness level. For selective blurring, use masking tools within the 'Effect Controls' to define the blur area.
Dynamics
This filter compresses limits, expands, or gates audio signals. As a result, it ensures that your audio levels are consistent throughout.
How to use: Apply it to an audio clip and use the 'Effect Controls' to adjust parameters like threshold, ratio, and attack.
Reverb
Adds an echoey sound, simulating the acoustics of different environments.
How to use: Once applied, select a preset (like Hall or Room) and adjust the mix and output levels for the desired intensity.
Filmic Transition
It provides a vintage, film-like transition between clips.
How to use: Place between two clips in your timeline. The effect will use a combination of light leaks, colour changes, and jitters to transition from one clip to another.
Unleash your creativity with our Adobe After Effects Course – Sign up now and elevate your digital animation skills to new heights!
Tips for using filters effectively
Filters can significantly augment the quality and feel of a video, but like any tool, they need to be wielded with care and precision. When used indiscriminately, they can enhance the content and distract the viewer. Let's dive into some best practices to ensure that filters enhance, rather than hinder, your storytelling prowess in Adobe Premiere Pro:

Understand the purpose
Before applying any filter, ask yourself, “Why am I using this?” Whether it's to set a mood, correct a mistake, or highlight a particular aspect of your footage, having a clear purpose will guide your choices and prevent over-processing.
Start subtle, then adjust
Especially with effects like colour correction or blur, it's always best to start with a subtle touch. It's much easier to incrementally increase the intensity of a Filter than to scale it back once you've overdone it.
Consistency is crucial
If you're applying a stylistic filter, ensure its use is consistent throughout the video. A cohesive visual language helps in maintaining viewer immersion.
Always preview
Adobe Premiere Pro provides an easy way to toggle between the original and edited versions of your footage using the ‘Global FX Mute’ button. Regularly checking ensures that your Filter choices are enhancing the content.
Avoid overlapping redundant Filters
Applying multiple filters that serve the same purpose can result in a messy or overly processed look. If you've added a colour correction filter, for instance, there's often no need to add a separate saturation filter.
Keep your audience in mind
Adobe Premiere Pro Filters and the effects that you employ should cater to your target audience's preferences and expectations. A music video for a young audience might benefit from flashy transitions and vibrant colour grading, while a corporate presentation might require more subdued and consistent visuals.
Use natural transitions
While there are numerous transition effects available, sometimes the best transitions are the natural ones present in the footage. Before adding a fade, swipe, or dissolve, consider whether cutting directly between clips or using a natural motion within the footage might serve the narrative better.
Save your presets
If you've spent time meticulously adjusting a filter's settings and think you might want to use the same effect again, save it as a preset. This not only ensures consistency across projects but also saves time in the future.
Stay updated and learn continuously
Adobe regularly rolls out updates to Premiere Pro. New filters, improvements to existing ones, and sometimes changes to the interface can greatly affect your workflow. Regularly updating and taking the time to learn about new features will keep you at the top of your game.
Get feedback
A fresh set of eyes can provide invaluable feedback. Share your edited footage with colleagues or friends and ask for their opinions on the effects you've applied. They might spot overuse or suggest areas where a Filter could be beneficial.
Conclusion
To sum it all up, filters in Adobe Premiere Pro elevate storytelling potential. When used judiciously, Adobe Premiere Pro Filters enhance visuals and captivate audiences. Mastering their nuanced application ensures a seamless, purposeful narrative, distinguishing amateur edits from professional masterpieces. For a deeper understanding of how to effectively use these filters, explore our Adobe Premiere Pro Tutorial and let creativity reign!
Unlock your creative potential with the Adobe Premiere Pro Course – join now and elevate your Video Editing skills!
Frequently Asked Questions
Upcoming Office Applications Resources Batches & Dates
Date
 Photoshop Course
Fri 7th Mar 2025
Fri 23rd May 2025
Fri 18th Jul 2025
Fri 12th Sep 2025
Fri 12th Dec 2025


 Top Rated Course


 If you wish to make any changes to your course, please


