


 Top Rated Course

We may not have the course you’re looking for. If you enquire or give us a call on +1 7204454674 and speak to our training experts, we may still be able to help with your training requirements.
Adobe Photoshop Color Palette: A Step-by-Step Tutorial
Sienna Roberts 03 December 2024Discover the power of Adobe Photoshop Color Palette! Explore how this essential tool in Adobe Photoshop can enhance your design projects, from creating harmonious colour schemes to efficient colour management. Learn how to master the Adobe Photoshop Color Palette to take your creative endeavours to new heights.

Training Outcomes Within Your Budget!
We ensure quality, budget-alignment, and timely delivery by our expert instructors.
Table of Contents

Have you ever wondered how professional Graphic Designers and Digital Artists create those stunning visuals with perfectly harmonised colours in Adobe Photoshop? The secret lies in understanding and effectively using the Adobe Photoshop Colour Palette. It is a vital tool for anyone working in the realms of graphic design, photography, and digital art.
If you are new to the world of Graphic Designing and looking to build a strong career, it’s time to understand this unique feature of Photoshop. Read this blog to learn about the process of creating the Adobe Photoshop Colour Palette so you don't get stuck on choosing the right colour.
Table of Contents
1) A brief introduction to Adobe Photoshop Colour Palette
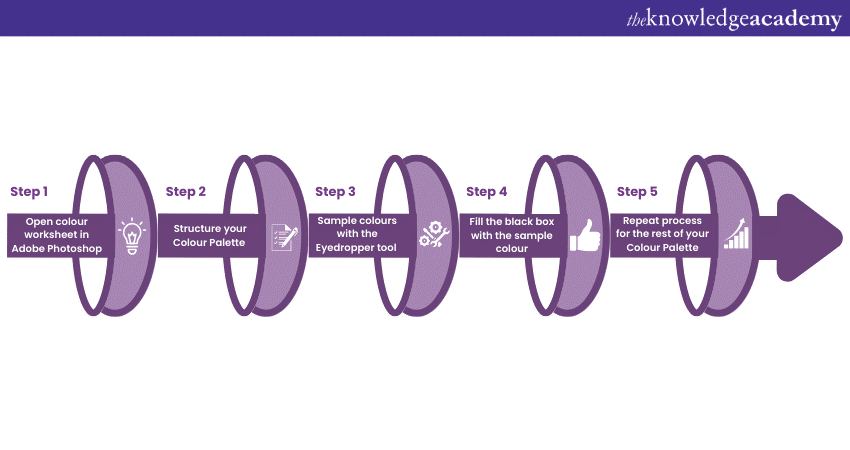
2) Exploring the steps to create a Colour Palette in Adobe Photoshop
a) Open colour worksheet in Adobe Photoshop
b) Structure your colour palette
c) Sample colours with the eyedropper tool
d) Fill the black box with the sample colour
e) Repeat the process for the rest of your colour palette
3) Conclusion
A brief introduction to Adobe Photoshop Colour Palette
Adobe Photoshop, developed by Adobe Inc., is one of the most influential and popular image editing software in the digital art and design world. Launched in 1988, it has revolutionised the way artists, photographers, and designers work with images.
In the design software, the Colour Palette function stands as an indispensable asset for professionals and hobbyists alike. This function is not merely about presenting a range of colours; it's a sophisticated mechanism that facilitates precision and depth in colour selection and manipulation. The Colour Palette is seamlessly integrated into Photoshop's architecture, making the colour-picking process intuitive and efficient.
It provides a visual representation of all available hues, allowing users to pick, mix, or modify them according to the project's needs. Moreover, it displays colours in a spectrum, from which users can select specific shades or gradients. Using the Eyedropper tool, colours can be sampled from existing images and added to your palette, ensuring consistency across designs.
Beyond just selecting colours, the Adobe Photoshop Colour Palette aids in creating custom swatches. Users can save specific colours or gradients for future use, facilitating a cohesive design language across different projects. This bespoke palette can be exported or shared, making collaborative work streamlined.

Exploring the steps to create a Colour Palette in Adobe Photoshop
The creation of colour palettes in Adobe Photoshop empowers artists to customise hues precisely to their needs. By using processes like blending, mixing, and saving individual colours, users can formulate their unique shades, akin to a personalised paint box. Here are the steps users can take the help of, to create their own Colour Palette with Adobe Photoshop:
Open colour worksheet in Adobe Photoshop
Follow the below-mentioned steps to open the colour worksheet in Adobe Photoshop:
a) Launch Adobe Photoshop: Open the Adobe Photoshop application on your computer.
b) Open your project: Navigate to 'File' and then click on 'Open,' selecting the desired project or image.
c) Access the colour panel: Go to the 'Window' menu and select the 'Colour' option, or simply press 'F6' to open the colour panel.
d) Choose colour mode: Within the colour panel, you can select between different colour modes, such as RGB or CMYK, depending on your project needs.
e) Adjust colours: Utilise sliders, colour pickers, or specific values to choose and adjust the colours within the colour panel. This can enable seamless colour manipulation within your design.
Experience hands-on Adobe Training that empowers you to create stunning visuals! Get started on your artistic journey today.
Structure your Colour Palette
Here are the steps that users follow to structure their Colour Palette in Adobe Photoshop:
a) Access the Swatches panel: Go to the 'Window' menu and select the 'Swatches' option to open your colour library.
b) Create a new Swatch: Click on the 'New Swatch' icon (or the '+' symbol) to add a custom colour.
c) Define colour: Use colour pickers or insert specific values to create the exact hue.
d) Name and save: Give your custom colour a name for easy reference and click the 'OK' button to save it.
e) Repeat as needed: Repeat steps 2-4 to build the full palette.
f) Organise palette: Next, drag and drop swatches to arrange them.
g) Save palette: From the Swatches menu, select the 'Save Swatches' option to store your palette for future use.
Sample colours with the Eyedropper tool
Follow the below-mentioned steps to make sample colours with the Eyedropper tool in Adobe Photoshop:
a) Select eyedropper tool: In the Tools panel, click the Eyedropper icon or press 'I' on your keyboard.
b) Choose sample size: From the Options Bar, select a sample size that determines the pixel range for sampling.
c) Adjust sample layer: Decide if you want to sample from all layers or just the current one.
d) Hover over colour: Move the Eyedropper cursor over the specific colour in the image you want to sample.
e) Click to sample: Click on the desired colour. The sampled colour will appear in the Foreground Colour Box.
f) Use sampled colour: The selected colour is now ready to use with any painting or drawing tools within Photoshop.
Learn more perspectives on design and solve problems innovatively by signing up for our Design Thinking Training now!
Fill the black box with the sample colour
Follow the below-mentioned steps to fill in the black box with the sample colour in Adobe Photoshop:
a) Sample colour: Using the Eyedropper tool, make a sample for the desired colour as previously described.
b) Select area: Use the selection tool (like the Rectangular Marquee) to highlight the black box or area you want to fill.
c) Set foreground colour: Ensure the sampled colour is set as the foreground colour. It will appear in the Foreground Colour Box.
d) Use the Paint Bucket or ‘Fill’ command: Select the Paint Bucket tool or go to 'Edit' > 'Fill.'
e) Choose foreground colour: In the Fill dialogue box or with the Paint Bucket, ensure 'Foreground Colour' is selected.
f) Apply fill: Click inside the selected black box, and it will fill with the sampled colour, transforming it to the chosen hue.
Activate your creativity by learning the skills of designing by signing up for our Adobe Photoshop Course now!
Repeat the process for the rest of your colour palette
Here are the steps that users can take help of, to repeat the above processes to complete the rest of their colour palette in Adobe Photoshop:
a) Select next colour: Use the Eyedropper tool to sample the next colour from your image or colour reference.
b) Select next area: Utilise a selection tool to highlight the next box or area you intend to fill.
c) Verify Foreground colour: Confirm that the newly sampled colour is set as the foreground colour.
d) Fill selected area: Use the Paint Bucket tool or 'Edit' > 'Fill' with 'Foreground Colour' to fill the selected area.
e) Repeat steps: Continue the process, cycling through steps 1-4 for each colour in the palette, ensuring each box or section is filled with the corresponding hue.
f) Save changes: Optionally, save your progress regularly to avoid any loss of your meticulously structured colour palette.
Conclusion
Mastering the Adobe Photoshop Colour Palette is an essential skill for Digital Artists and Graphic Designers. It allows for customisation, creativity, and precision in visual projects. As a result, it helps unlock endless artistic possibilities.
Elevate your design skills with our Adobe Illustrator Training! Learn to create stunning graphics and unleash your creativity. Join us today!
Frequently Asked Questions
Upcoming Office Applications Resources Batches & Dates
Date
 Photoshop Course
Photoshop Course
Fri 10th Jan 2025
Photoshop Course
Fri 14th Feb 2025
Photoshop Course
Fri 11th Apr 2025
Photoshop Course
Fri 23rd May 2025
Photoshop Course
Fri 8th Aug 2025
Photoshop Course
Fri 26th Sep 2025
Photoshop Course
Fri 21st Nov 2025
 If you wish to make any changes to your course, please


