


 Top Rated Course

We may not have the course you’re looking for. If you enquire or give us a call on +1 7204454674 and speak to our training experts, we may still be able to help with your training requirements.
List of Adobe Photoshop Tools - Everything You Want To Know
Sienna Roberts 19 December 2024Explore the List of Adobe Photoshop Tools to enhance your understanding of this powerful image editing software. Discover a comprehensive list of tools, including selection tools, crop and slice tools, retouching and painting tools, drawing and type tools, and navigation tools. Further, read this blog to know all you need to know about the top Adobe Photoshop Tools.

Training Outcomes Within Your Budget!
We ensure quality, budget-alignment, and timely delivery by our expert instructors.
Table of Contents
Adobe Photoshop is a revolutionary software platform that has forever changed the landscape of visual editing and design. With an array of Adobe Photoshop Tools that can turn a blank canvas into an astounding piece of art, Photoshop is a must-learn tool for designers, photographers, and digital artists alike. In this blog, we will provide you with an overview of the different Adobe Photoshop Tools, how they can be used and how they cater to different purposes.
Table of Contents
1) List of Adobe Photoshop Tools
a) Selection tools
b) Crop and Slice tools
c) Retouching and painting tools
d) Drawing and Type tools
e) Navigation tools
2) Conclusion
List of Adobe Photoshop Tools
So what tools are on Adobe Photoshop? This section of the blog will expand on all you need to know.
Selection tools
The true prowess of Adobe Photoshop lies in the precision and versatility it offers, and the selection tools are a testament to this. A robust set of selection tools at your disposal means you have the ability to single out, manipulate and perfect specific parts of your artwork or image, down to the very last pixel. Let's delve deeper into each of these tools.
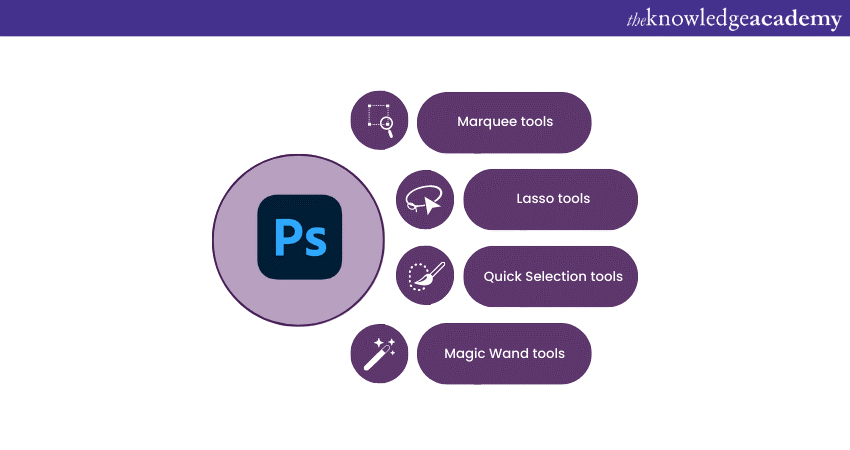
Marquee tools
The Marquee tools, resembling the shape of a dotted rectangle or ellipse in the toolbar, are among the simplest tools to understand. There are four types:
1) Rectangular Marquee tool: As the name suggests, it is used to make rectangular or square selections. This tool is ideal for selecting regular, straight-edged sections of your image.
2) Elliptical Marquee tool: This is used to make oval or circular selections. If you're trying to select an object that is round, this is your go-to tool.
3) Single row Marquee tool and Single column Marquee tool: These tools help you select a single row or column of pixels throughout the width or height of your image.
Lasso tools
The Lasso tools are more free-form and allow for greater flexibility. They are great for making complex, irregular selections. They come in three variants:
1) Lasso tool: This tool helps you draw freehand selections. It's perfect for those cases where you need to make a very specific selection that doesn't conform to geometric shapes.
2) Polygonal Lasso tool: This version lets you make straight-edged selections. Clicking point to point, you can outline the area of your image you want to select. It's perfect for selecting polygon-like shapes.
3) Magnetic Lasso tool: This ingenious tool automatically follows and clings to the edge of the object you are tracing, based on the contrast between the object and its background. This tool can significantly speed up your workflow when working with well-defined objects.
Quick Selection tool
The Quick Selection tool is a lifesaver when you need to make a fast selection. This tool selects an area based on colour and tone. You just click and drag over the area, and Photoshop will automatically select similar pixels. The tool is perfect when the part of the image you want to select has a distinctive colour or tone.
Magic Wand tool
The Magic Wand Tool works in a similar way to the Quick Selection Tool but with just a single click. It selects all the contiguous (touching) pixels that are similar in colour to the pixel where you clicked. It's great for selecting large areas of similar colours, such as a clear sky or a solid background.

Crop and Slice tools
A pivotal part of photo editing and graphic design is the ability to change the dimensions, perspective or sections of your image or design. This is where Adobe Photoshop's Crop and Slice tools come into play. These tools are highly effective for shaping your image to the right size and extracting specific portions of it for varied purposes. Let's delve deeper into the functionality of these tools.
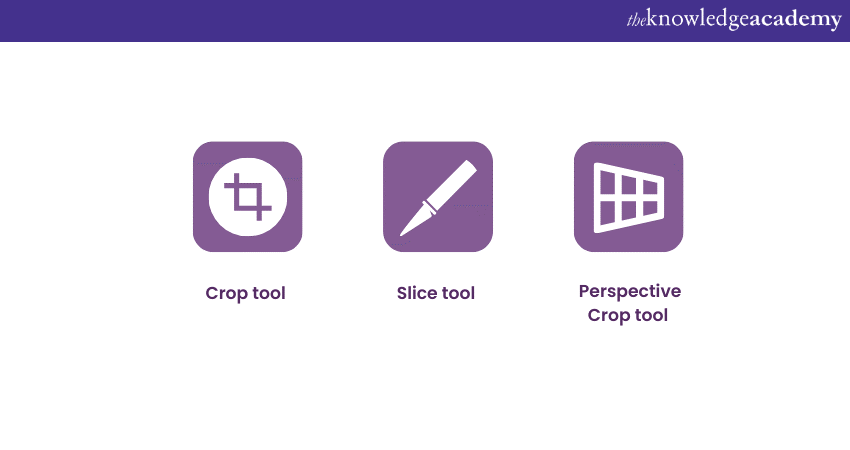
Crop tool
The Crop tool is a very commonly used tool in Photoshop. This tool allows you to cut out a portion of your image or design to remove undesired elements or to focus on a specific subject. The tool can also be used to alter the dimensions or aspect ratio of your picture.
Here's how it works:
1) Click on the Crop tool from the toolbox, or use the shortcut 'C' on your keyboard.
2) Click and drag the tool across the picture to create a bounding box. You can alter the size of this box by dragging the corners or sides.
3) Once you are satisfied with the selection, press Enter to confirm. The area outside of the bounding box will be removed.
4) The Crop tool also comes with some presets that can be useful for specific tasks such as cropping to specific aspect ratios or sizes.
Ready to bring your visions to life? Join our Adobe Training and transform your artistic ideas into stunning realities!
Slice tool
While the Crop tool is about removing parts of an image, the Slice tool takes a different approach. It allows you to divide your image into smaller sections, each of which can be exported as a separate file. This tool is particularly useful in web design where different parts of an image might need to be saved separately for better web performance. To use the Slice Tool:
1) Select the Slice tool, or use the shortcut 'K' on your keyboard.
2) Click and drag across your image to create a slice. You can adjust the size of this slice by dragging the corners or sides.
3) If you want to create additional slices, simply repeat the process. Photoshop will automatically create slice lines for you.
4) Once you have made your slices, you can save each one as a separate file via 'File' > 'Export' > 'Save for Web'.
Perspective Crop tool
The Perspective Crop tool is a more advanced version of the Crop tool. This tool not only allows you to crop your image but also corrects the perspective of the cropped area. This is particularly useful when you are dealing with images that have been taken at an angle where the perspective is skewed.
Here’s how to use the Perspective Crop tool:
1) Select the Perspective Crop tool from the toolbox.
2) Click and drag across your image to create a perspective bounding box. You can adjust the corners of this box independently to match the perspective of your image.
3) Once you have matched the perspective, press Enter. The selected area will be cropped and the perspective will be automatically corrected.
Unlock your creativity with our Adobe InDesign Course – start your design journey today!
Retouching and painting tools
Retouching and painting tools in Adobe Photoshop provide the means to tweak, enhance, correct, or completely transform your images. These tools are your best friends when it comes to perfecting an image, repairing flaws, or even creating digital paintings and special effects. Let's explore these tools in more depth.
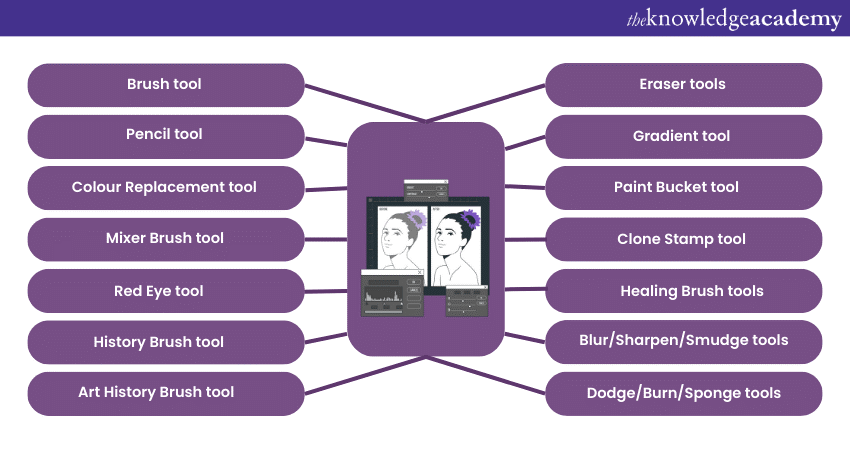
Brush tool
The Brush tool is known as one of the most versatile tools in Photoshop. It can paint colours onto your canvas using a variety of brush shapes, sizes, and modes. Brushes range from simple hard or soft round brushes to more complex brushes that mimic natural media like charcoal, oil paint, or watercolour. Additionally, Photoshop allows you to customise brushes or download new ones, which makes the possibilities for painting, texturing, and special effects almost limitless.
Pencil tool
The Pencil tool, akin to the Brush tool, helps you draw freehand lines and strokes on your image, but unlike the Brush tool, it produces hard-edged lines. This tool is great for pixel art or whenever a hard edge is needed.
Colour Replacement tool
The Colour Replacement tool, as the name suggests, helps you replace a selected colour with a new one, while preserving the original image's shadows, highlights, and textures. This is extremely useful when you need to change the colour of objects in your image without affecting their detail.
Mixer Brush tool
The Mixer Brush tool goes beyond the basic Brush tool by allowing you to mix colours and create more realistic brush strokes that reflect the physical properties of paint. It's a must-use tool for anyone who wants to create digital paintings that mimic the look of traditional media.
Red Eye tool
The Red Eye tool is a highly specific retouching tool designed to remove the red-eye effect caused by flash photography. All you need to do is click on the red part of the eye with the tool, and Photoshop will automatically neutralise the red colour.
History Brush tool
The History Brush tool helps you paint previous states of your image into the current image. This can be highly useful for undoing specific parts of your edits without affecting the rest of the image.
Art History Brush tool
The Art History Brush tool is a variant of the History Brush Tool, but it paints with stylised strokes, using the selected state or snapshot. This tool can be used to make unique artwork and effects.
Eraser tools
The Eraser tools are used to remove pixels in your image:
1) Eraser tool: This acts like a brush, erasing whatever it touches.
2) Background Eraser tool: This erases pixels of a similar colour to the one you click on. It's useful for removing backgrounds.
3) Magic Eraser tool: This acts like the Paint Bucket Tool but instead of filling, it erases.
Gradient tool
The Gradient tool helps you create a gradual blend between multiple colours. You can choose from preset gradients or create your own.
Paint Bucket tool
The Paint Bucket tool fills a specific area with a single colour or pattern. It's a quick way to replace a colour in an image or a selection.
Clone Stamp tool
The Clone Stamp tool is a powerful retouching tool that allows you to sample pixels from one part of an image and paint them onto another part. This tool is incredibly useful for removing unwanted objects from your image, or for duplicating elements. For instance, if you have a blemish on a face that you want to remove, you could use the Clone Stamp Tool to paint over the blemish with 'clean' skin from another area of the face.
Healing Brush tools
The Healing Brush tools are a set of very effective retouching tools that Photoshop offers. They are designed to correct imperfections in your image by blending them with the surrounding pixels. These tools are especially useful for tasks like retouching skin in a portrait or removing dust and scratches from a photo. There are different types of Healing Brushes:
1) Healing Brush tool: This requires you to sample a 'source' point in your image, which will be used as a reference to fix the flaws.
2) Spot Healing Brush tool: This tool doesn’t require a sample point. It automatically samples from around the area you paint and blends the flaw into the surrounding pixels.
3) Patch tool: This tool lets you select an area of your image (the flaw) and replace it with another area of your image.
4) Content-Aware Move tool: This tool helps you select and move a part of your image to a new location. Photoshop will automatically fill in the gap where the object used to be.
Blur/Sharpen/Smudge tools
These three tools are used for making minor adjustments to your image.
1) Blur tool: This softens the area of your image where it's used. It's helpful for reducing detail or depth of field.
2) Sharpen tool: This tool enhances the contrast of adjacent pixels to give the illusion of sharper focus.
3) Smudge tool: This tool mimics the action of dragging a finger through wet paint. It can be used for creating effects such as smoke or clouds, or for retouching.
Dodge/Burn/Sponge tools
These tools are used for manipulating the light and colour saturation in your image.
1) Dodge tool: This tool lightens the area where it's used. It's great for bringing out details in the shadows.
2) Burn tool: This tool darkens the area where it's used. It's helpful for toning down highlights that are too bright.
3) Sponge tool: This tool changes the colour saturation in your image. It can saturate (increase) or desaturate (decrease) the colours, depending on the mode you choose.
Unleash your creative potential today with our Adobe Illustrator Training. Click here to sign up and start your design journey!
Drawing and Type tools
Adobe Photoshop's suite of drawing and type tools offers a powerful medium for creating and manipulating shapes, lines, and text within your designs. Whether you're designing a poster with eye-catching typography, creating a logo, or sketching out a web design layout, these tools are indispensable. Let's take a closer look at each of them.

Pen tools
The Pen tools provide an incredible degree of precision for creating lines and curves. These are vector-based tools, meaning they create paths that can be scaled indefinitely without any loss of quality. Here's a brief rundown:
1) Pen tool: The basic Pen tool is used for creating straight lines and smooth curving paths. It's ideal for creating precise, complex shapes and outlines.
2) Freeform Pen tool: This variant lets you draw paths freehand, much like you would with a pencil or brush.
3) Add Anchor Point, Delete Anchor Point, and Convert Point tools: These tools allow you to modify existing paths by adding or removing anchor points or changing straight points to curves, and vice versa.
Shape tools
Shape tools allow you to create geometric shapes, such as rectangles, ellipses, and polygons, but also lines and custom shapes. These shapes are vector-based, meaning they can be scaled and resized without losing quality. The different shapes have their individual tools, but you can also find more options in the custom shape tool, which includes shapes like speech bubbles, symbols, and more.
Path Selection and Direct Selection tools
These tools are used to select as well as manipulate paths:
1) Path Selection tool: This allows you to move entire paths or shape layers.
2) Direct Selection tool: This lets you select and move individual anchor points or segments within paths.
Type Tools
Type Tools are your go-to tools for adding text to your images or designs:
1) Horizontal Type and Vertical Type tools: These allow you to add text horizontally or vertically.
2) Type Mask tools: These tools create a selection in the shape of the text you type. This is useful if you want to create text out of an image or texture.
Within the Type Tools, Photoshop also offers a wide variety of options for manipulating text, such as changing the font, size, alignment, colour, and more. You can also warp text to fit into certain shapes or paths, and create 3D text effects.
Hand Tool and Rotate View Tool
These aren't drawing or type tools per se, but they're essential when you're working with these tools:
1) Hand tool: This tool allows you to move around within your image without disturbing any of the artwork. This is useful when you're zoomed in and working on details.
2) Rotate View tool: This tool allows you to rotate your canvas for easier drawing or painting, without rotating the actual image.
Unleash your creativity with our Adobe After Effects Course – sign up now and elevate your digital animation skills to new heights!
Navigation tools
Navigating efficiently within Adobe Photoshop is crucial to maintain a seamless workflow, particularly when working with complex designs or large files. That's where Photoshop's Navigation tools come into play, ensuring you have full control over how you view and move around within your projects. Let's explore these handy tools in detail.

Hand tool
The Hand tool, accessible by pressing the 'H' key or selecting it from the toolbox, is a simple but essential tool for moving around your canvas. When you're zoomed into a document, you can click and drag the canvas to reposition your view. This is particularly helpful when working on detailed sections of a project, as it allows you to smoothly transition your view from one part of the image to another without having to zoom out.
Zoom tool
The Zoom tool, available by pressing 'Z' or selecting it from the toolbox, is the main tool for changing the magnification of your image or artwork. Clicking on your canvas with the Zoom Tool will zoom in, while holding down 'Alt' (or 'Option' on a Mac) and clicking will zoom out.
You also have the option to drag the Zoom tool over a specific area of your image to zoom directly into that area. At the top menu, you can choose 'Scrubby Zoom' for a click and drag zooming experience.
Navigator Panel
The Navigator Panel is another useful feature for navigating your image, especially large files. This panel, which can be found under 'Window' > 'Navigator', provides an overall view of your image. A red rectangle within the panel represents the area currently in view. You can move this rectangle to navigate different parts of your image, or drag the slider at the bottom of the panel to adjust your zoom level.
Rotate View tool
The Rotate View tool, accessible by pressing 'R' or selecting it from the toolbox, lets you non-destructively rotate your canvas view – perfect for more comfortable drawing and painting angles. This tool rotates your point of view without changing the actual orientation of the image. To reset your view to the standard orientation, simply click 'Reset View' in the options bar.
Scroll Bars and Scroll Wheel
Scroll bars appear on the right as well as bottom edges of your image window when the image is larger than the window itself. You can use these bars to navigate horizontally and vertically. Additionally, if you have a mouse with a scroll wheel, you can use this to scroll up and down. Holding 'Shift' while scrolling will move your view side to side.
Conclusion
To sum it up, Adobe Photoshop is a comprehensive software with an array of tools that cater to varied needs. Learning to use Adobe Photoshop Tools effectively is the key to mastering Photoshop. Now that you are familiar with these tools, you are well on your way to becoming a Photoshop expert. You must remember to practice using each tool and understand its functionality to elevate your image editing and graphic design skills.
Unleash your creative potential with our Adobe Photoshop Course - join today and take your design skills to new heights!
Frequently Asked Questions
Upcoming Office Applications Resources Batches & Dates
Date
 Photoshop Course
Photoshop Course
Fri 10th Jan 2025
Photoshop Course
Fri 14th Feb 2025
Photoshop Course
Fri 11th Apr 2025
Photoshop Course
Fri 23rd May 2025
Photoshop Course
Fri 8th Aug 2025
Photoshop Course
Fri 26th Sep 2025
Photoshop Course
Fri 21st Nov 2025
 If you wish to make any changes to your course, please


