We may not have the course you’re looking for. If you enquire or give us a call on +1 7204454674 and speak to our training experts, we may still be able to help with your training requirements.
Training Outcomes Within Your Budget!
We ensure quality, budget-alignment, and timely delivery by our expert instructors.
- Quick Powerful Graphics with Power View, PowerPivot, Power Query, Power Map and Power BI M55164
- Microsoft Power BI for End Users 55400AC
- Retired : Designing and Implementing Enterprise-Scale Analytics Solutions Using Microsoft Azure and Microsoft Power BI DP500
- Microsoft Power BI Data Analyst PL300
- Microsoft BI Training

Row-Level Security (RLS) in Power BI is like having a personal data guard, and it is that feature of Power BI which allows you to control access to data at the individual row level. By implementing RLS, you can restrict access to sensitive information to only authorised individuals or groups.
Microsoft said more than 5 million subscribers have started using Power BI for modern business intelligence. The essential benefit of RLS in today’s business intelligence era is that it helps ensure data confidentiality and enhances data security. RLS in Power BI is used to protect the Power BI data and reports by restricting visibility access to the user. This blog will help you learn more about RLS in Power BI.
Table of Contents
1) What is Power BI Row-Level Security?
2) Features of Power BI Row-Level Security
3) Types of Power BI Row-Level Security
4) Use cases of Power BI RLS
5) Defining security roles in Power BI
6) Validating roles in Power BI
7) Limitations of Power BI RLS
8) Conclusion
What is Power BI Row-Level Security?
Power BI RLS is a powerful tool that lets you control data access in a more detailed manner. It's like having individual locks on each row of data, allowing only authorised individuals to see specific information. RLS helps protect sensitive data and maintains confidentiality by setting rules about who can view which rows of data. This ensures that everyone sees only the relevant data to their role or permissions. With RLS, you can prevent unauthorised access, safeguard privacy, and ensure everyone gets access to the correct information without compromising security.
It primarily focuses on two aspects:
a) Data confidentiality: RLS ensures that sensitive data remains confidential by restricting access to authorised individuals or groups.
b) Enhanced security: RLS prevents unauthorised access and data manipulation, enhancing overall data security.
RLS is a method of restricting data access on a row-by-row basis within a table. It works by imposing filters on the data, limiting visibility for specific users as directed by the administrator. These filters are established within specific roles and enforce access limitations at the row level. RLS provides an extra layer of control to ensure that users can only see the data that aligns with their authorised permissions, maintaining data security and confidentiality. By implementing RLS, organisations can strengthen strict data governance and comply with privacy regulations while empowering users with personalised data insights.

Features of Power BI Row-Level Security
Row Level Security (RLS) in Power BI is a valuable feature that allows you to control data access at a granular level. By implementing RLS, organisations can comply with regulations, protect sensitive information, and provide personalised data insights. Let's explore some key features of Power BI Row Level Security in more detail:
a) It lets you limit access to specific rows of data, ensuring only authorised people can see them. You can create custom filters to control which data each person can access.
b) RLS aligns with different roles or groups in your organisation, so individuals see only the data relevant to their responsibilities.

a) It maintains data confidentiality, keeping sensitive information protected.
b) RLS helps you comply with regulations by controlling data access.
c) It simplifies management by centralising security rules and enhances data security by preventing unauthorised access or manipulation.
d) It minimises the risk of data breaches and unauthorised data manipulation.
Types of Power BI Row-Level Security
There are two broad categories of RLS in Power BI
a) Static RLS
b) Dynamic RLS
Static RLS
In Power BI, static RLS restricts data access based on predefined rules. It is like having a fixed set of permissions determining who can see what data. With static RLS, you define the access rules once, which remain the same unless you manually update them. It allows you to control data visibility at a row level based on user roles or criteria you set. This ensures that specific users can only view the designated rows of data, providing a secure and controlled data access environment.
Use cases of Static RLS
Static RLS in Power BI offers a range of use cases to control data access and protect sensitive information within an organisation. Let’s discuss about them in detail:
a) Hierarchy-based access: RLS reflects organisational hierarchies by controlling data visibility based on reporting structures. Managers can access data related to their direct reports, while higher-level executives have broader access to aggregated data across teams or departments.
b) Regional access control: RLS can limit data visibility based on geographic regions. It allows users to see data specific to their assigned area, making it useful for companies operating in multiple locations or serving customers in different regions.
c) Vendor or partner access: RLS can restrict data visibility for external vendors or partners collaborating with an organisation. By assigning specific roles to vendors or partners and applying appropriate filters, access to relevant data is limited to ensure data security and privacy.
d) Confidential client information: RLS helps protect sensitive client data by controlling access based on confidentiality levels. Different security roles, like "Standard Clients" and "VIP Clients," are created, and RLS filters ensure that users can only view data appropriate for their client category.
e) Department-based access: RLS can restrict data visibility based on different departments in an organisation. Each department is assigned a specific role, and RLS filters are applied to ensure users can only access data relevant to their department.
Dynamic RLS
Dynamic RLS in Power BI is a feature that allows you to control data access based on dynamic conditions. It means you can set up rules that automatically adjust data visibility depending on certain factors, such as user roles, departments, or time periods. With dynamic RLS, you don't have to update access rules whenever something changes manually; the system adapts to the conditions you've defined. This ensures that users see the most up-to-date and relevant data based on their specific context, making data analysis more accurate and efficient.
Use cases of Dynamic RLS
Dynamic Row Level Security (RLS) in Power BI offers versatile data access control based on changing conditions and user attributes. Here are some simplified explanations of use cases for dynamic RLS:
a) Personalised data access: Dynamic RLS allows users to view only the data relevant to them based on attributes like department, role, or region. This ensures that each user sees the information specific to their responsibilities, avoiding data overload.
b) Time-based data filtering: Dynamic RLS can restrict data visibility to specific time periods, such as a particular month or year. It lets users focus on data within their designated time frames, facilitating timely and accurate analysis.
c) Customer-specific data segmentation: RLS can implement dynamic filtering based on customer segmentation. Users can access data related to specific customer groups or individual customers they are responsible for, enabling personalised insights and tailored decision-making.
d) Hierarchical data control: Dynamic RLS accommodates hierarchical data structures, such as organisational levels or team hierarchies. Users can access data based on their hierarchical position, ensuring they see only the relevant information within their reporting structure.
e) Attribute-driven filtering: RLS leverages user attributes like job function, business unit, or product line to determine data visibility. This allows users to focus on data directly related to their specific areas of responsibility, streamlining their analysis and decision-making processes.
Now let’s understand both categories with the help of relevant examples:
Static RLS: Imagine you have a sales team with two managers, Alex and Sarah. With static RLS, you manually define that Alex can see sales data from the Western region while Sarah can access sales data from the Eastern region. These rules remain fixed, and whenever you update or change parts, you need to manually adjust the RLS rules to reflect the new setup.
Dynamic RLS: Now, let's consider dynamic RLS. Instead of manually assigning regions to each manager, you create a rule that automatically gives areas based on the manager's department. So, if Alex moves from the sales team to the marketing team, the dynamic RLS will automatically adjust his access rights, allowing him to see the marketing data relevant to his new role. This means that as your organisation evolves or personnel changes occur, the RLS adapts automatically without requiring manual updates.
Static RLS requires manual adjustments to the access rules. At the same time, dynamic RLS automatically adapts to changes in roles, departments, or other dynamic factors, simplifying data access management and ensuring that users always have the appropriate data based on their current context.
Master the art of data visualisation in Power BI with Microsoft Power BI Training & Certification Course!
Use Cases of Power BI RLS
When dealing with sensitive information in your dataset, it is essential to implement RLS in Power BI. This is particularly important for data involving company finances, customer information, or patient records. Now, let's delve into several typical scenarios where organisations use RLS.
Business Line-based RLS: Here, the company aims to grant users access to information specific to a particular business line, product, service, or unit. This helps streamline data access and ensures that users can focus on the data that directly impacts their area of expertise or responsibility.
Location-based RLS: This scenario arises when a company wants to restrict a user's access to data within a specific area or location. For example, a user may only be allowed to view information related to a particular city, state, or country. This ensures that data is accessed only by authorised personnel in designated regions.
Employee-based RLS: In this case, the company wants to limit employees' access to data relevant to their job responsibilities. For instance, a store manager should only have visibility into information related to their specific store's business operations. This ensures that employees can focus on their assigned tasks without being overwhelmed by irrelevant data.
Other RLS scenarios: Besides the use cases mentioned above, RLS can also be implemented based on different criteria. This includes restrictions based on time, such as limiting access to data for specific months or years. Furthermore, RLS can be applied to customer data, allowing users to view information related to customers or groups of customers. These additional RLS configurations provide further control and enable the customisation of data access based on specific requirements.
Defining Security Roles in Power BI
Power BI desktop helps to determine the factors that will govern the data access for different security roles. Let’s understand how to define security roles using Power BI with the help of the following steps:
Step 1: Bring your data model into your Power BI Desktop report, including the tables and relationships that make up your dataset.
Step 2: Under the "Modelling" tab in Power BI Desktop, you will find an option called "Manage roles." Click on this option to access the role management settings.

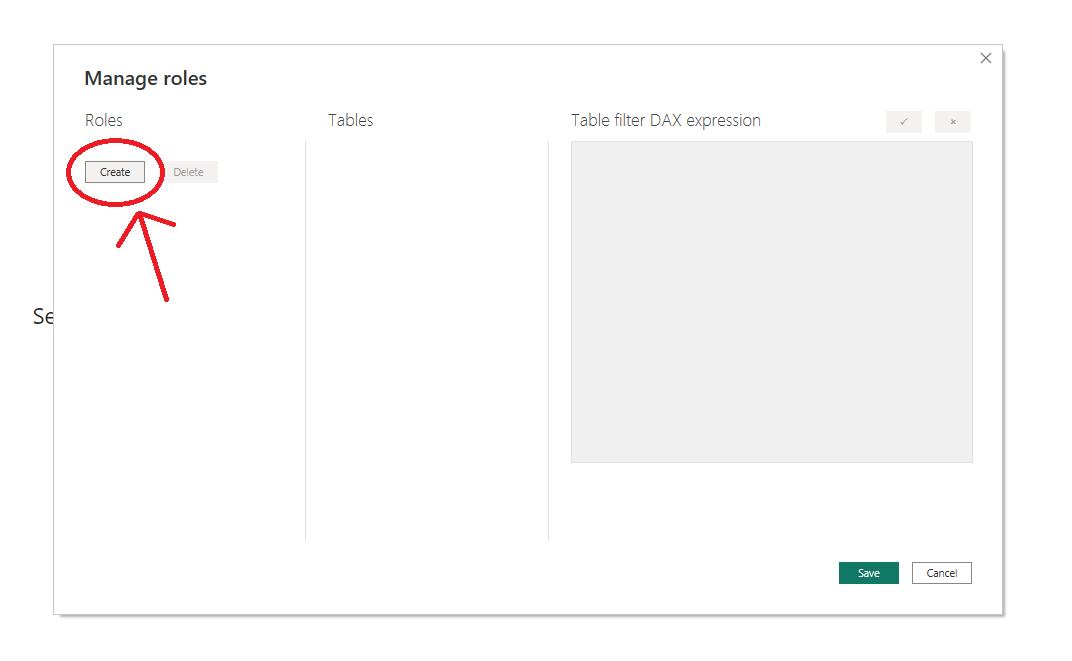
Step 3: You will be directed towards a new pop-up window, click on “Create” option.

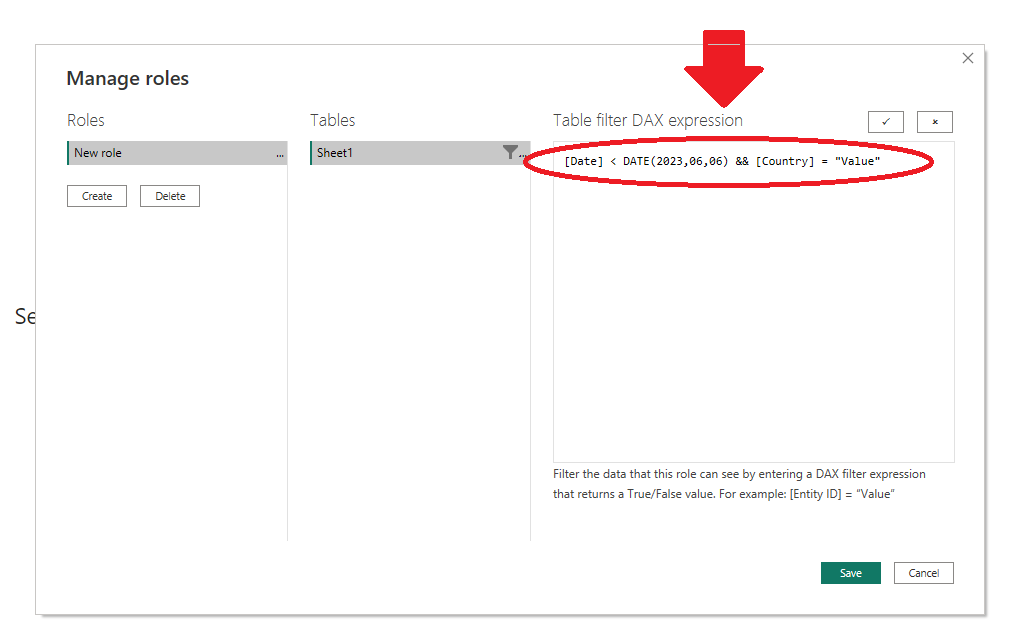
Step 4: Name the role and choose the table you want to apply the DAX rule to.
Step 5: Power BI Security uses DAX expressions, so select the DAX Expression box and tick the same box to validate the same.

Step 6: Save the settings.
Step 7: By default, Power BI Security uses single-directional filters. However, you can implement dynamic Row Level Security using username () or principal user name () DAX functions. Configure the relationship between tables and select the "Apply security filter in both directions" checkbox to enable bi-directional cross-filtering in Row Level Security. This allows for more precise data access control based on user roles or specific users.

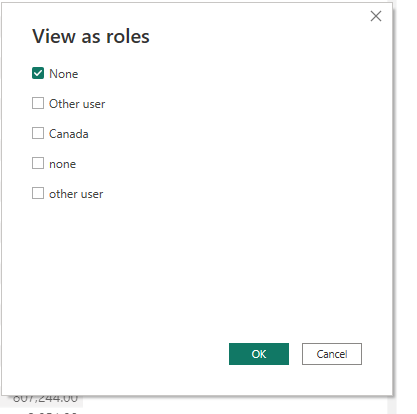
Step 2: A new window appears, here you can find the created roles.

Step 3: Select the role you defined in the previous step after creating the security roles. Click on "OK" to apply the role-specific filters to the report. This ensures that the report displays only the data relevant to that role.
Step 4: Once you have verified and validated the security roles, you can publish your report to the Power BI service. By doing so, the security settings and data restrictions you have implemented will be maintained when users access the report online.
Limitations of Power BI RLS
There are some limitations in Power BI RLS that you should be aware of:
a) RLS in Power BI allows you to apply fixed filters based on predefined rules. It doesn't support dynamic filtering that can change based on user inputs or conditions within the report.
b) RLS controls data visibility at the row level, but it doesn't provide control over which visualisations users can see. Users with access to the data can still see all visualisations within the report.
c) RLS works within a single dataset, so you can define security roles and apply filters for that dataset only. It doesn't extend across multiple datasets or workspaces, requiring separate configuration for each dataset.
d) RLS may not work as expected with custom connectors that connect to external data sources. It's important to test RLS behaviour with custom connectors to ensure proper data access restrictions.
e) Some features like "Analyse in Excel" or "Export to CSV" may not comply with RLS rules, potentially exposing restricted data. Consider the compatibility of these features when implementing RLS.
Learn the important skills for Data Analysis with Business Intelligence Reporting!
Conclusion
We hope this blog provided a detailed understanding of using RLS in Power BI. It is a valuable tool for managing data access and ensuring data security. By defining security roles and applying filters, RLS allows organisations to control which users can see specific data based on their roles and attributes. RLS empowers organisations to maintain data governance, enhance user productivity, and confidently make informed decisions.
To become an expert in Power BI, the industry leader in data analysis tools, register for our Microsoft Power BI Data Analyst PL300 right away!
Frequently Asked Questions
Upcoming Office Applications Resources Batches & Dates
Date
 Microsoft Power BI Course
Fri 17th Jan 2025
Fri 21st Feb 2025
Fri 4th Apr 2025
Fri 6th Jun 2025
Fri 29th Aug 2025
Fri 24th Oct 2025
Fri 26th Dec 2025


 Top Rated Course


 If you wish to make any changes to your course, please


