


 Top Rated Course

We may not have the course you’re looking for. If you enquire or give us a call on + 1-866 272 8822 and speak to our training experts, we may still be able to help with your training requirements.
What is Docker Container Lifecycle? A Complete Guide
Sophia Ellis 21 August 2023This blog on Docker Container Lifecycle outlines the stages a container goes through from creation to termination. It includes the creation, execution, suspension, deletion, and pausing of Docker Containers. This lifecycle manages the entire lifespan of a container, from its inception to its cessation, ensuring efficient and controlled operations within the Docker environment.

Training Outcomes Within Your Budget!
We ensure quality, budget-alignment, and timely delivery by our expert instructors.
Table of Contents
This Docker Container Lifecycle is one of the revolutionary technologies which offers a consistent, scalable and isolated way to run applications by packaging them along with their dependencies. It is an open-source platform that has significantly influenced the Software Development landscape.
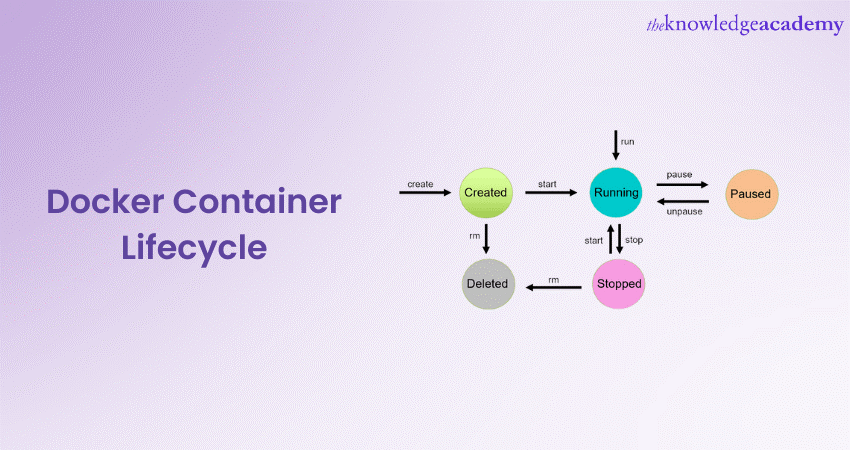
So, if you want to understand in simpler terms, these containers ensure an application developed in one computing environment operates smoothly in another. In this blog, we will discuss about the different stages of Docker Container Lifecycle which includes Create, Run, Delete, Pause and Stop phases.
Table of Contents
1) A brief introduction to Docker Container Lifecycle
2) A brief explanation of phases of the Docker Container Lifecycle
3) Data Management in Docker Containers
4) Difference between Docker create, Docker start and Docker run
5) Port mapping in Docker
6) Conclusion
A brief introduction to Docker Container Lifecycle
Docker has transformed the Software Development world by introducing containerisation. This is a technique that allows developers to package applications with all necessary components for guaranteed functionality across various computing environments. So, having good knowledge and skill in Docker Container Lifecycle Management is imperative for any Software Developer.
There is a sequence of stages in the Lifecycle of Docker Container, from creation to termination. This sequence ensures the smooth operation of these containers. Effective lifecycle management is paramount for any developer or system administrator using it.
A brief explanation of phases of the Docker Container Lifecycle
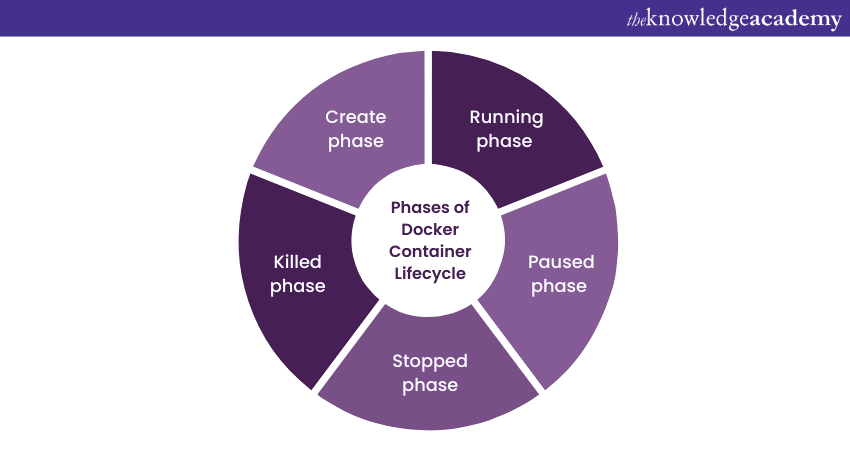
a) The Create phase
In this phase, containers are created, which involves some more steps. Let’s have a look:
1) Docker image acquisition: The first step in creating a docker container is getting the docker image. You can either pull an existing image from Docker Hub or create your own custom image. If you're pulling an existing image, the command is:
docker pull
The output will show it downloading the image layers.
2) Container creation: Once you have the image, you can make a container using the docker create command:
docker create
This command returns a long string, which is the unique identifier (container ID) of the newly created container.
3) Docker run command: Alternatively, the docker run command can be used to make and start a container in a single command. If the specified image is not present locally, docker will first pull it from the hub:
docker run
Depending on the nature of the image, the output will vary. For a simple image like hello-world, it will print a welcome message.
4) Setting a container name: When creating a container, you can also set a name for the container using the --name option. This makes it easier to manage containers as you can refer to them by their names instead of their IDs:
docker create --name
5) Exposing ports: If your application runs a service on a specific port, you need to expose and map this port to a port on your host. This is done with the -p flag:
docker run -p
6) Environment variables: Some images require environment variables to be set. These can be passed during container creation with the -e flag:
docker run -e
Remember, the docker create command only creates a container. The container will remain in the stopped state until you start it with the docker start command.

b) The run phase
The run phase in the Docker Container Lifecycle refers to the process of starting and running a container. Here's a step-by-step guide:
1) Start a container: Once you've created a container, you can begin it using the docker start command, which is followed by the container ID or name:
docker start
This command will begin the container in the background.
2) Interactive mode: If you want to interact with the container (for example, if the container is based on an image that runs a shell or an interactive application), you should start the container in interactive mode. This can be done by including the -i and -t flags in the docker run command, often combined as -it:
docker run -it
Now, you're interacting with the container directly. You'll see the command prompt change to reflect that you're inside the container.
3) Running a specific command: You can also run a specific command in a new container. This is done by appending the command to the docker run command:
docker run
For example, to run the ‘ls’ command in a new Ubuntu container, you would use:
docker run ubuntu ls
This will create and start a new container, run the ls command, and then stop the container.
4) Detach mode: If you want to start the container in the background and free up your terminal, you can start the container in detached mode using the -d flag:
docker run -d
The output will be the container ID of the newly started container.
5) Check running containers: To view all currently running containers, you can utilise the docker ps command. The output will show you information about all active containers, including their IDs, image names, created time, status, and ports.
Please remember that it's critical to properly manage the running phase of the Docker Container Lifecycle, as it directly affects the performance and reliability of your application.
Elevate your DevOps skills with Introduction to Docker Training! Join now!
c) The pause phase
The pause phase in the Docker Container Lifecycle refers to the ability to temporarily suspend a running container's process.
1) Pause a container: If you need to momentarily pause a running container, it allows you to do this using the docker pause command, followed by the container ID or name:
docker pause
Once you execute this command, the container's processes will be paused, and it will stop utilising CPU cycles.
2) Check paused container: To check the status of your containers and confirm that the desired container is indeed paused, you can use the Docker ps command. The status column in the output will show "Up (paused)" for the paused container.
3) Resume a container: When you're ready to resume a paused container, you can do so with the docker unpause command, again followed by the container ID or name:
docker unpause
The container's processes will resume from exactly where they were paused, and the container will start using CPU cycles again.
The pause and unpause commands in docker provide a powerful way to manage your containers and system resources effectively. Pausing and unpausing containers are efficient processes as they do not require the containers to stop and start, thereby not triggering the complete lifecycle events, which can be time-consuming.
Unlock your potential as a DevOps Professional-Register for our Certified Agile DevOps Professional (CADOP) .
d) The stopped phase
The stopped phase in the lifecycle of a container refers to the state where a container's process is not currently running. Here's how it works:
1) Checking the status: The status of a container can be checked by using the docker ps -a command. This command lists all containers, including those that are stopped.
docker ps -a
2) Stopping a running container: If a container is running, it can be stopped using the docker stop command. This is followed by either the container ID or the container name. The docker daemon sends a SIGTERM signal to the main process inside the container, requesting a graceful shutdown.
docker stop
3) Aftermath of the Stop Command: The container moves into the stopped state after the main process inside the container finishes its execution. In this state, the container is not removed from the system. It's just not actively running any process.
4) Start a stopped container: A stopped container can be initiated again using the Docker Start Command, which is followed by the container ID or name. This is useful when you need to run the same container without setting up the environment again.
docker start
5) Forced stop: In case a container doesn't stop with the standard Docker Stop command, we can force stop it by sending a SIGKILL signal using the Docker Kill command.
docker kill
Secure your future in DevOps – Register now in our Certified DevOps Security Professional Course.
e) The killed phase
The kill phase refers to the situation when a container needs to be forcefully stopped. Please remember that the docker kill command should be used judiciously, as it immediately stops the process without any cleanup.
You should always try to stop a container using docker stop before resorting to docker kill. This typically happens when a container doesn't respond to the standard docker stop command. It provides a command docker kill to handle such situations:
1) Forcefully stopping a container: If a container is not responding or taking too long to stop, it can be forcefully stopped using the docker kill command followed by either the container ID or the container name.
docker kill
2) Underlying mechanism: The docker kill command sends a SIGKILL signal to the main process inside the container. Unlike the SIGTERM signal sent by docker stop, the SIGKILL signal cannot be caught, blocked, or ignored. It immediately terminates the process.
3) Impact of the kill command: When the docker kill command is executed, the container's process is terminated instantly, and the container moves to the "Exited" state. The container's filesystem still exists, but the container is no longer running any process.
4) Restarting a killed container: A container that was forcefully stopped using the docker kill command can be started again by using the docker start command, which is followed by the container ID or name.
docker start
5) Specifying a signal with docker kill: By default, docker kill sends a SIGKILL signal, but you can specify a different signal using the -s option. For example, to send a SIGINT signal, you would use:
docker kill -s SIGINT
Data Management in Docker Containers
Docker facilitates faster development and release for developers. Applications must now be moved to the new world of microservices and containers, where relevant data is present. How are we going to use Docker to accomplish this?
Every file created inside a container is initially kept on the writable container layer. It means that:
1) When that container is deleted, the data is lost, and if another process requires the data, it may be challenging to retrieve it from the container.
2) The host computer on which a container is operating is closely connected to the container's writable layer. The data is not easily transferable to another location.
3) A storage driver must be used to control the filesystem when writing to a container's writable layer. Using the Linux kernel, the storage driver offers a union filesystem. Performance is decreased by this additional abstraction when compared to the use of data volumes, which write directly to the host filesystem.
Docker solution for Data Management
Volumes and bind mounts are the two ways that Docker offers containers to store files on the host system so that they remain there even after the container stops working.
Volumes: Volumes are kept in a section of the host filesystem that is maintained by Docker in Linux (specifically, /var/lib/docker/volumes/). This filesystem section shouldn't be altered by non-Docker processes. In Docker, volumes are the most effective way to store data. Docker creates and maintains volumes. A volume can be created with the docker volume create command, or it can be created by Docker when a container or service is created.
Bind mounts: They can be kept on the host system in any location. They might even be crucial system directories or files. Compared to volumes, bind mounts are less functional than volumes. A file or directory on the host computer is mounted into a container when you use bind mount.
Difference between Docker create, Docker start and Docker run
The Docker create command uses the specified image to create a new container. Even though it won't launch the container right away.
To restart any container that has stopped, use the Docker start command. This command can be used to start the container if we created it using the docker program.
The Docker run command instantaneously starts a new container and combines the creation and start commands. If the specified image cannot be found on your system, the docker run command can retrieve it from Docker Hub.
Port mapping in Docker
A container in Docker is a virtual or physical machine-like isolated environment that runs applications and services. Containers have their own ports, just like these machines do. These ports cannot be accessed directly from outside the container by default.
This is the use of port mapping, which is another name for port forwarding. By exposing the ports inside a Docker Container, you can make its services accessible to other containers in the Docker environment or to the host system. This process is known as port mapping.
Key Concepts in port mapping
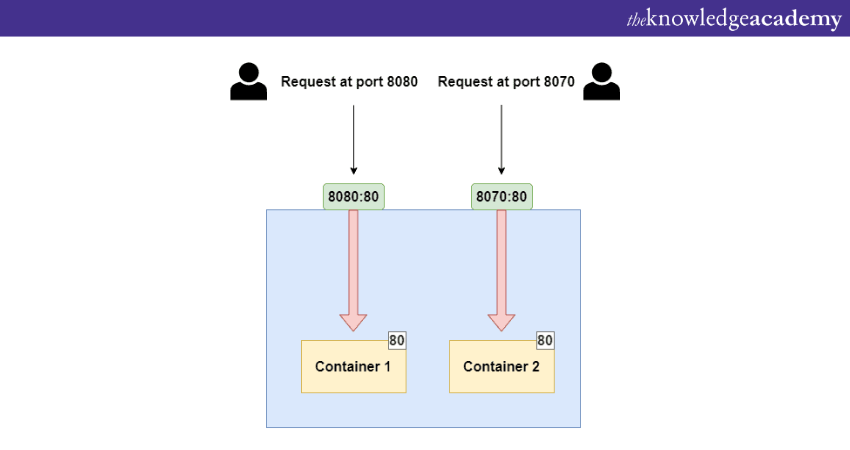
Here are some of the key concepts of port mapping.
Ports: These are numerical identifiers that are used to distinguish between various network services that are operating on the same host. Well-known ports (which range from 0 to 1023) and dynamic or private ports (1024 to 49151) are the two categories into which ports are divided. Popular ports such as 80 and 443 are reserved for widely used services like HTTP and HTTPS.
Host port: This port is on the host system, which is the computer that Docker is operating on. Accessing the service or application within the Docker Container from the host machine or external systems is possible via the host port.
Container port: This is the port that the Docker Container's internal service or application is listening on. It might be a particular port that the application needs, like a web server that is waiting on port 80.
Conclusion
Managing these Docker Container Lifecycles effectively involves understanding various commands and signals like SIGKILL. They facilitate control over the container's state, ensuring efficient operation and resource utilisation. This ultimately leads to successful and streamlined Software Development and deployment.
Level up your DevOps game with our ITSM For DevOps Training .
Frequently Asked Questions
Upcoming Programming & DevOps Resources Batches & Dates
Date
 Docker Course
Docker Course
Fri 17th Jan 2025
Docker Course
Fri 21st Feb 2025
Docker Course
Fri 4th Apr 2025
Docker Course
Fri 6th Jun 2025
Docker Course
Fri 29th Aug 2025
Docker Course
Fri 24th Oct 2025
Docker Course
Fri 26th Dec 2025
 If you wish to make any changes to your course, please


